# Quickstart: Scheduler
Source: https://developer.nylas.com/docs/v3/getting-started/scheduler/
Nylas Scheduler gives your users embeddable scheduling pages that handle availability, booking, and calendar sync across Google, Microsoft, and Exchange -- without you building any of that logic.
This quickstart walks you through embedding the Scheduler components in a web app and creating your first scheduling page.
> **Info:**
> **Want programmatic control instead?** You can also create and manage scheduling configurations entirely through the [Scheduler API](/docs/v3/scheduler/) without embedding UI components.
The complete code for this quickstart is on GitHub: [Web component (HTML)](https://github.com/nylas-samples/quickstart-scheduler-html) or [React](https://github.com/nylas-samples/quickstart-scheduler-react).
## Before you begin
You need:
- **Node.js v18+** -- run `node -v` to check your version.
- **A Nylas application with a client ID** -- if you haven’t set one up yet, follow the [CLI setup](/docs/v3/getting-started/cli/) or [Dashboard setup](/docs/v3/getting-started/dashboard/). Your client ID is on the Dashboard Overview page.
## Bootstrap your app
Create a new local project. There are two paths: Web components (HTML) or React. Pick one and follow it through the rest of the guide.
```bash
mkdir nylas-scheduler/
cd nylas-scheduler/
touch index.html
touch scheduler-editor.html
```
```bash
npm create vite@latest nylas-scheduler
# -> When prompted, choose the "React" template
# -> When prompted, choose the "TypeScript" language
cd nylas-scheduler/
npm install react-router-dom # Needed for routing
npm install @nylas/react@latest # Install the Nylas React components
# Quick verify: you should now have a `public/`, `src/`, and `node_modules/` folder inside the `nylas-scheduler` folder.
```
## Register a callback URI
Register a callback URI so Nylas can redirect users after authentication. Since we're running locally, the URI uses `localhost`.
> **Warn:**
> **You might need to use a different port number**. You should use the conventional port that your chosen language and framework uses.
1. In your Sandbox application, click **Hosted Authentication** in the left navigation, and click **Callback URIs**.
2. Click **Add a callback URI**, and enter your application's callback URI.
3. Select the **JavaScript** platform.
4. For **URL**, enter `http://localhost:/scheduler-editor`.
5. For **Origin**, enter `http://localhost:`.
6. Click **Add callback URI**.
The URL endpoints can be anything you want. However, they must match the callback URI and port in your application when you configure the Scheduler Editor Component.
## Add the Scheduler components
Include the Scheduler Editor and Scheduling components in your app. The files you need to update depend on your framework:
| Framework | UI Component | Files |
| --------------- | ---------------- | ----------------------- |
| HTML/Vanilla JS | Scheduler Editor | `scheduler-editor.html` |
| | Scheduling | `index.html` |
| React | Scheduler Editor | `App.tsx`, `index.css` |
| | Scheduling | `App.tsx`, `App.css` |
See the [Scheduler UI component reference](/docs/reference/ui/) for all available options and data properties.
> **Warn:**
> Make sure to replace the `NYLAS_CLIENT_ID` with the value you copied from the Dashboard in the [Get your application credentials](#set-up-your-nylas-account) step.
```html [include_scripts-HTML (scheduler-editor.html)]
Nylas Scheduler Editor Component
```
```tsx [include_scripts-React (App.tsx)]
import { BrowserRouter, Route, Routes } from "react-router-dom";
import { NylasSchedulerEditor, NylasScheduling } from "@nylas/react";
import "./App.css";
function App() {
// Get the configuration ID from the URL query string
const urlParams = new URLSearchParams(window.location.search);
const configId = urlParams.get("config_id") || "";
return (
View Scheduler Editor
}
/>
}
/>
);
}
export default App;
```
```css [include_scripts-React (index.css)]
@import url("https://fonts.googleapis.com/css2?family=Inter:wght@100..900&display=swap");
html {
height: 100%;
}
body {
font-family: "Inter", sans-serif;
margin: 0;
padding: 0;
box-sizing: border-box;
height: 100%;
}
```
```css [include_scripts-React (App.css)]
#root {
display: grid;
place-items: center;
height: 100%;
}
#root > div {
display: grid;
gap: 1rem;
}
.button {
width: fit-content;
padding-left: 1rem;
padding-right: 1rem;
padding-top: 0.5rem;
padding-bottom: 0.5rem;
font-weight: 700;
color: rgb(59, 130, 246);
text-decoration: inherit;
border-width: 1px;
border-radius: 0.25rem;
border-color: rgb(59, 130, 246);
border-style: solid;
}
```
## Start the dev server
Run a local server from your project root:
```bash
npx serve --listen
```
```bash
npm run dev -- --port
```
After you run the command, open your browser to `http://localhost:/scheduler-editor` to see your Scheduler Editor.
## Create a scheduling page
Open `http://localhost:/scheduler-editor` in your browser. Log in with your email provider, and the editor loads.
Click **Create new** to set up your first scheduling page.
Enter a title, duration, and description. Set availability under **Availability** in the left nav, then click **Create**.
The editor returns to the manager view showing all your scheduling pages.
## Visit your scheduling page
Click **Preview** from the manager view, or visit `http://localhost:/?config_id=` directly. This is the page your users' invitees will see when booking time.
## What's next
- **[Scheduler overview](/docs/v3/scheduler/)** -- availability rules, booking confirmations, and customization options
- **[Scheduler UI components](/docs/reference/ui/)** -- full reference for all component properties and events
- **[Scheduler & Notetaker integration](/docs/v3/scheduler/scheduler-notetaker-integration/)** -- automatically record meetings booked through Scheduler
- **[Authentication](/docs/v3/auth/)** -- set up OAuth so your users can connect their accounts
- **[Webhooks](/docs/v3/notifications/)** -- get notified when bookings are created or cancelled
 ## Before you begin
You need:
- **Node.js v18+** -- run `node -v` to check your version.
- **A Nylas application with a client ID** -- if you haven’t set one up yet, follow the [CLI setup](/docs/v3/getting-started/cli/) or [Dashboard setup](/docs/v3/getting-started/dashboard/). Your client ID is on the Dashboard Overview page.
## Bootstrap your app
Create a new local project. There are two paths: Web components (HTML) or React. Pick one and follow it through the rest of the guide.
```bash
mkdir nylas-scheduler/
cd nylas-scheduler/
touch index.html
touch scheduler-editor.html
```
```bash
npm create vite@latest nylas-scheduler
# -> When prompted, choose the "React" template
# -> When prompted, choose the "TypeScript" language
cd nylas-scheduler/
npm install react-router-dom # Needed for routing
npm install @nylas/react@latest # Install the Nylas React components
# Quick verify: you should now have a `public/`, `src/`, and `node_modules/` folder inside the `nylas-scheduler` folder.
```
## Register a callback URI
Register a callback URI so Nylas can redirect users after authentication. Since we're running locally, the URI uses `localhost`.
> **Warn:**
> **You might need to use a different port number**. You should use the conventional port that your chosen language and framework uses.
1. In your Sandbox application, click **Hosted Authentication** in the left navigation, and click **Callback URIs**.
2. Click **Add a callback URI**, and enter your application's callback URI.
3. Select the **JavaScript** platform.
4. For **URL**, enter `http://localhost:
## Before you begin
You need:
- **Node.js v18+** -- run `node -v` to check your version.
- **A Nylas application with a client ID** -- if you haven’t set one up yet, follow the [CLI setup](/docs/v3/getting-started/cli/) or [Dashboard setup](/docs/v3/getting-started/dashboard/). Your client ID is on the Dashboard Overview page.
## Bootstrap your app
Create a new local project. There are two paths: Web components (HTML) or React. Pick one and follow it through the rest of the guide.
```bash
mkdir nylas-scheduler/
cd nylas-scheduler/
touch index.html
touch scheduler-editor.html
```
```bash
npm create vite@latest nylas-scheduler
# -> When prompted, choose the "React" template
# -> When prompted, choose the "TypeScript" language
cd nylas-scheduler/
npm install react-router-dom # Needed for routing
npm install @nylas/react@latest # Install the Nylas React components
# Quick verify: you should now have a `public/`, `src/`, and `node_modules/` folder inside the `nylas-scheduler` folder.
```
## Register a callback URI
Register a callback URI so Nylas can redirect users after authentication. Since we're running locally, the URI uses `localhost`.
> **Warn:**
> **You might need to use a different port number**. You should use the conventional port that your chosen language and framework uses.
1. In your Sandbox application, click **Hosted Authentication** in the left navigation, and click **Callback URIs**.
2. Click **Add a callback URI**, and enter your application's callback URI.
3. Select the **JavaScript** platform.
4. For **URL**, enter `http://localhost: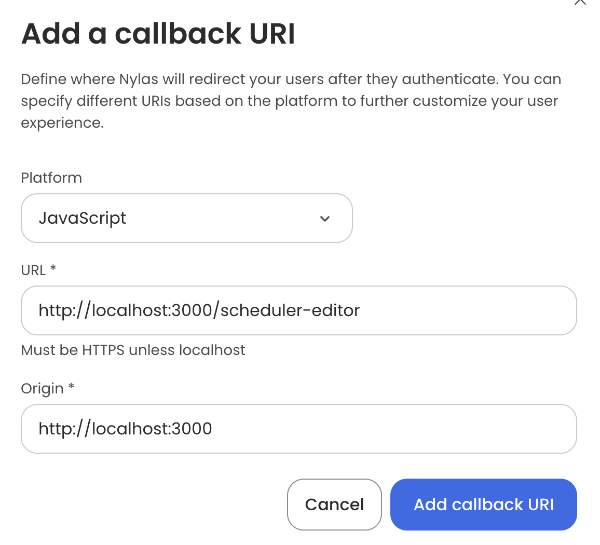 The URL endpoints can be anything you want. However, they must match the callback URI and port in your application when you configure the Scheduler Editor Component.
## Add the Scheduler components
Include the Scheduler Editor and Scheduling components in your app. The files you need to update depend on your framework:
| Framework | UI Component | Files |
| --------------- | ---------------- | ----------------------- |
| HTML/Vanilla JS | Scheduler Editor | `scheduler-editor.html` |
| | Scheduling | `index.html` |
| React | Scheduler Editor | `App.tsx`, `index.css` |
| | Scheduling | `App.tsx`, `App.css` |
See the [Scheduler UI component reference](/docs/reference/ui/) for all available options and data properties.
> **Warn:**
> Make sure to replace the `NYLAS_CLIENT_ID` with the value you copied from the Dashboard in the [Get your application credentials](#set-up-your-nylas-account) step.
```html [include_scripts-HTML (scheduler-editor.html)]
The URL endpoints can be anything you want. However, they must match the callback URI and port in your application when you configure the Scheduler Editor Component.
## Add the Scheduler components
Include the Scheduler Editor and Scheduling components in your app. The files you need to update depend on your framework:
| Framework | UI Component | Files |
| --------------- | ---------------- | ----------------------- |
| HTML/Vanilla JS | Scheduler Editor | `scheduler-editor.html` |
| | Scheduling | `index.html` |
| React | Scheduler Editor | `App.tsx`, `index.css` |
| | Scheduling | `App.tsx`, `App.css` |
See the [Scheduler UI component reference](/docs/reference/ui/) for all available options and data properties.
> **Warn:**
> Make sure to replace the `NYLAS_CLIENT_ID` with the value you copied from the Dashboard in the [Get your application credentials](#set-up-your-nylas-account) step.
```html [include_scripts-HTML (scheduler-editor.html)]
 Click **Create new** to set up your first scheduling page.
 Enter a title, duration, and description. Set availability under **Availability** in the left nav, then click **Create**.
 The editor returns to the manager view showing all your scheduling pages.
 ## Visit your scheduling page
Click **Preview** from the manager view, or visit `http://localhost:
## Visit your scheduling page
Click **Preview** from the manager view, or visit `http://localhost: ## What's next
- **[Scheduler overview](/docs/v3/scheduler/)** -- availability rules, booking confirmations, and customization options
- **[Scheduler UI components](/docs/reference/ui/)** -- full reference for all component properties and events
- **[Scheduler & Notetaker integration](/docs/v3/scheduler/scheduler-notetaker-integration/)** -- automatically record meetings booked through Scheduler
- **[Authentication](/docs/v3/auth/)** -- set up OAuth so your users can connect their accounts
- **[Webhooks](/docs/v3/notifications/)** -- get notified when bookings are created or cancelled
## What's next
- **[Scheduler overview](/docs/v3/scheduler/)** -- availability rules, booking confirmations, and customization options
- **[Scheduler UI components](/docs/reference/ui/)** -- full reference for all component properties and events
- **[Scheduler & Notetaker integration](/docs/v3/scheduler/scheduler-notetaker-integration/)** -- automatically record meetings booked through Scheduler
- **[Authentication](/docs/v3/auth/)** -- set up OAuth so your users can connect their accounts
- **[Webhooks](/docs/v3/notifications/)** -- get notified when bookings are created or cancelled