This tutorial will walk you through creating a functional app with Nylas by setting up user authentication using the Nylas API in just a few simple steps. The guide primarily focuses on user authentication, but also provides code samples at the end to accomplish common tasks such as reading or sending emails and creating calendar events using Nylas APIs.
There are also Github repos of sample apps available in your preferred language towards the end of this guide, which you can clone and launch in seconds. 🚀
Prerequisites
Section titled “Prerequisites”Before you begin, make sure you have:
- Nylas Developer Account: Sign up here if you don’t have one
- OAuth Redirect URI: A web server URL that Nylas will redirect to after user login (local or production)
- Nylas Client ID and API Key: Obtainable from your Nylas Dashboard
1. Bootstrap your app
Section titled “1. Bootstrap your app”Create your ENV file
Section titled “Create your ENV file”Create an .env file. You’ll use this file to store credentials and constants that you want to avoid including in your source code.
Your Nylas API URI should be either https://api.us.nylas.com if you’re using the U.S. region, or https://api.eu.nylas.com if you’re using the E.U. region.
# .envNYLAS_CLIENT_ID=ADD_YOUR_NYLAS_CLIENT_ID_HERENYLAS_API_KEY=ADD_YOUR_NYLAS_API_KEY_HERENYLAS_API_URI=(pick one: https://api.us.nylas.com or https://api.eu.nylas.com)# .envNYLAS_CLIENT_ID="ADD_YOUR_NYLAS_CLIENT_ID_HERE"NYLAS_API_KEY="ADD_YOUR_NYLAS_API_KEY_HERE"NYLAS_API_URI="(pick one: https://api.us.nylas.com or https://api.eu.nylas.com)"Install your dependencies
Section titled “Install your dependencies”Install the Nylas SDK of your choice, along with the dependencies for this project.
npm install nylaspip3 install nylasgem install nylas<dependency> <groupId>com.nylas.sdk</groupId> <artifactId>nylas</artifactId> <version>2.0.0</version></dependency><dependency> <groupId>com.nylas.sdk</groupId> <artifactId>nylas</artifactId> <version>2.0.0</version></dependency>Configure the Nylas SDK
Section titled “Configure the Nylas SDK”Set up the Nylas SDK, using some of the environment variables from your .env file.
import "dotenv/config";import express from "express";import Nylas from "nylas";
const nylasConfig = {  clientId: process.env.NYLAS_CLIENT_ID,  callbackUri: "http://localhost:3000/oauth/exchange",  apiKey: process.env.NYLAS_API_KEY,  apiUri: process.env.NYLAS_API_URI,};
const nylas = new Nylas({  apiKey: nylasConfig.apiKey,  apiUri: nylasConfig.apiUri,});
const app = express();const port = 3000;
// Define your app routes
// Start the serverapp.listen(port, () => {  console.log(`Server is running on port ${port}`);});
from dotenv import load_dotenvimport osfrom nylas import Clientfrom flask import Flaskfrom nylas.models.auth import URLForAuthenticationConfigfrom nylas.models.auth import CodeExchangeRequest
load_dotenv()
nylas_config = { "client_id": os.getenv("NYLAS_CLIENT_ID"), "callback_uri": "http://localhost:5000/oauth/exchange", "api_key": os.getenv("NYLAS_API_KEY"), "api_uri": os.getenv("NYLAS_API_URI"),}
nylas = Client( api_key=nylas_config["api_key"], api_uri=nylas_config["api_uri"],)
app = Flask(__name__)port = 5000
# Define your app routes
if __name__ == "__main__": app.run(port=port)require 'nylas'require 'dotenv/load'require 'sinatra'
nylas_config = { client_id: ENV['NYLAS_CLIENT_ID'], callback_uri: 'http://localhost:4567/oauth/exchange', api_key: ENV['NYLAS_API_KEY'], api_uri: ENV['NYLAS_API_URI']}
nylas = Nylas::Client.new( api_key: nylas_config[:api_key], api_uri: nylas_config[:api_uri])
# Define your app routes
# Start the serverset :port, 4567run!import io.github.cdimascio.dotenv.Dotenv;import com.nylas.NylasClient;import static spark.Spark.*;
public class QuickstartJava { public static void main(String[] args) { Dotenv dotenv = Dotenv.load();
Map<String, String> nylasConfig = new HashMap<>(); nylasConfig.put("clientId", dotenv.get("NYLAS_CLIENT_ID")); nylasConfig.put("callbackUri", "http://localhost:4567/oauth/exchange"); nylasConfig.put("apiKey", dotenv.get("NYLAS_API_KEY")); nylasConfig.put("apiUri", dotenv.get("NYLAS_API_URI"));
NylasClient nylas = new NylasClient.Builder(nylasConfig.get("apiKey")) .apiUri(nylasConfig.get("apiUri")) .build();
port(4567);
// Define your app routes
// Start the server }}import com.nylas.NylasClientimport io.github.cdimascio.dotenv.dotenvimport spark.kotlin.Httpimport spark.kotlin.ignite
fun main(args: Array<String>) { val dotenv = dotenv()
val nylasConfig = mapOf( "clientId" to dotenv["NYLAS_CLIENT_ID"], "callbackUri" to "http://localhost:4567/oauth/exchange", "apiKey" to dotenv["NYLAS_API_KEY"], "apiUri" to dotenv["NYLAS_API_URI"] )
val nylas = NylasClient( apiKey = nylasConfig["apiKey"]!!, apiUri = nylasConfig["apiUri"]!! )
val http: Http = ignite() http.port(4567)
// Define your app routes
// Start the server}Next up, you’ll log a user into your application.
2. Authentication
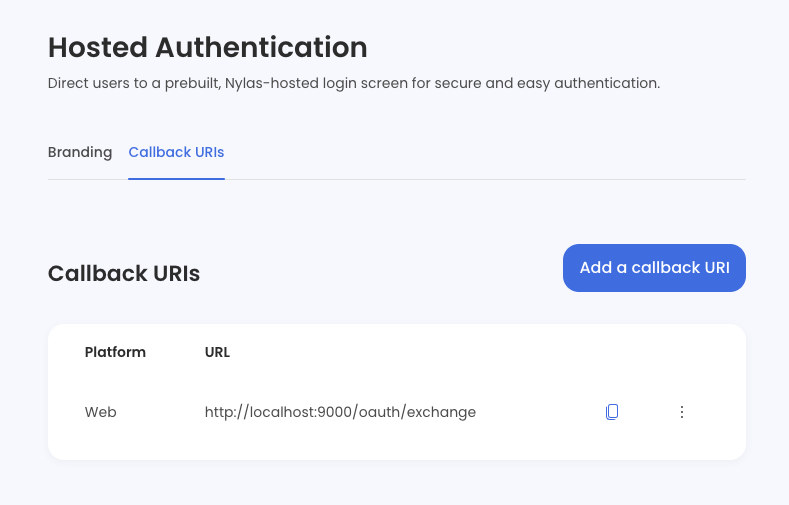
Section titled “2. Authentication”Register an authentication callback URI
Section titled “Register an authentication callback URI”Next, you will register a callback URI with Nylas, which Nylas will redirect the user to when the authentication flow completes. This callback route or page is where we will add logic to finalize the authentication.
- In the Nylas Dashboard, click Hosted Authentication in the left navigation, and click the Callback URI tab.
- Click Add a callback URI, and enter your application’s callback URI.
Redirect your user to the provider’s login screen
Section titled “Redirect your user to the provider’s login screen”The first step of the authentication process is to start an authorization request. Usually, this is a button or link in your application that the user clicks.
When the user initiates this process, your server should use the Nylas SDK to make an auth URL, which you will then redirect your user to. This will kick off the authentication process, with Nylas handling the user experience.
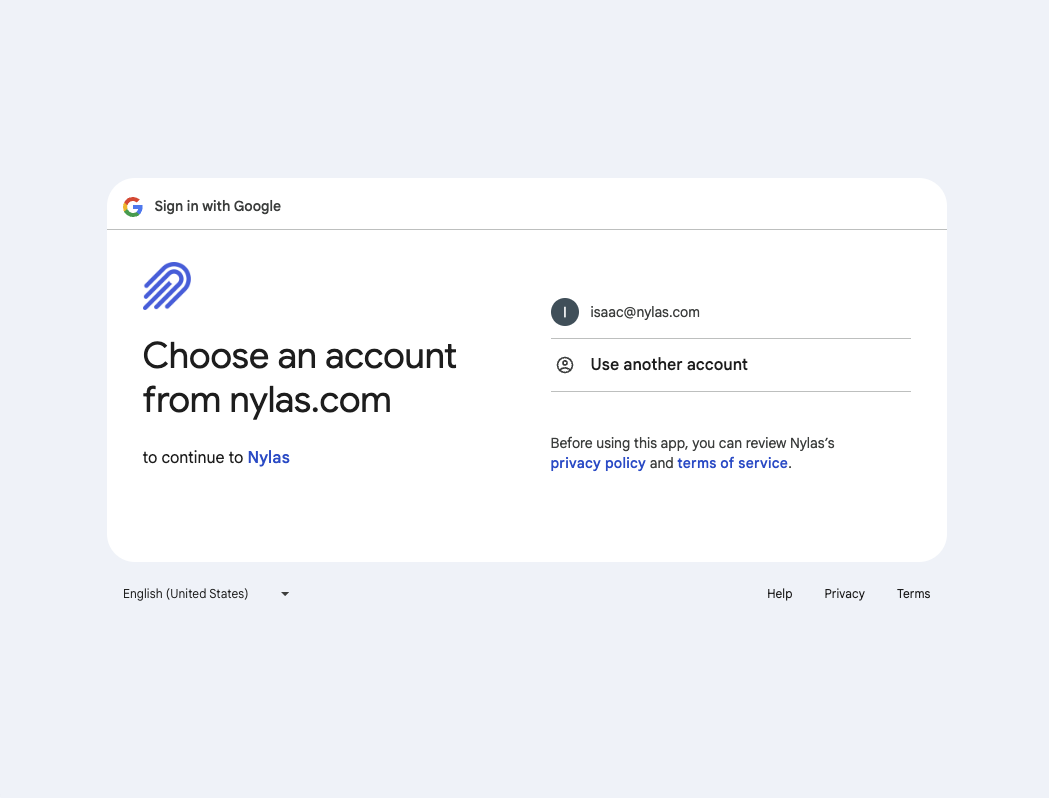
Nylas offers several ways to customize your OAuth flow. For this guide, we’ve kept it simple, but you can learn more in the Nylas API documentation.
Receive a callback from Nylas with the user’s grant ID
Section titled “Receive a callback from Nylas with the user’s grant ID”If the user successfully authenticates, they will be taken to your Redirect URI that you’ve specified, with a special one-time-use code in the URL query (i.e. http://localhost:3000/auth-success?code=12345). On your server you’ll then pass that code to Nylas (called “token exchange”) to finalize the authentication, which will give you a unique Grant ID that you can use for API calls.
Here are some examples of how you can execute the token exchange:
// callback route Nylas redirects toapp.get("/oauth/exchange", async (req, res) => {  console.log("Received callback from Nylas");  const code = req.query.code;
  if (!code) {    res.status(400).send("No authorization code returned from Nylas");    return;  }
  try {    const response = await nylas.auth.exchangeCodeForToken({      clientSecret: nylasConfig.apiKey,      clientId: nylasConfig.clientId, // Note this is *different* from your API key      redirectUri: nylasConfig.callbackUri, // URI you registered with Nylas in the previous step      grantType: nylasConfig.grantType,      code,    });    const { grantId } = response;
    // You'll use this grantId to make API calls to Nylas perform actions on    // behalf of this account. Store this in a database, associated with a user    console.log(response.grantId);
    // This depends on implementation. If the browser is hitting this endpoint    // you probably want to use res.redirect('/some-successful-frontend-url')    res.json({      message: "OAuth2 flow completed successfully for grant ID: " + grantId,    });  } catch (error) {    res.status(500).send("Failed to exchange authorization code for token");  }});
/** * Pure Javascript */const urlParams = new URLSearchParams(window.location.search);const nylasCode = urlParams.get("code");// Pass this code to your server, then execute// thetoken exchange seen in the other examples
/** * Next.js page router example */import { useRouter } from "next/router";
export default () => { const router = useRouter(); useEffect(() => { const nylasCode = router.query.code; // Pass this code to your server, then execute // token exchange in the other examples }, [router.query.code]);
return <div>Completing connection...</div>;};@app.route("/oauth/exchange", methods=["GET"])def oauth_exchange(): code = request.args.get("code")
if not code: return "No authorization code returned from Nylas", 400
try: exchangeRequest = CodeExchangeRequest({ "redirect_uri": nylas_config["callback_uri"], "code": code, "client_id": nylas_config["client_id"], "grant_type": nylas_config["grant_type"] }) exchange = nylas.auth.exchange_code_for_token( exchangeRequest )
grant_id = exchange.grant_id
# You'll use this grant_id to make API calls to Nylas to perform actions on behalf of this account. # Store this in a database, associated with a user print(f"Grant ID: {grant_id}")
# This depends on your implementation. If the browser is hitting this endpoint # you may want to redirect to a success page return jsonify({ "message": f"OAuth2 flow completed successfully for grant ID: {grant_id}", }) except Exception: return "Failed to exchange authorization code for token", 500get '/oauth/exchange' do code = params[:code]
if code.nil? status 400 return "No authorization code returned from Nylas" end
begin response = nylas.auth.exchange_code_for_token({ client_id: nylas_config[:client_id], # Note this is *different* from your API key redirect_uri: nylas_config[:callback_uri], # URI you registered with Nylas in the previous step code: code, grant_type: nylas_config[:grant_type], }) grant_id = response[:grant_id]
# You'll use this grant_id to make API calls to Nylas to perform actions on behalf of this account. # Store this in a database, associated with a user puts "Grant ID: #{grant_id}"
# This depends on your implementation. If the browser is hitting this endpoint # you may want to redirect to a success page content_type :json { message: "OAuth2 flow completed successfully for grant ID: #{grant_id}" }.to_json rescue StandardError status 500 "Failed to exchange authorization code for token" endendget("/oauth/exchange", (request, response) -> { String code = request.queryParams("code");
if (code == null) { response.status(400); return "No authorization code returned from Nylas"; }
try { CodeExchangeRequest codeRequest = new CodeExchangeRequest( nylasConfig.get("callbackUri"), // redirectUri code, // code nylasConfig.get("clientId"), // clientId (different from your API key) nylasConfig.get("grantType"), // grantType null, null // scope (optional) );
CodeExchangeResponse exchangeResponse = nylas.auth().exchangeCodeForToken(codeRequest); String grantId = exchangeResponse.getGrantId();
// You'll use this grantId to make API calls to Nylas to perform actions on behalf of this account. // Store this in a database, associated with a user System.out.println("Grant ID: " + grantId);
// This depends on your implementation. If the browser is hitting this endpoint // you may want to redirect to a success page response.type("application/json"); return String.format("{\"message\": \"OAuth2 flow completed successfully for grant ID: %s\"}", grantId); } catch (Exception e) { response.status(500); return "Failed to exchange authorization code for token"; }});http.get("/oauth/exchange") { val code = request.queryParams("code")
if (code == null) { response.status(400) "No authorization code returned from Nylas" } else { try { val codeRequest = CodeExchangeRequest( nylasConfig["callbackUri"]!!, // redirectUri code, // code nylasConfig["clientId"]!!, // clientId (different from your API key) nylasConfig["grantType"]!!, // grantType null, null // scope (optional) )
val exchangeResponse = nylas.auth().exchangeCodeForToken(codeRequest) val grantId = exchangeResponse.grantId
// You'll use this grantId to make API calls to Nylas to perform actions on behalf of this account. // Store this in a database, associated with a user println("Grant ID: $grantId")
// This depends on your implementation. If the browser is hitting this endpoint // you may want to redirect to a success page response.type("application/json") "{\"message\": \"OAuth2 flow completed successfully for grant ID: $grantId\"}" } catch (e: Exception) { response.status(500) "Failed to exchange authorization code for token" } }}When this process completes successfully, Nylas marks the user’s grant as verified and sends you their grant ID and email address. Phew!
The next section is the fun part! Now that you’ve authenticated your user and have a grant ID, you can use the Nylas Email, Calendar and Contacts API. In the following sections, we will see how we can achieve some common tasks like reading and sending emails and creating calendar events!
3. Use the Nylas APIs
Section titled “3. Use the Nylas APIs”Email API
Section titled “Email API”Read messages
curl --request GET \ --url "https://api.us.nylas.com/v3/grants/<NYLAS_GRANT_ID>/messages?limit=5" \ --header 'Accept: application/json, application/gzip' \ --header 'Authorization: Bearer <NYLAS_API_KEY>' \ --header 'Content-Type: application/json'app.get("/nylas/recent-emails", async (req, res) => { try { const grantId = fetchUserGrantIdFromYourDb(); // This is an example, you'll have to write this const messages = await nylas.messages.list({ identifier: grantId, queryParams: { limit: 5, }, });
res.json(messages); } catch (error) { console.error("Error fetching emails:", error); }});@app.route("/nylas/recent-emails", methods=["GET"])
def recent_emails(): query_params = {"limit": 5}
try: messages, _, _ = nylas.messages.list(session["grant_id"], query_params)
return jsonify(messages) except Exception as e: return f'{e}'get '/nylas/recent-emails' do query_params = { limit: 5 } messages, = nylas.messages.list(identifier: session[:grant_id], query_params: query_params)
messages.to_jsonrescue StandardError => e e.to_sendget("/nylas/recent-emails", (request, response) -> { try { ListMessagesQueryParams queryParams = new ListMessagesQueryParams.Builder().limit(5).build();
ListResponse<Message> emails = nylas.messages().list(request.session().attribute("grant_id"), queryParams);
Gson gson = new Gson();
return (gson.toJson(emails.getData())); } catch (Exception e) { return "%s".formatted(e); }});http.get("/nylas/recent-emails") { try { val queryParams = ListMessagesQueryParams.Builder().limit(5).build()
val emails = nylas.messages().list(request.session().attribute("grant_id"), queryParams)
val gson = Gson()
gson.toJson(emails.data) } catch (e : Exception) { e.toString() }}Send messages
curl --request POST \ --url 'https://api.us.nylas.com/v3/grants/<NYLAS_GRANT_ID>/messages/send' \ --header 'Authorization: Bearer <NYLAS_API_KEY>' \ --header 'Content-Type: application/json' \ --data '{ "subject": "Reaching Out with Nylas", "body": "Reaching out using the <a href='https://www.nylas.com/products/email-api/'>Nylas Email API</a>", "to": [{ "name": "Leyah Miller", "email": "[email protected]" }], "tracking_options": { "opens": true, "links": true, "thread_replies": true, "label": "hey just testing" } }'app.get("/nylas/send-email", async (req, res) => { try { const grantId = fetchUserGrantIdFromYourDb(); // This is an example, you'll have to write this const sentMessage = await nylas.messages.send({ identifier: grantId, requestBody: { subject: "Your Subject Here", body: "Your email body here.", }, });
res.json(sentMessage); } catch (error) { console.error("Error sending email:", error); }});@app.route("/nylas/send-email", methods=["GET"])
def send_email(): try: body = {"subject" : "Your Subject Here", "body":"Your Email Here", "reply_to":[{"name": "Name", "email": os.environ.get("EMAIL")}], "to":[{"name": "Name", "email": os.environ.get("EMAIL")}]}
message = nylas.messages.send(session["NYLAS_GRANT_ID"], request_body = body).data
return jsonify(message) except Exception as e: return f'{e}'get '/nylas/send-email' do request_body = { subject: 'Your Subject Here', body: 'Your Email Here', to: [{ name: 'Name', email: ENV['EMAIL'] }], reply_to: [{ name: 'Name', email: ENV['EMAIL'] }] }
email, = nylas.messages.send(identifier: session[:grant_id], request_body: request_body)
email.to_jsonrescue StandardError => e e.to_sendget("/nylas/send-email", (request, response) -> { try { List<EmailName> emailNames = new ArrayList<>(); emailNames.add(new EmailName(dotenv.get("EMAIL"), "Name"));
SendMessageRequest requestBody = new SendMessageRequest.Builder(emailNames). replyTo(emailNames). subject("Your Subject Here"). body("Your email body here"). build();
Response<Message> email = nylas.messages().send(dotenv.get("NYLAS_GRANT_ID"), requestBody); Gson gson = new Gson();
return gson.toJson(email.getData()); } catch (Exception e) { return "%s".formatted(e); }});http.get("/nylas/send-email") { try { val emailNames : List<EmailName> = listOf(EmailName(dotenv["EMAIL"], "Name"))
val requestBody : SendMessageRequest = SendMessageRequest.Builder(emailNames). replyTo(listOf(EmailName(dotenv["EMAIL"], "Name"))). subject("Your Subject Here"). body("Your email body here"). build()
val email = nylas.messages().send(request.session().attribute("NYLAS_GRANT_ID"), requestBody)
val gson = Gson()
gson.toJson(email.data) } catch (e : Exception) { e.toString() }}Calendar API
Section titled “Calendar API”List events on primary calendar
curl --request GET \ --url 'https://api.us.nylas.com/v3/grants/<NYLAS_GRANT_ID>/events?calendar_id=primary&limit=5' \ --header 'Accept: application/json, application/gzip' \ --header 'Authorization: Bearer <NYLAS_API_KEY>' \ --header 'Content-Type: application/json'// Route to list events on a calendarapp.get("/nylas/list-events", async (req, res) => { try { const grantId = fetchUserGrantIdFromYourDb(); // This is an example, you'll have to write this const calendarId = "primary"; // You can fetch the calendars of the user if you want to specify one
const events = await nylas.events.list({ identifier: grantId, queryParams: { calendar_id: calendarId, limit: 5, }, });
res.json(events); } catch (error) { console.error("Error fetching events:", error); }});@app.route("/nylas/list-events", methods=["GET"])
def list_events(): try: query_params = {"calendar_id": "primary", "limit": 5}
events = nylas.events.list(session["NYLAS_GRANT_ID"], query_params=query_params).data
return jsonify(events) except Exception as e: return f'{e}'get '/nylas/list-events' do query_params = { calendar_id: "primary", limit: 5 }
events, _request_ids = nylas.events.list(identifier: session[:grant_id], query_params: query_params)
events.to_jsonrescue StandardError => e e.to_sendget("/nylas/list-events", (request, response) -> { try { ListEventQueryParams listEventQueryParams = new ListEventQueryParams. Builder("primary"). limit(5). build();
List<Event> events = nylas.events().list(request.session().attribute("NYLAS_GRANT_ID"), listEventQueryParams).getData();
return "%s".formatted(events); } catch (Exception e) { return "%s".formatted(e); }});http.get("/nylas/list-events") { try { val eventQuery: ListEventQueryParams = ListEventQueryParams( calendarId = "primary", limit = 5)
val myEvents: List<Event> = nylas.events().list( request.session().attribute("NYLAS_GRANT_ID"), queryParams = eventQuery).data
myEvents } catch (e : Exception) { e.toString() }}Create events on primary calendar
!!!include(../sdks/javascript-time.md)!!!
curl --request POST \ --url 'https://api.us.nylas.com/v3/grants/<NYLAS_GRANT_ID>/events?calendar_id=primary' \ --header 'Accept: application/json, application/gzip' \ --header 'Authorization: Bearer <NYLAS_API_KEY>' \ --header 'Content-Type: application/json' \ --data '{ "title": "Annual Philosophy Club Meeting", "busy": true, "participants": [ { "name": "Leyah Miller", "email": "[email protected]" }, { "name": "Nyla", "email": "[email protected]" } ], "resources": [{ "name": "Conference room", "email": "[email protected]" }], "description": "Come ready to talk philosophy!", "when": { "start_time": 1674604800, "end_time": 1722382420, "start_timezone": "America/New_York", "end_timezone": "America/New_York" }, "location": "New York Public Library, Cave room", "recurrence": [ "RRULE:FREQ=WEEKLY;BYDAY=MO", "EXDATE:20211011T000000Z" ] }'// Route to create an event on a calendarapp.get("/nylas/create-event", async (req, res) => { try { const grantId = fetchUserGrantIdFromYourDb(); // This is an example, you'll have to write this const calendarId = "primary";
// Schedule the event to start in 5 minutes and end in 35 minutes const now = new Date(); const startTime = new Date(now.getTime()); startTime.setMinutes(now.getMinutes() + 5); const endTime = new Date(now.getTime()); endTime.setMinutes(now.getMinutes() + 35);
const newEvent = await nylas.events.create({ identifier: grantId, queryParams: { calendarId, }, requestBody: { title: "Your event title here", when: { startTime: Math.floor(startTime.getTime() / 1000), // Time in Unix timestamp format (in seconds) endTime: Math.floor(endTime.getTime() / 1000), }, }, });
res.json(newEvent); } catch (error) { console.error("Error creating event:", error); }});@app.route("/nylas/create-event", methods=["GET"])def create_event(): now = datetime.now() now_plus_5 = now + timedelta(minutes = 5)
start_time = int(datetime(now.year, now.month, now.day, now_plus_5.hour, now_plus_5.minute, now_plus_5.second).strftime('%s'))
now_plus_35 = now_plus_5 + timedelta(minutes = 35)
end_time = int(datetime(now.year, now.month, now.day, now_plus_35.hour, now_plus_35.minute, now_plus_35.second).strftime('%s'))
query_params = {"CALENDAR_ID": "primary"}
request_body = { "when": { "start_time": start_time, "end_time": end_time, }, "title": "Your event title here" }
try: event = nylas.events.create(session["NYLAS_GRANT_ID"], query_params = query_params, request_body = request_body)
return jsonify(event) except Exception as e: return f'{e}'# To handle time manipulationclass Numeric def minutes self / 1440.0 end alias minute minutes
def seconds self / 86_400.0 end alias second secondsend
get '/nylas/create-event' do now = DateTime.now now += 5.minutes
start_time = Time.local(now.year, now.month, now.day, now.hour, now.minute, now.second).strftime('%s')
now += 35.minutes
end_time = Time.local(now.year, now.month, now.day, now.hour, now.minute, now.second).strftime('%s')
query_params = { calendar_id: "primary" }
request_body = { when: { start_time: start_time.to_i, end_time: end_time.to_i }, title: 'Your event title here' }
event, = nylas.events.create(identifier: session[:grant_id], query_params: query_params, request_body: request_body)
event.to_jsonrescue StandardError => e e.to_sendget("/nylas/create-event", (request, response) -> { try { LocalDate today = LocalDate.now(); Instant instant = today.atStartOfDay(ZoneId.systemDefault()).toInstant(); Instant now_plus_5 = instant.plus(5, ChronoUnit.MINUTES); long startTime = now_plus_5.getEpochSecond(); Instant now_plus_10 = now_plus_5.plus(35, ChronoUnit.MINUTES); long endTime = now_plus_10.getEpochSecond();
CreateEventRequest.When.Timespan timespan = new CreateEventRequest.When.Timespan. Builder(Math.toIntExact(startTime), Math.toIntExact(endTime)). build();
CreateEventRequest createEventRequest = new CreateEventRequest.Builder(timespan) .title("Your event title here") .build();
CreateEventQueryParams createEventQueryParams = new CreateEventQueryParams. Builder("primary"). build();
Event event = nylas.events().create(request.session().attribute("NYLAS_GRANT_ID"), createEventRequest, createEventQueryParams).getData();
return "%s".formatted(event); } catch (Exception e) { return "%s".formatted(e); }});http.get("/nylas/create-event") { try { val today = LocalDate.now() val instant = today.atStartOfDay(ZoneId.systemDefault()).toInstant() val nowPlus5 = instant.plus(5, ChronoUnit.MINUTES) val startTime = nowPlus5.epochSecond val nowPlus10 = nowPlus5.plus(35, ChronoUnit.MINUTES) val endTime = nowPlus10.epochSecond
val eventWhenObj: CreateEventRequest.When = CreateEventRequest.When.Timespan(startTime.toInt(), endTime.toInt())
val eventRequest: CreateEventRequest = CreateEventRequest.Builder(eventWhenObj). title("Your event title here").build()
val eventQueryParams: CreateEventQueryParams = CreateEventQueryParams("primary")
val event: Response<Event> = nylas.events().create(request.session().attribute("NYLAS_GRANT_ID"), eventRequest, eventQueryParams)
event } catch (e : Exception) { e.toString() }}Contacts API
Section titled “Contacts API”Read contacts
app.get("/list-contacts", async (req, res) => {  try {    const grantId = fetchUserGrantIdFromYourDb(); // This is an example, you'll have to write this    const contacts = await nylas.contacts.list({      identifier: grantId,      queryParams: {},    });
res.json(contacts); } catch (error) { console.error("Error sending email:", error); }});@app.route("/nylas/list-contacts", methods=["GET"])
def list_contacts(): try: query_params = {"limit": 5} contacts = nylas.contacts.list(session["grant_id"], query_params=query_params).data
return jsonify(contacts) except Exception as e: return f'{e}'get '/nylas/list-contacts' do query_params = { limit: 5 }
contacts, _request_ids = nylas.contacts.list(identifier: session[:grant_id], query_params: query_params)
contacts.to_jsonrescue StandardError => e e.to_sendget("/nylas/list-contacts", (request, response) -> { try { ListContactsQueryParams listContactsQueryParams = new ListContactsQueryParams. Builder(). limit(5). build();
List<Contact> contacts = nylas.contacts().list( request.session().attribute("grant_id"), listContactsQueryParams). getData();
return "%s".formatted(contacts); } catch (Exception e) { return "%s".formatted(e); }});http.get("/nylas/list-contacts") { try { val listContactsQueryParams = ListContactsQueryParams.Builder().limit(5).build()
val contacts = nylas.contacts().list(request.session().attribute("grant_id"), listContactsQueryParams).data
contacts } catch (e : Exception) { e.toString() }}Create contacts
app.post("/create-contact", async (req, res) => { try { const grantId = fetchUserGrantIdFromYourDb(); // This is an example, you'll have to write this
const contact = await nylas.contacts.create({ identifier: grantId, requestBody: { givenName: "My", middleName: "Nylas", surname: "Friend", notes: "Make sure to keep in touch!", phoneNumbers: [{ type: "work", number: "(555) 555-5555" }], webPages: [{ type: "other", url: "nylas.com" }], }, });
res.json(contact); } catch (error) { console.error("Error sending email:", error); }});@app.route("/nylas/create-contact", methods=["GET"])
def create_contact(): request_body = { "company_name": "Nylas", "given_name": "Nylas' Swag", "notes": "This is good swag", "web_pages": [{"url": "https://www.nylas.com", "type": "work"}] }
try: event = nylas.contacts.create(session["NYLAS_GRANT_ID"], request_body = request_body)
return jsonify(event) except Exception as e: return f'{e}'get '/nylas/create-contact' do request_body = { given_name: 'My', middle_name: 'Nylas', surname: 'Friend', notes: 'Make sure to keep in touch!', phone_numbers: [{ number: '555 555-5555', type: 'business' }], web_pages: [{ url: 'https://www.nylas.com', type: 'homepage' }] }
contact, = nylas.contacts.create(identifier: session[:grant_id], request_body: request_body)
contact.to_jsonrescue StandardError => e e.to_sendget("/nylas/create-contact", (request, response) -> { try { List<ContactEmail> contactEmails = new ArrayList<>(); List<WebPage> contactWebpages = new ArrayList<>(); contactWebpages.add(new WebPage("https://www.nylas.com", "work"));
CreateContactRequest requestBody = new CreateContactRequest.Builder(). emails(contactEmails). companyName("Nylas"). givenName("Nylas' Swag"). notes("This is good swag"). webPages(contactWebpages). build();
Response<Contact> contact = nylas.contacts().create(dotenv.get("NYLAS_GRANT_ID"), requestBody);
return "%s".formatted(contact); } catch (Exception e) { return "%s".formatted(e); }});http.get("/nylas/create-contact") { try { val webpage : List<WebPage> = listOf(WebPage("https://www.nylas.com", "work"))
val contactRequest = CreateContactRequest.Builder(). emails(emails). companyName("Nylas"). givenName("Nylas' Swag"). notes("This is good swag"). webPages(webpage). build()
val contact = nylas.contacts().create(request.session().attribute("grant_id"), contactRequest)
contact }catch (e : Exception){ e.toString() }}