Register an application in Microsoft Entra ID so your users can connect their Microsoft accounts to your Nylas application. The setup has four parts: register the app, add Microsoft Graph permissions, create a client secret, and add a Microsoft connector.
The steps on this page use the Microsoft Entra admin center. The same App registrations pages are available in the Azure portal.
Before you begin
Section titled “Before you begin”You need a Microsoft account that can register applications in a Microsoft Entra tenant. If you don’t have one, create a free Azure account.
Plan your scopes
Section titled “Plan your scopes”Microsoft calls scopes API permissions. List the Nylas APIs your project uses, then find the Microsoft Graph permissions each one needs in the scopes documentation. Request only the permissions you use.
Register an application
Section titled “Register an application”An app registration gives you the client ID that identifies your application to Microsoft.
-
In the Microsoft Entra admin center, go to Entra ID > App registrations and click New registration.
-
Enter a Name. Your users see this name when they authenticate.
-
Under Supported account types, select who can authenticate with your application.
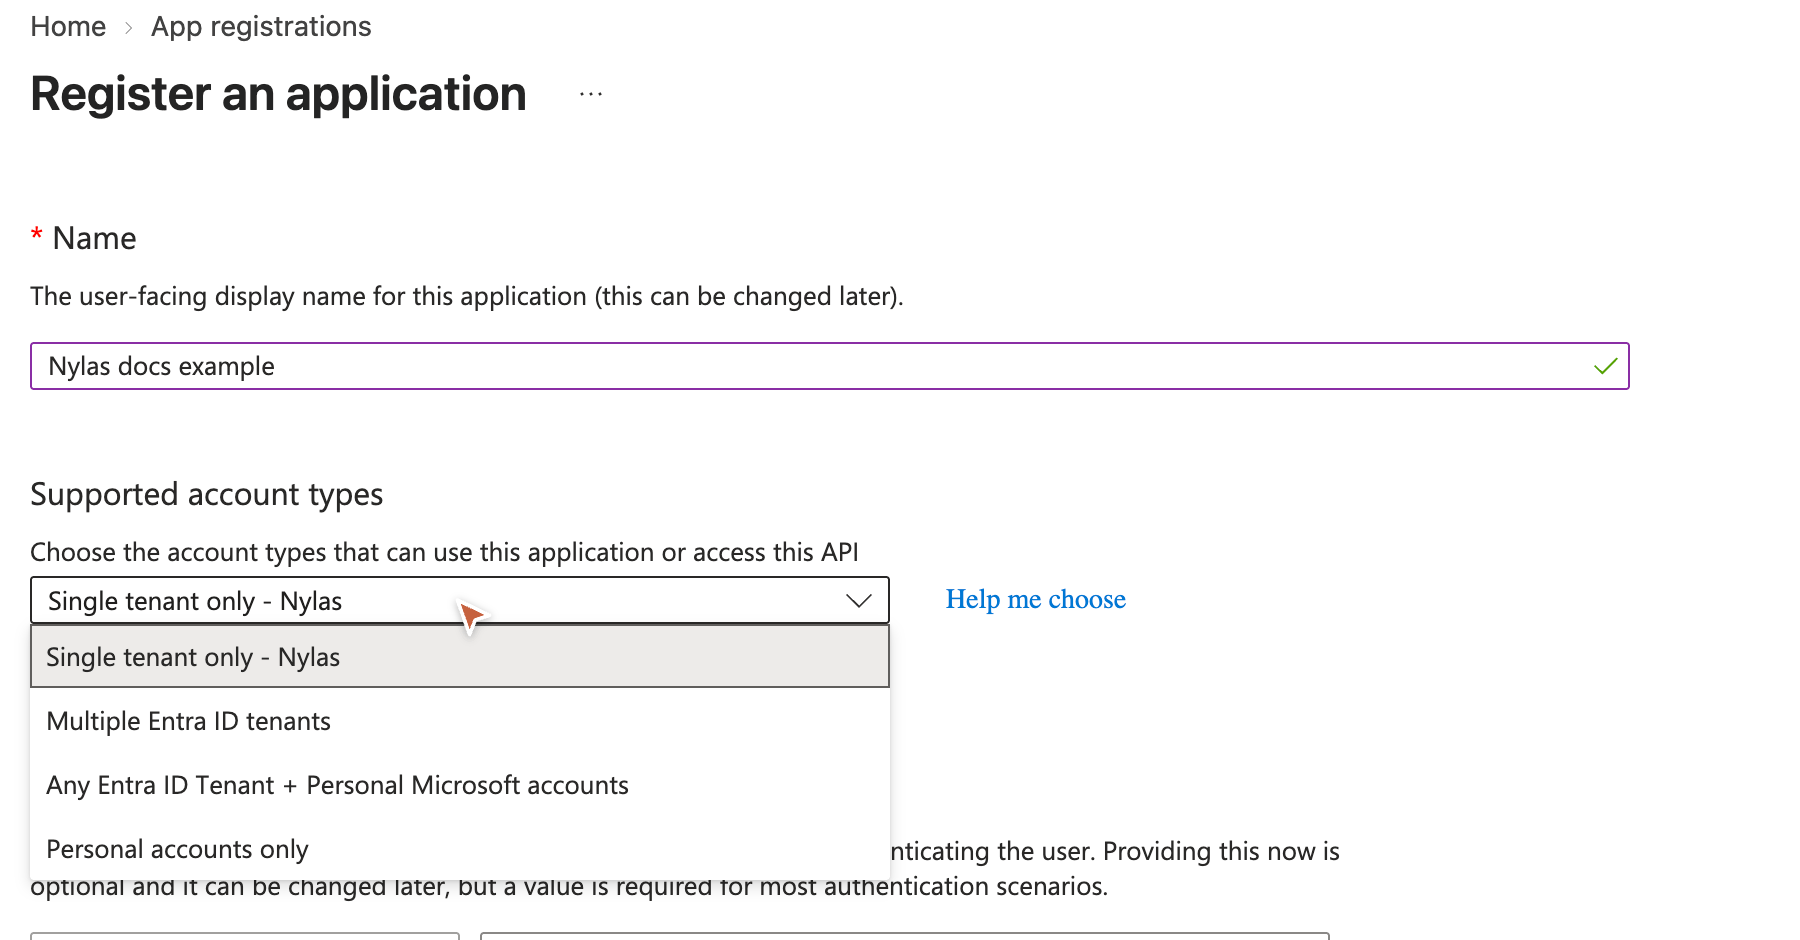
-
Under Redirect URI, select the Web platform and enter the URI for your authentication method:
- U.S. Hosted OAuth:
https://api.us.nylas.com/v3/connect/callback - E.U. Hosted OAuth:
https://api.eu.nylas.com/v3/connect/callback - Bring Your Own Authentication: Your project’s callback URI.
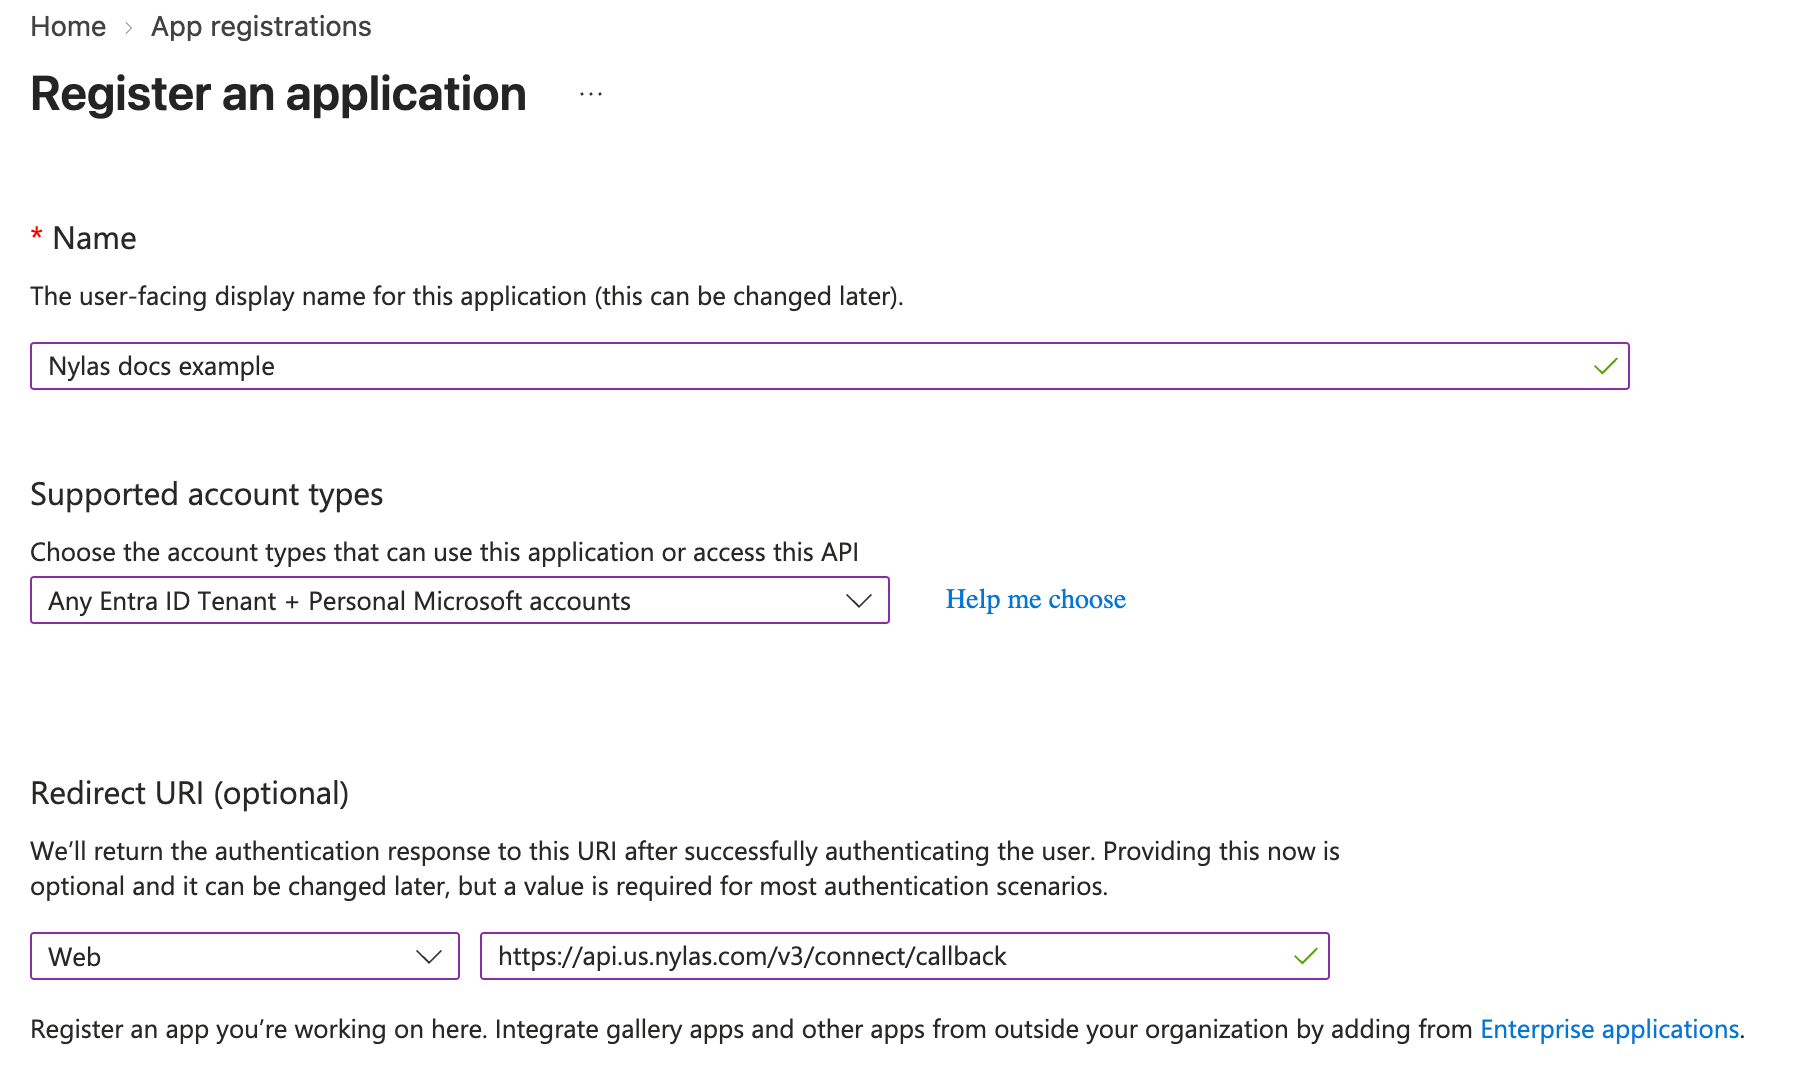
- U.S. Hosted OAuth:
-
Review the Microsoft Platform Policies, then click Register.
-
On the Overview page, copy the Application (client) ID.
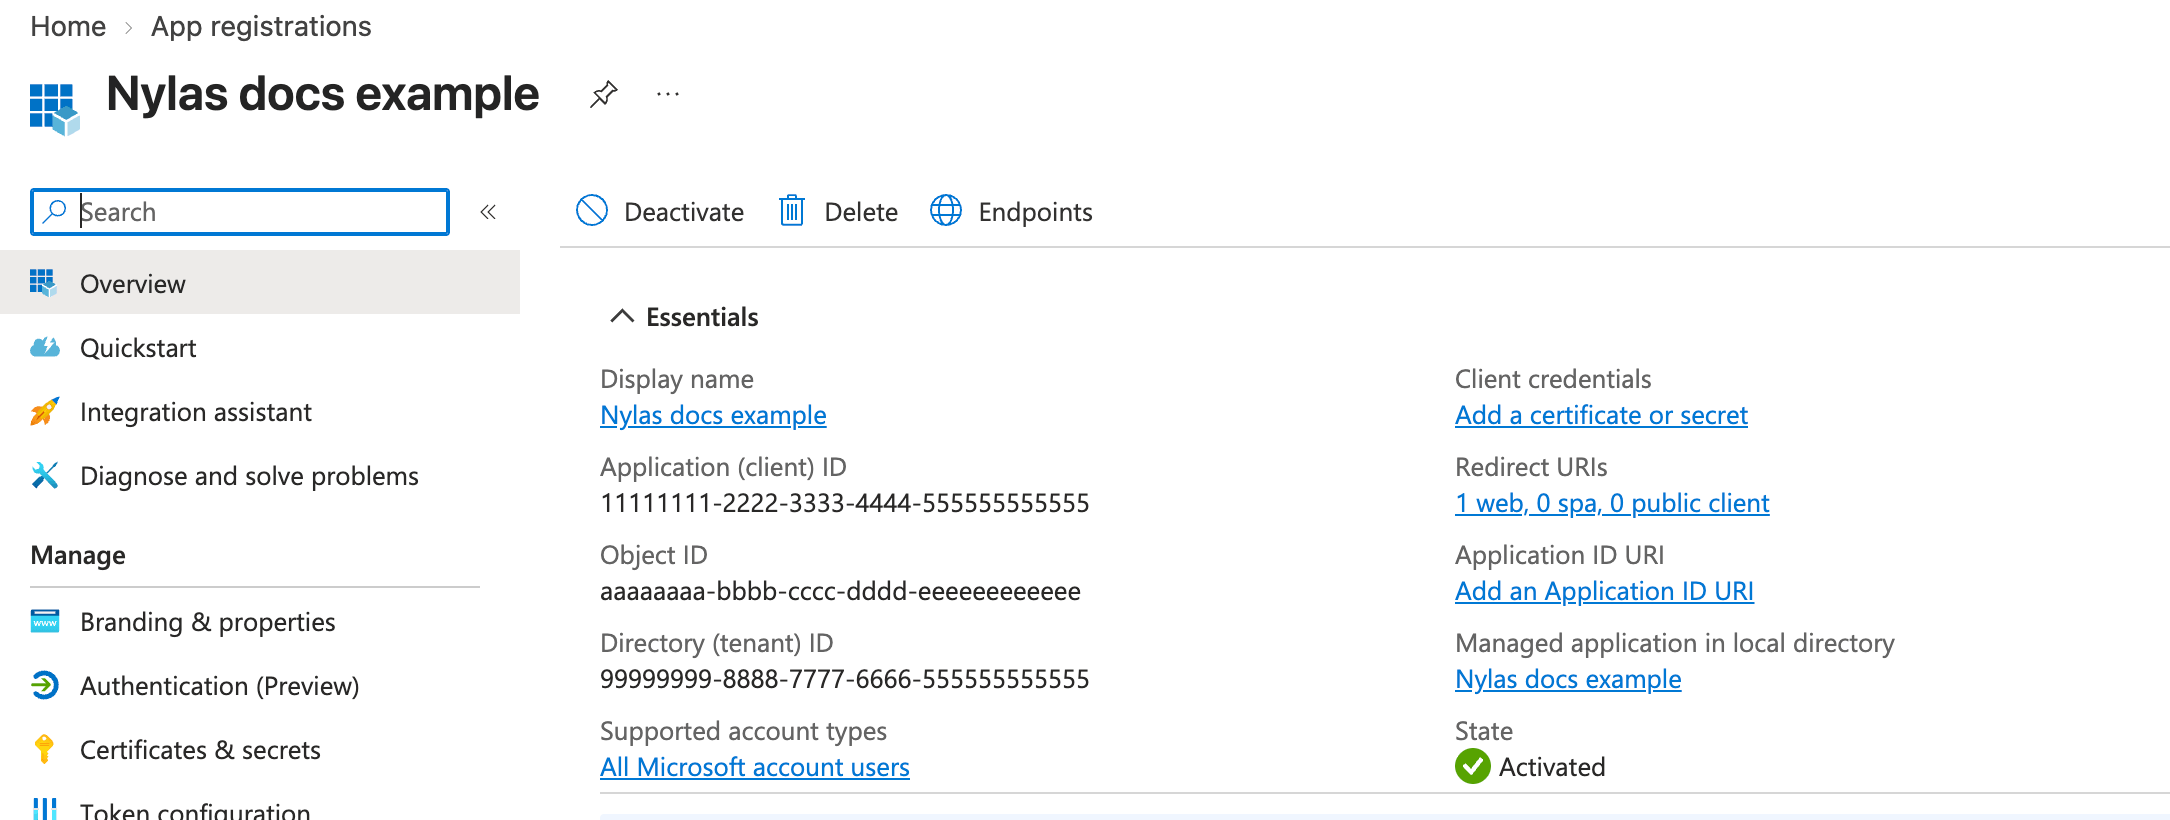
The account type you select decides which Microsoft accounts can authenticate, and which tenant value your connector uses.
| Supported account types | Who can authenticate | Connector tenant |
|---|---|---|
| Any Entra ID Tenant + Personal Microsoft accounts | Work, school, and personal Microsoft accounts | common |
| Multiple Entra ID tenants | Work and school accounts in any organization | organizations |
| Single tenant only | Accounts in your organization only | Your Directory (tenant) ID |
If you don’t set tenant, Nylas uses common. For what each value allows, see Microsoft’s endpoint documentation.
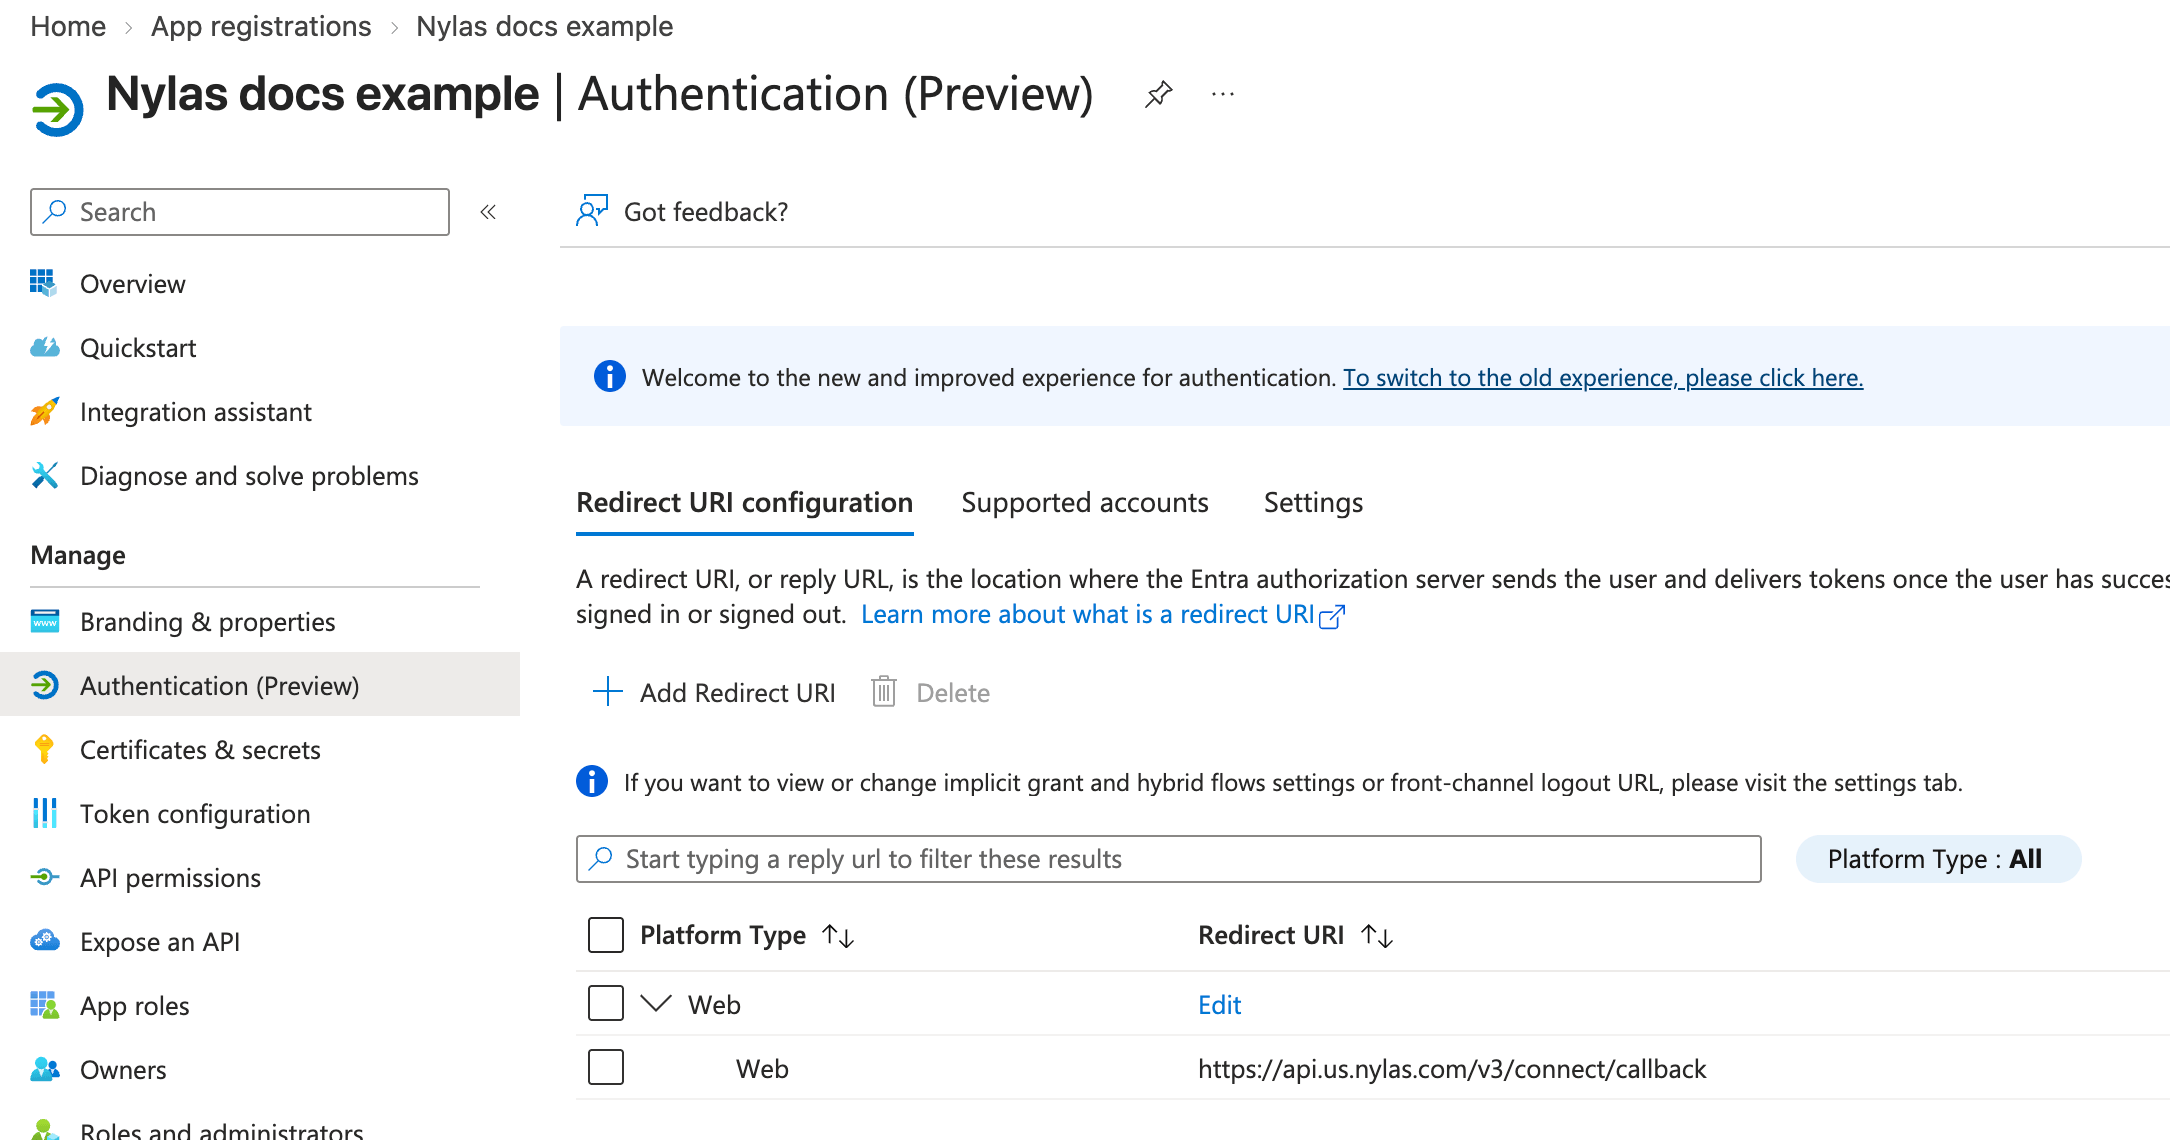
To add or change a redirect URI later, open Authentication on the app registration and click Add Redirect URI.
Add Microsoft Graph permissions
Section titled “Add Microsoft Graph permissions”New app registrations start with one permission, User.Read. Add the rest of the permissions your application requests.
- On the app registration, select API permissions and click Add a permission.
- Select Microsoft Graph, then Delegated permissions.
- For bulk authentication, select Application permissions instead. For more information, see Use a Microsoft bulk authentication grant.
- Under OpenId permissions, select
email,offline_access,openid, andprofile. - Search for each feature permission your project needs, such as
Mail.ReadWrite, and select it.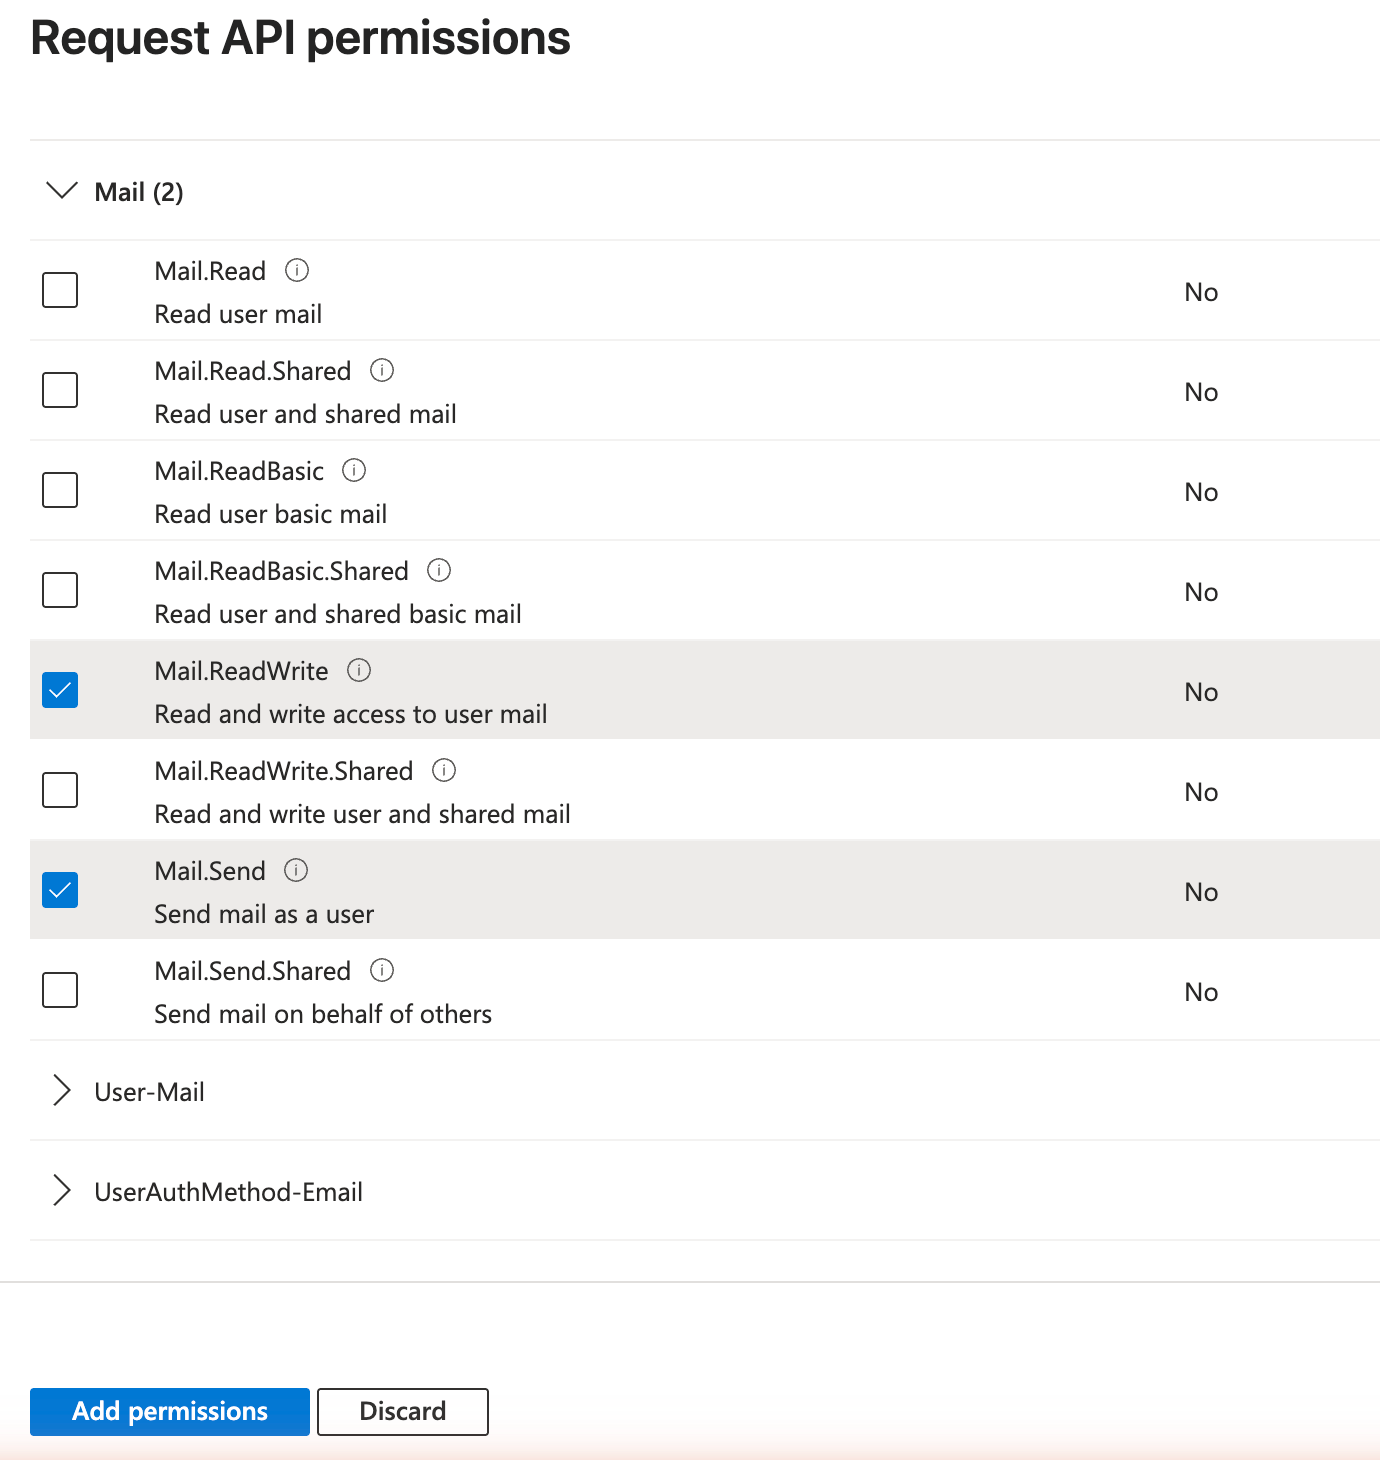
- Click Add permissions.
Nylas requests User.Read, offline_access, openid, and email on every Microsoft auth request, even if your connector doesn’t list them. Your app registration needs those four, plus profile and at least one feature permission.
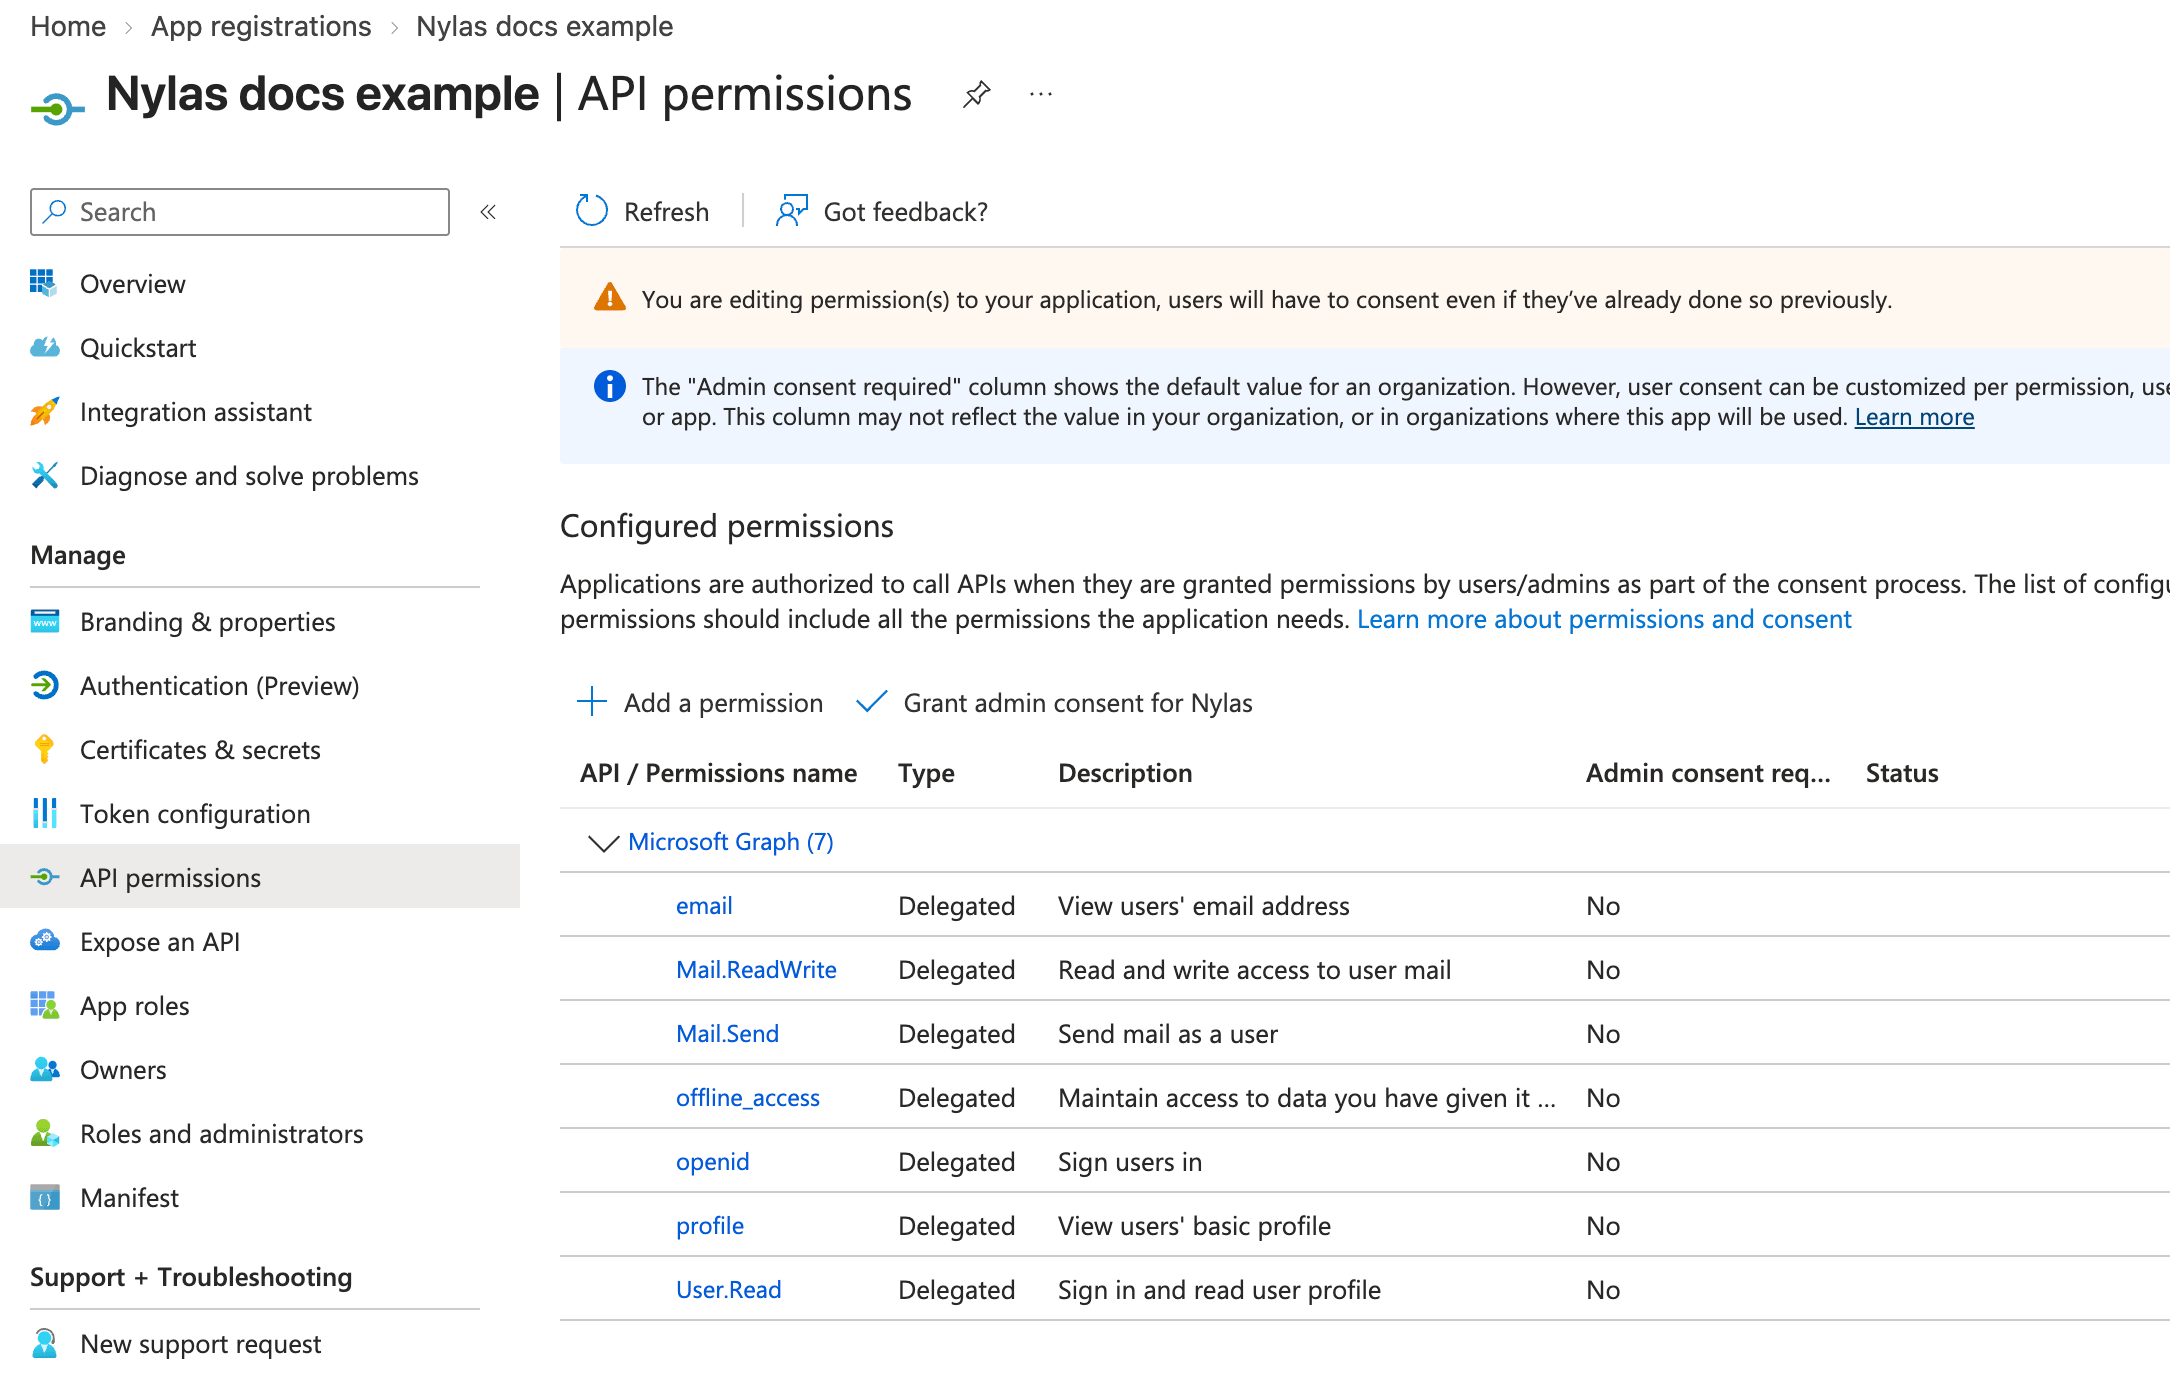
For the full list of permissions, see Microsoft’s permissions reference. If your users’ organizations require an administrator to approve applications, see Configuring Microsoft admin approval.
Add permissions with the manifest
Section titled “Add permissions with the manifest”You can also edit an app registration’s permissions as JSON. For the format, see Microsoft’s app manifest reference.
- On the app registration, select Manifest.
- Find
requiredResourceAccessin the editor. - Add
offline_access,openid,email,profile,User.Read, and at least one feature permission. - Click Save.
If an app that was registered with a manifest returns the following error when you add permissions on the API permissions page, use the manifest or register a new application.
One or more of the following permission(s) are currently not supported: EWS.AccessAsUser.All. Please remove these permission(s) and retry your request.
Create a client secret
Section titled “Create a client secret”Nylas authenticates as your app registration with the client ID and a client secret.
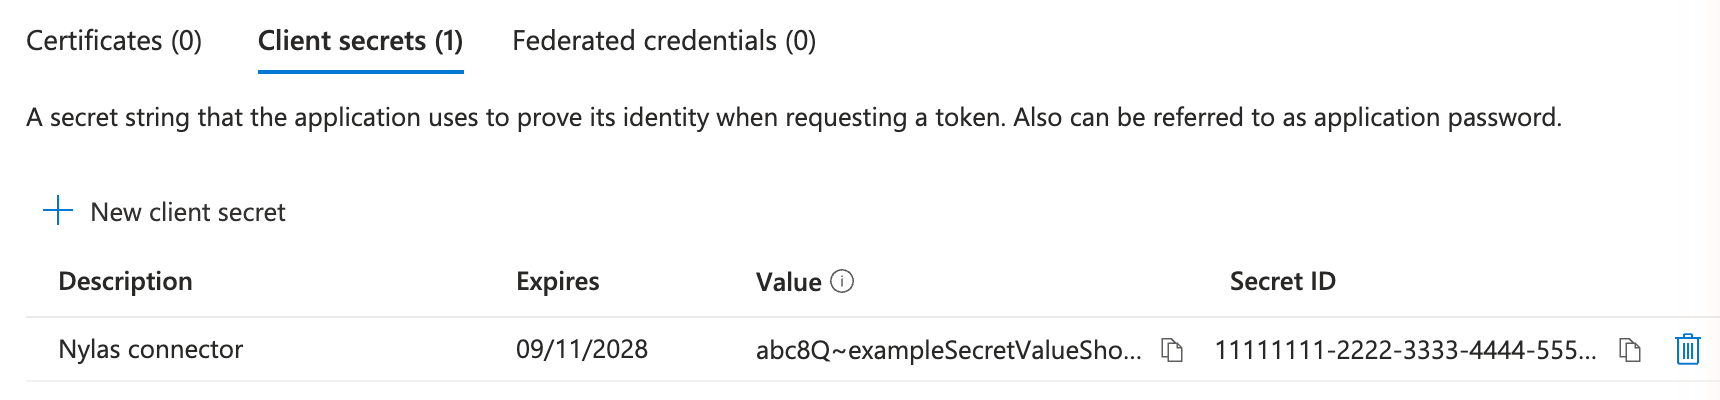
- On the app registration, select Certificates & secrets, then Client secrets.
- Click New client secret.
- Enter a Description and select when the secret Expires. The longest option is 730 days (24 months).
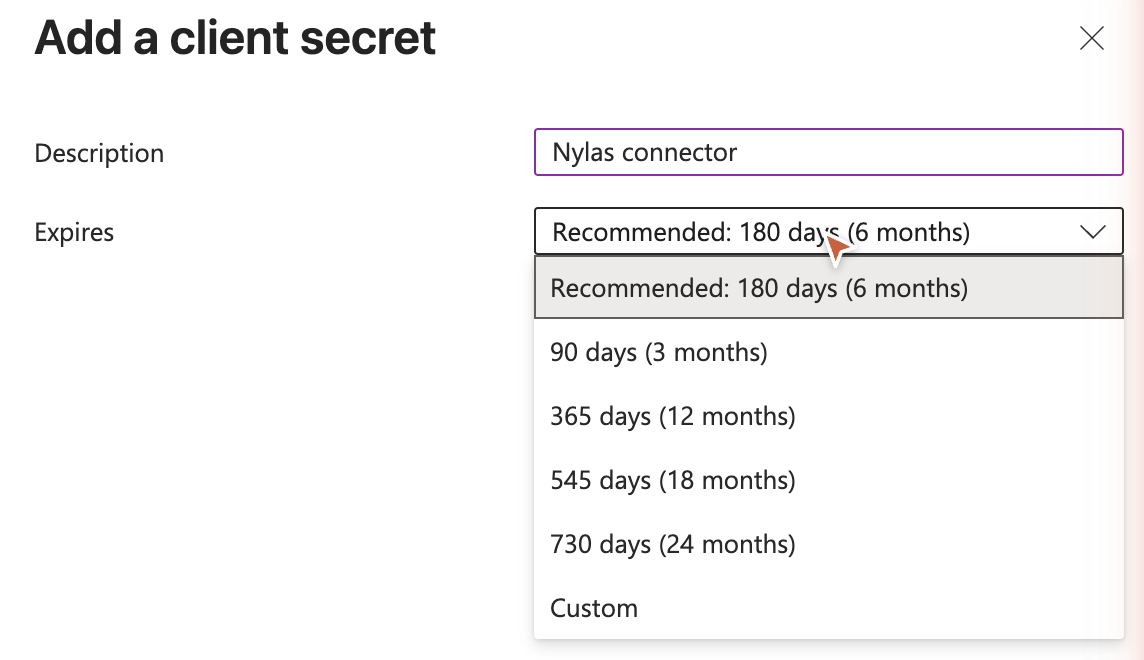
- Click Add.
- Copy the secret’s Value and save it in a secrets manager.
Add a Microsoft connector to Nylas
Section titled “Add a Microsoft connector to Nylas”A connector stores your client ID, client secret, and default scopes in your Nylas application. Create it in the Dashboard or with the API.
Create the connector in the Dashboard
Section titled “Create the connector in the Dashboard”- In the Nylas Dashboard, open your application and select Connectors.
- In the Microsoft row, click Configure.
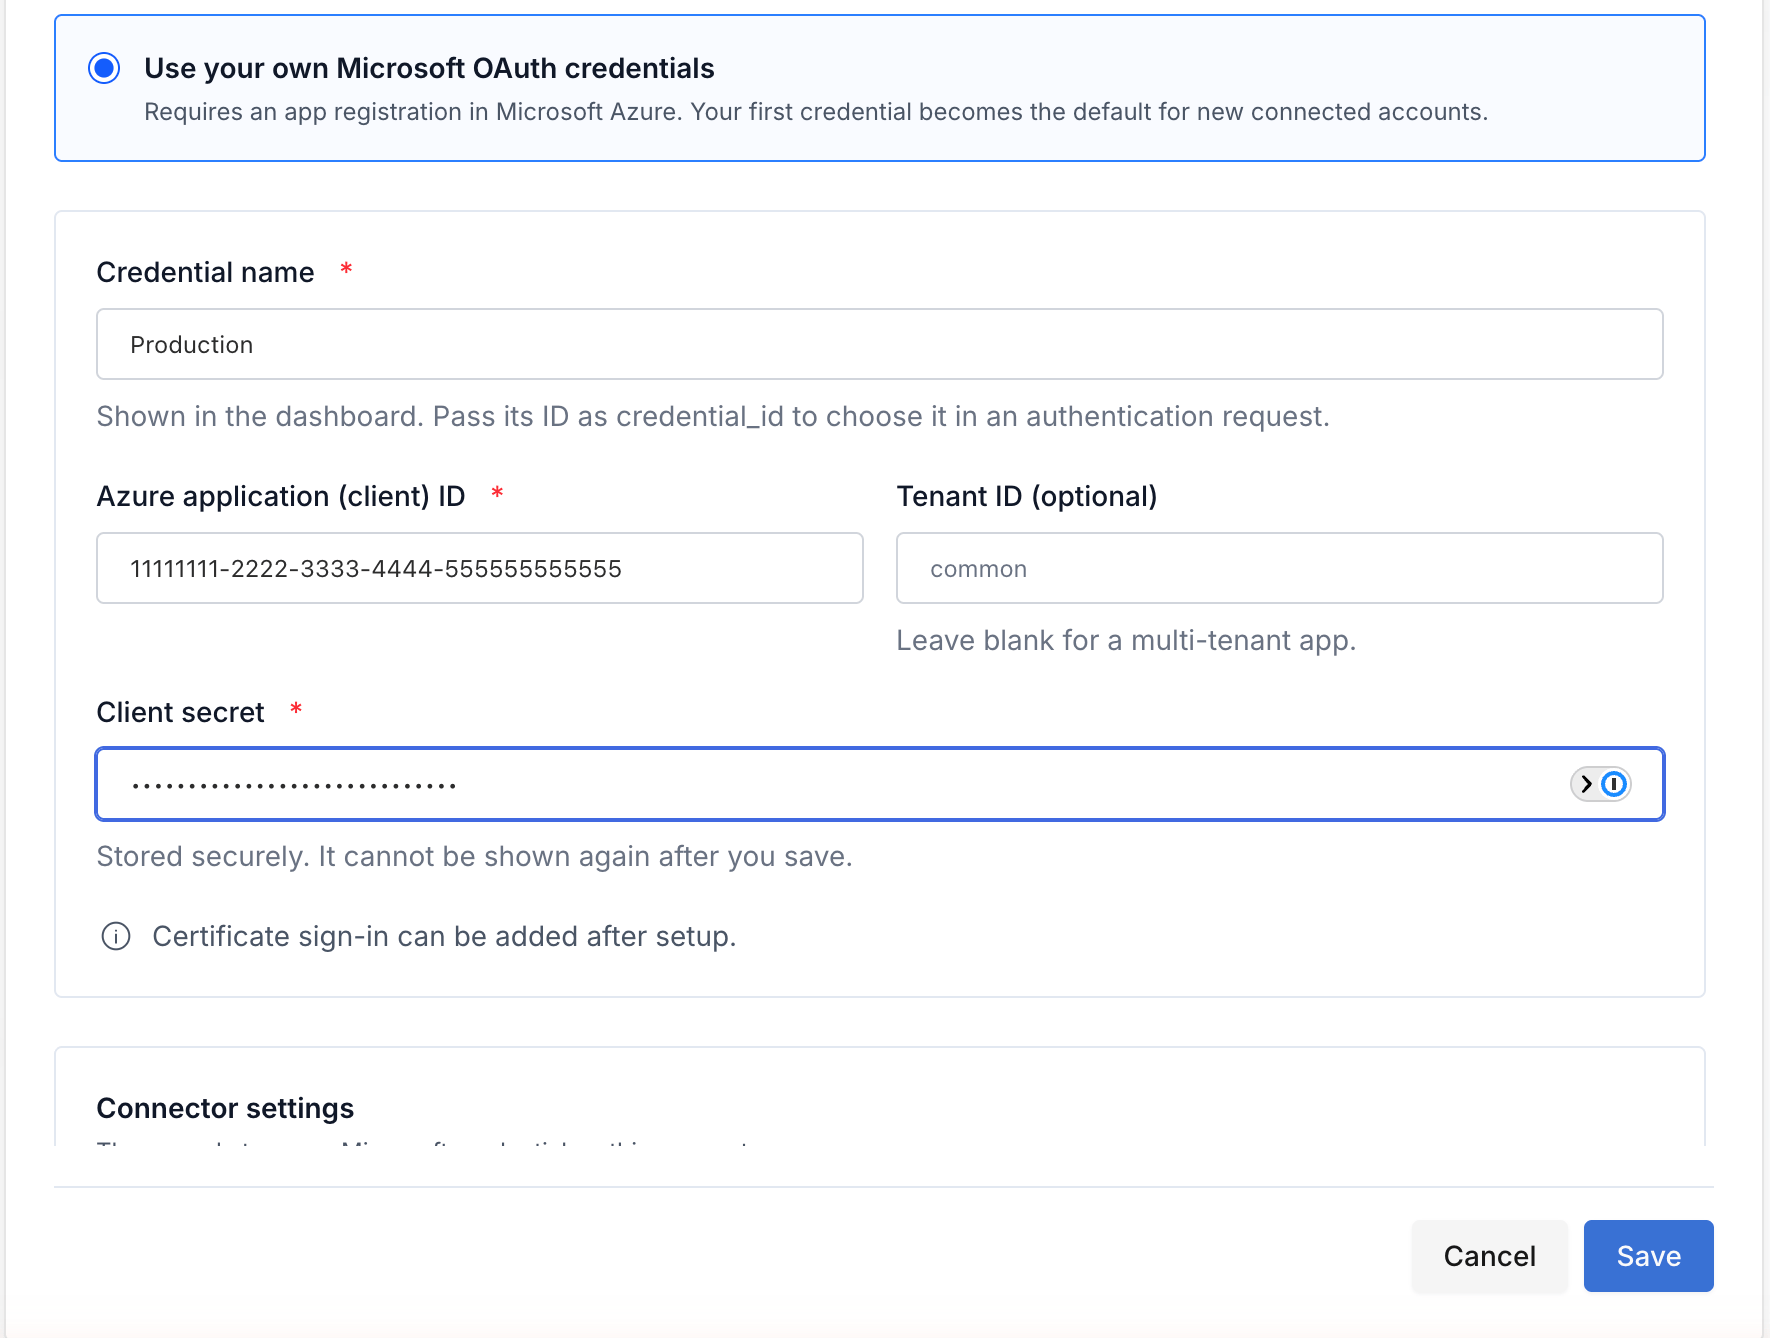
- Select Use your own Microsoft OAuth credentials.
- Enter a Credential name. The Dashboard shows this name; API requests use the credential’s ID.
- Enter the Azure application (client) ID and the Client secret value.
- Leave Tenant ID blank for a multi-tenant app. For a single-tenant app, enter your Directory (tenant) ID.
- Under Connector settings, select the OAuth scopes your users are asked to grant.
- Click Save.
If the Microsoft connector already exists, add the app registration as another credential instead. See Using multiple provider applications.
Create the connector with the API
Section titled “Create the connector with the API”Make a Create Connector request with your client ID, client secret, tenant, and scopes. Set tenant to common for a multi-tenant app.
curl -X POST 'https://api.us.nylas.com/v3/connectors' \ --header 'Authorization: Bearer <NYLAS_API_KEY>' \ --header 'Content-Type: application/json' \ --data '{ "name": "microsoft example", "provider": "microsoft", "settings": { "client_id": "<AZURE_CLIENT_ID>", "client_secret": "<AZURE_CLIENT_SECRET>", "tenant": "common" }, "scope": [ "offline_access", "openid", "profile", "User.Read", "Calendars.Read", "Calendars.ReadWrite", "Mail.ReadWrite", "Mail.Send" ] }'Things to know about Microsoft app registrations
Section titled “Things to know about Microsoft app registrations”- Client secrets expire. The longest lifetime is 24 months. When a secret expires, it invalidates the associated grants. See Update your client secret.
- Multi-tenant apps need a verified publisher. Users can’t grant consent to a newly registered multi-tenant app without a verified publisher. See the Microsoft publisher verification guide.
- Changing permissions asks users to consent again. When you add or remove a permission, users see the consent screen the next time they authenticate.
- The redirect URI is region-specific. An app registration with only the U.S. callback URI can’t authenticate users for an E.U. Nylas application. Add both URIs if you use both regions.
- The tenant must match the account type. Microsoft rejects sign-ins for a single-tenant app registration when the connector’s
tenantiscommon.
Update your client secret
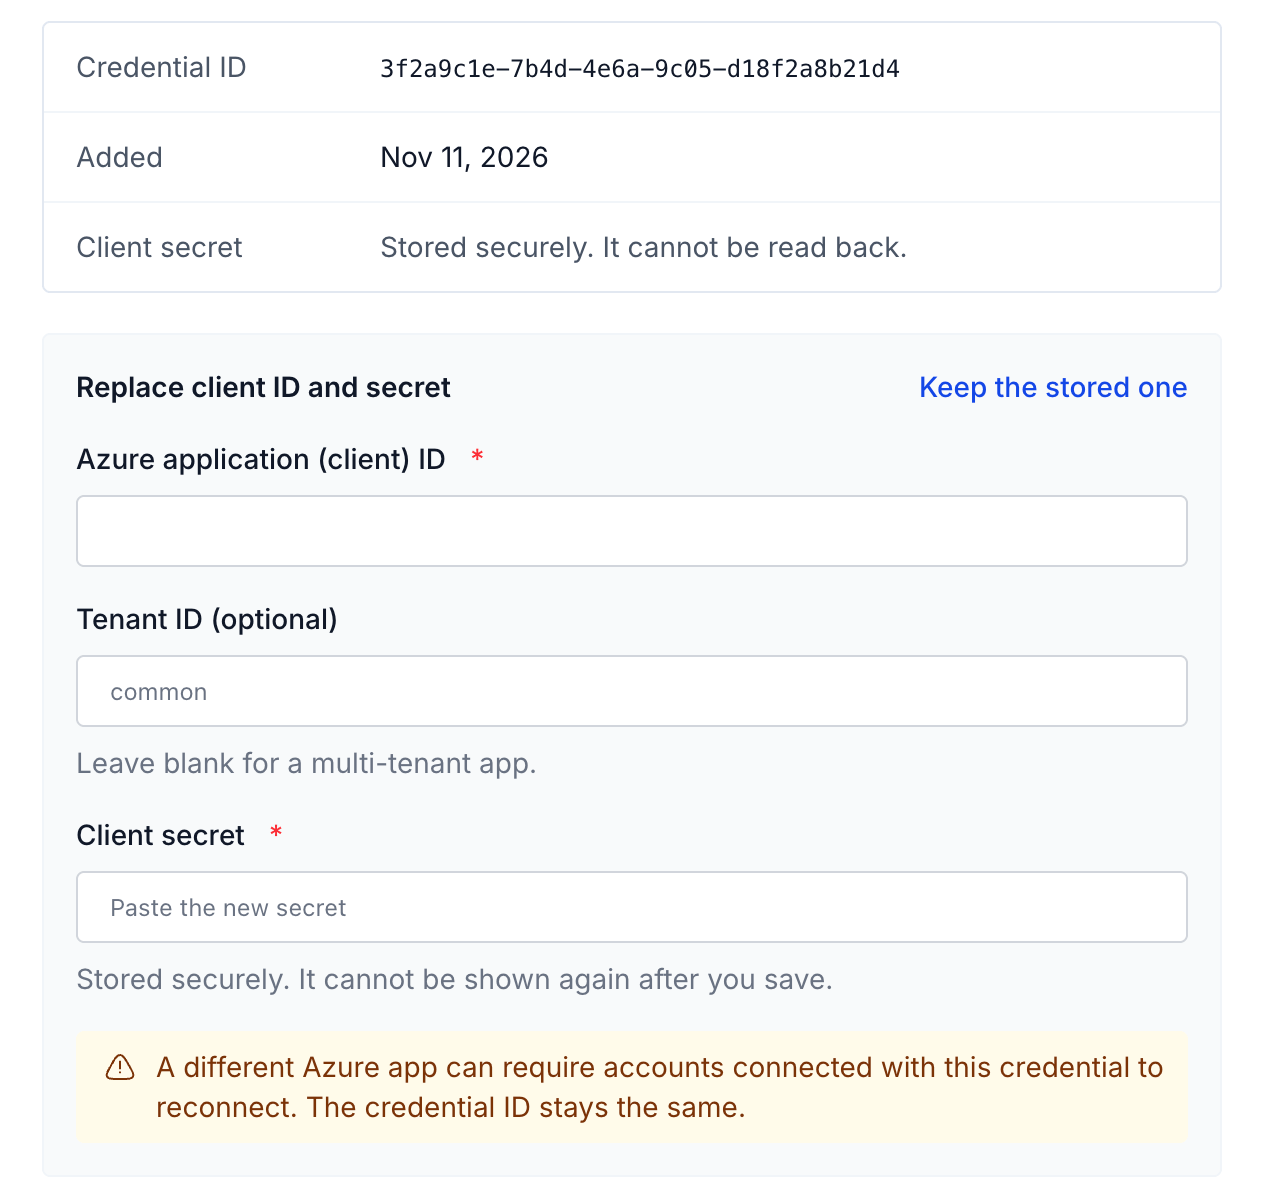
Section titled “Update your client secret”Create a new client secret before the current one expires, then replace the secret on the connector’s credential. The credential ID stays the same.
- In the Microsoft Entra admin center, create a new client secret on the app registration and copy its Value.
- In the Nylas Dashboard, select Connectors, then click Manage in the Microsoft row.
- Click Edit on the credential, then click Replace.
- Enter the Azure application (client) ID, the Tenant ID if you use one, and the new Client secret.
- Click Save changes.
For more information, see How to renew Microsoft Azure client secret for your Nylas application.
Set up the app registration with a browser agent
Section titled “Set up the app registration with a browser agent”An AI agent that can control your browser can complete the Microsoft Entra admin center steps on this page. Copy the following sample prompt, replace the placeholder values, and run it in a browser where you’re already signed in to Microsoft Entra. The prompt keeps the policy agreement, admin consent, and client secret steps with you.
Sample prompt: set up the Microsoft app registration
Register an application for use with Nylas in my signed-in browser athttps://entra.microsoft.com. Follow the steps athttps://developer.nylas.com/docs/provider-guides/microsoft/create-azure-app/(request the page with "Accept: text/markdown" if you can).
Inputs- App name: <APP_NAME>- Supported account types: <ACCOUNT_TYPE>- Nylas region: <US or EU>- Feature permissions: <GRAPH_PERMISSIONS>
Steps1. Go to Entra ID > App registrations > New registration. Enter the app name   and select the supported account types.2. Add a Web redirect URI: https://api.us.nylas.com/v3/connect/callback for   US, or https://api.eu.nylas.com/v3/connect/callback for EU.3. On API permissions, add these Microsoft Graph delegated permissions: email,   offline_access, openid, profile, and each feature permission.4. On Certificates & secrets, open the New client secret panel and select the   730 days (24 months) expiry.
Rules- Stop and ask me before you click Register (it accepts the Microsoft Platform  Policies), before you click Grant admin consent, and before you click Add on  the client secret panel.- Don't read, copy, or screenshot the client secret value. Tell me the secret  is ready so that I can copy it myself.- Don't enter passwords or complete sign-in prompts. If Microsoft asks me to  sign in, stop and tell me.- Don't change any app registration other than <APP_NAME>.
When you finish, report the Application (client) ID, the Directory (tenant)ID, the configured permissions, and the redirect URIs.