Nylas Scheduler gives your users embeddable scheduling pages that handle availability, booking, and calendar sync across Google, Microsoft, and Exchange — without you building any of that logic.
This quickstart walks you through embedding the Scheduler components in a web app and creating your first scheduling page.
The complete code for this quickstart is on GitHub: Web component (HTML) or React.

Before you begin
Section titled “Before you begin”You need:
- Node.js v18+ — run
node -vto check your version. - A Nylas application with a client ID — if you haven’t set one up yet, follow the CLI setup or Dashboard setup. Your client ID is on the Dashboard Overview page.
Bootstrap your app
Section titled “Bootstrap your app”Create a new local project. There are two paths: Web components (HTML) or React. Pick one and follow it through the rest of the guide.
mkdir nylas-scheduler/cd nylas-scheduler/touch index.htmltouch scheduler-editor.htmlnpm create vite@latest nylas-scheduler# -> When prompted, choose the "React" template# -> When prompted, choose the "TypeScript" languagecd nylas-scheduler/npm install react-router-dom # Needed for routingnpm install @nylas/react@latest # Install the Nylas React components# Quick verify: you should now have a `public/`, `src/`, and `node_modules/` folder inside the `nylas-scheduler` folder.Register a callback URI
Section titled “Register a callback URI”Register a callback URI so Nylas can redirect users after authentication. Since we’re running locally, the URI uses localhost.
- In your Sandbox application, click Hosted Authentication in the left navigation, and click Callback URIs.
- Click Add a callback URI, and enter your application’s callback URI.
- Select the JavaScript platform.
- For URL, enter
http://localhost:<PORT>/scheduler-editor. - For Origin, enter
http://localhost:<PORT>. - Click Add callback URI.
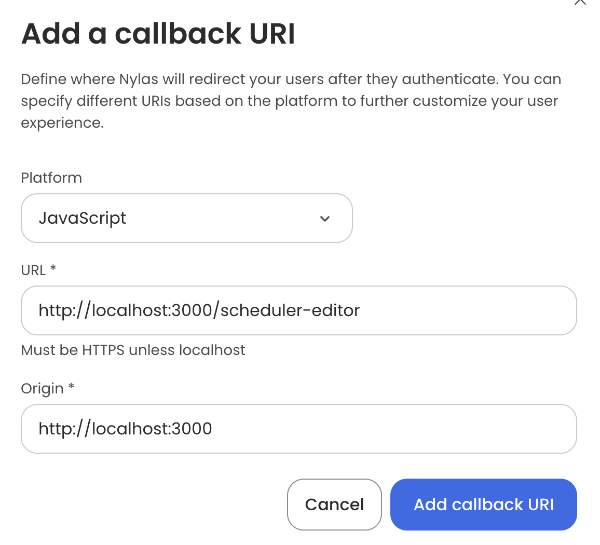
The URL endpoints can be anything you want. However, they must match the callback URI and port in your application when you configure the Scheduler Editor Component.
Add the Scheduler components
Section titled “Add the Scheduler components”Include the Scheduler Editor and Scheduling components in your app. The files you need to update depend on your framework:
| Framework | UI Component | Files |
|---|---|---|
| HTML/Vanilla JS | Scheduler Editor | scheduler-editor.html |
| Scheduling | index.html | |
| React | Scheduler Editor | App.tsx, index.css |
| Scheduling | App.tsx, App.css |
See the Scheduler UI component reference for all available options and data properties.
<!-- scheduler-editor.html -->
<!doctype html><html class="h-full bg-white" lang="en"> <head> <meta charset="UTF-8" /> <meta name="viewport" content="width=device-width, initial-scale=1.0" /> <title>Nylas Scheduler Editor Component</title> <link rel="preconnect" href="https://fonts.googleapis.com" /> <link rel="preconnect" href="https://fonts.gstatic.com" crossorigin /> <link rel="stylesheet" /> <script src="https://cdn.tailwindcss.com"></script>
<style type="text/css"> body { font-family: "Inter", sans-serif; } </style> </head> <body class="h-full"> <div class="grid h-full place-items-center"> <!-- Add the Nylas Scheduler Editor component --> <nylas-scheduler-editor /> </div>
<!-- Configure the Nylas Scheduler Editor component --> <script type="module"> import { defineCustomElement } from "https://cdn.jsdelivr.net/npm/@nylas/web-elements@latest/dist/cdn/nylas-scheduler-editor/nylas-scheduler-editor.es.js";
defineCustomElement();
const schedulerEditor = document.querySelector("nylas-scheduler-editor"); schedulerEditor.schedulerPreviewLink = `${window.location.origin}/?config_id={config.id}`; schedulerEditor.nylasSessionsConfig = { clientId: "<NYLAS_CLIENT_ID>", // Replace with your Nylas client ID from the previous section. redirectUri: `${window.location.origin}/scheduler-editor`, domain: "https://api.us.nylas.com/v3", hosted: true, accessType: "offline", };
schedulerEditor.defaultSchedulerConfigState = { selectedConfiguration: { // Create a public Configuration that doesn't require a session. requires_session_auth: false, scheduler: { rescheduling_url: `${window.location.origin}/reschedule/:booking_ref`, cancellation_url: `${window.location.origin}/cancel/:booking_ref`, }, }, }; </script> </body></html><!-- index.html -->
<!doctype html><html class="h-full bg-white" lang="en"> <head> <meta charset="UTF-8" /> <meta name="viewport" content="width=device-width, initial-scale=1.0" /> <title>Nylas Scheduling Component</title> <link rel="preconnect" href="https://fonts.googleapis.com" /> <link rel="preconnect" href="https://fonts.gstatic.com" crossorigin /> <link rel="stylesheet" /> <script src="https://cdn.tailwindcss.com"></script>
<style type="text/css"> body { font-family: "Inter", sans-serif; } </style> </head> <body> <div class="grid gap-0 h-full place-items-center"> <div class="grid gap-4"> <!-- A button to view the Scheduler Editor --> <a href="scheduler-editor.html" class="w-fit border border-blue-500 hover:bg-blue-100 text-blue-500 font-bold py-2 px-4 rounded" > View Scheduler Editor </a>
<!-- Add the Nylas Scheduling Component --> <nylas-scheduling></nylas-scheduling> </div> </div>
<!-- Configure the Nylas Scheduling Component with a Configuration ID. --> <script type="module"> import { defineCustomElement } from "https://cdn.jsdelivr.net/npm/@nylas/web-elements@latest/dist/cdn/nylas-scheduling/nylas-scheduling.es.js";
defineCustomElement();
const nylasScheduling = document.querySelector("nylas-scheduling"); nylasScheduling.schedulerApiUrl = "https://api.us.nylas.com";
// Get the Configuration ID from the URL (`?config_id=<NYLAS_SCHEDULER_CONFIGURATION_ID>`). const urlParams = new URLSearchParams(window.location.search);
// If `config_id` doesn't exist, throw a `console.error`. if (!urlParams.has("config_id")) { console.error( "No Scheduler Configuration ID found in the URL. Please provide a Configuration ID.", ); }
// Set the Configuration ID. nylasScheduling.configurationId = urlParams.get("config_id"); </script> </body></html>import { BrowserRouter, Route, Routes } from "react-router-dom";import { NylasSchedulerEditor, NylasScheduling } from "@nylas/react";import "./App.css";
function App() { // Get the configuration ID from the URL query string const urlParams = new URLSearchParams(window.location.search); const configId = urlParams.get("config_id") || "";
return ( <BrowserRouter> <Routes> <Route path="/" element={ <div> <a href="/scheduler-editor" className="button"> View Scheduler Editor </a> <NylasScheduling configurationId={configId} schedulerApiUrl="https://api.us.nylas.com" /> </div> } /> <Route path="/scheduler-editor" element={ <div> <NylasSchedulerEditor schedulerPreviewLink={`${window.location.origin}/?config_id={config.id}`} nylasSessionsConfig={{ clientId: "NYLAS_CLIENT_ID", // Replace with your Nylas client ID from the previous redirectUri: `${window.location.origin}/scheduler-editor`, domain: "https://api.us.nylas.com/v3", // or 'https://api.eu.nylas.com/v3' for EU data center hosted: true, accessType: "offline", }} defaultSchedulerConfigState={{ selectedConfiguration: { requires_session_auth: false, // Creates a public configuration which doesn't require a session scheduler: { // The callback URLs to be set in email notifications rescheduling_url: `${window.location.origin}/reschedule/:booking_ref`, // The URL of the email notification includes the booking reference cancellation_url: `${window.location.origin}/cancel/:booking_ref`, }, }, }} /> </div> } /> </Routes> </BrowserRouter> );}export default App;
html { height: 100%;}
body { font-family: "Inter", sans-serif; margin: 0; padding: 0; box-sizing: border-box; height: 100%;}#root { display: grid; place-items: center; height: 100%;}
#root > div { display: grid; gap: 1rem;}
.button { width: fit-content; padding-left: 1rem; padding-right: 1rem; padding-top: 0.5rem; padding-bottom: 0.5rem; font-weight: 700; color: rgb(59, 130, 246); text-decoration: inherit; border-width: 1px; border-radius: 0.25rem; border-color: rgb(59, 130, 246); border-style: solid;}Start the dev server
Section titled “Start the dev server”Run a local server from your project root:
npx serve --listen <PORT>npm run dev -- --port <PORT>After you run the command, open your browser to http://localhost:<PORT>/scheduler-editor to see your Scheduler Editor.
Create a scheduling page
Section titled “Create a scheduling page”Open http://localhost:<PORT>/scheduler-editor in your browser. Log in with your email provider, and the editor loads.

Click Create new to set up your first scheduling page.

Enter a title, duration, and description. Set availability under Availability in the left nav, then click Create.

The editor returns to the manager view showing all your scheduling pages.

Visit your scheduling page
Section titled “Visit your scheduling page”Click Preview from the manager view, or visit http://localhost:<PORT>/?config_id=<CONFIGURATION_ID> directly. This is the page your users’ invitees will see when booking time.

What’s next
Section titled “What’s next”- Scheduler overview — availability rules, booking confirmations, and customization options
- Scheduler UI components — full reference for all component properties and events
- Scheduler & Notetaker integration — automatically record meetings booked through Scheduler
- Authentication — set up OAuth so your users can connect their accounts
- Webhooks — get notified when bookings are created or cancelled