Beta Feature: Nylas Inbound is currently in beta. You can join the waitlist at https://inbound.nylas.com/.
Nylas Inbound lets you create a managed email address that accepts incoming mail and immediately delivers a webhook notification containing the message data to your application. It’s designed for simple, reliable email intake without building an OAuth flow or connecting to a third‑party mailbox.
Use Nylas Inbound when you want to:
- Capture emails sent to a dedicated address (for example, intake@, leads@, tickets@)
- Trigger workflows from incoming mail (routing, enrichment, automation)
- Hand off message data to workers, LLMs, or downstream systems in real time
Nylas Inbound can send your application messages through webhooks, and stores received emails so you can access them through the GET /messages endpoint.
Domains
Section titled “Domains”Domains for sending & receiving emails through Inbound are controlled at an Organization-level in Nylas. When you add a new domain you’ll need to choose which data center your applications are based in (US or EU).
Nylas offers a default inbound domain for testing which you can register through the dashboard. This gives you the address <alias>@<your-application>.nylas.email.
You can also use your own domain or subdomain combination with Nylas Inbound. This gives you full customization around the name of the inbox you’re creating. Once your domain is added to Nylas, we generate TXT & MX records for you to add to your DNS. Nylas will verify that those records have been added, and then you’ll be able to start using your domain.
It’s recommended to register a subdomain for this purpose (like inbound.yourcompany.com).
You can register your domain in your Organization Settings. For details on registering and verifying domains via the API, see Managing domains.
Through the dashboard
Section titled “Through the dashboard”Creating inboxes
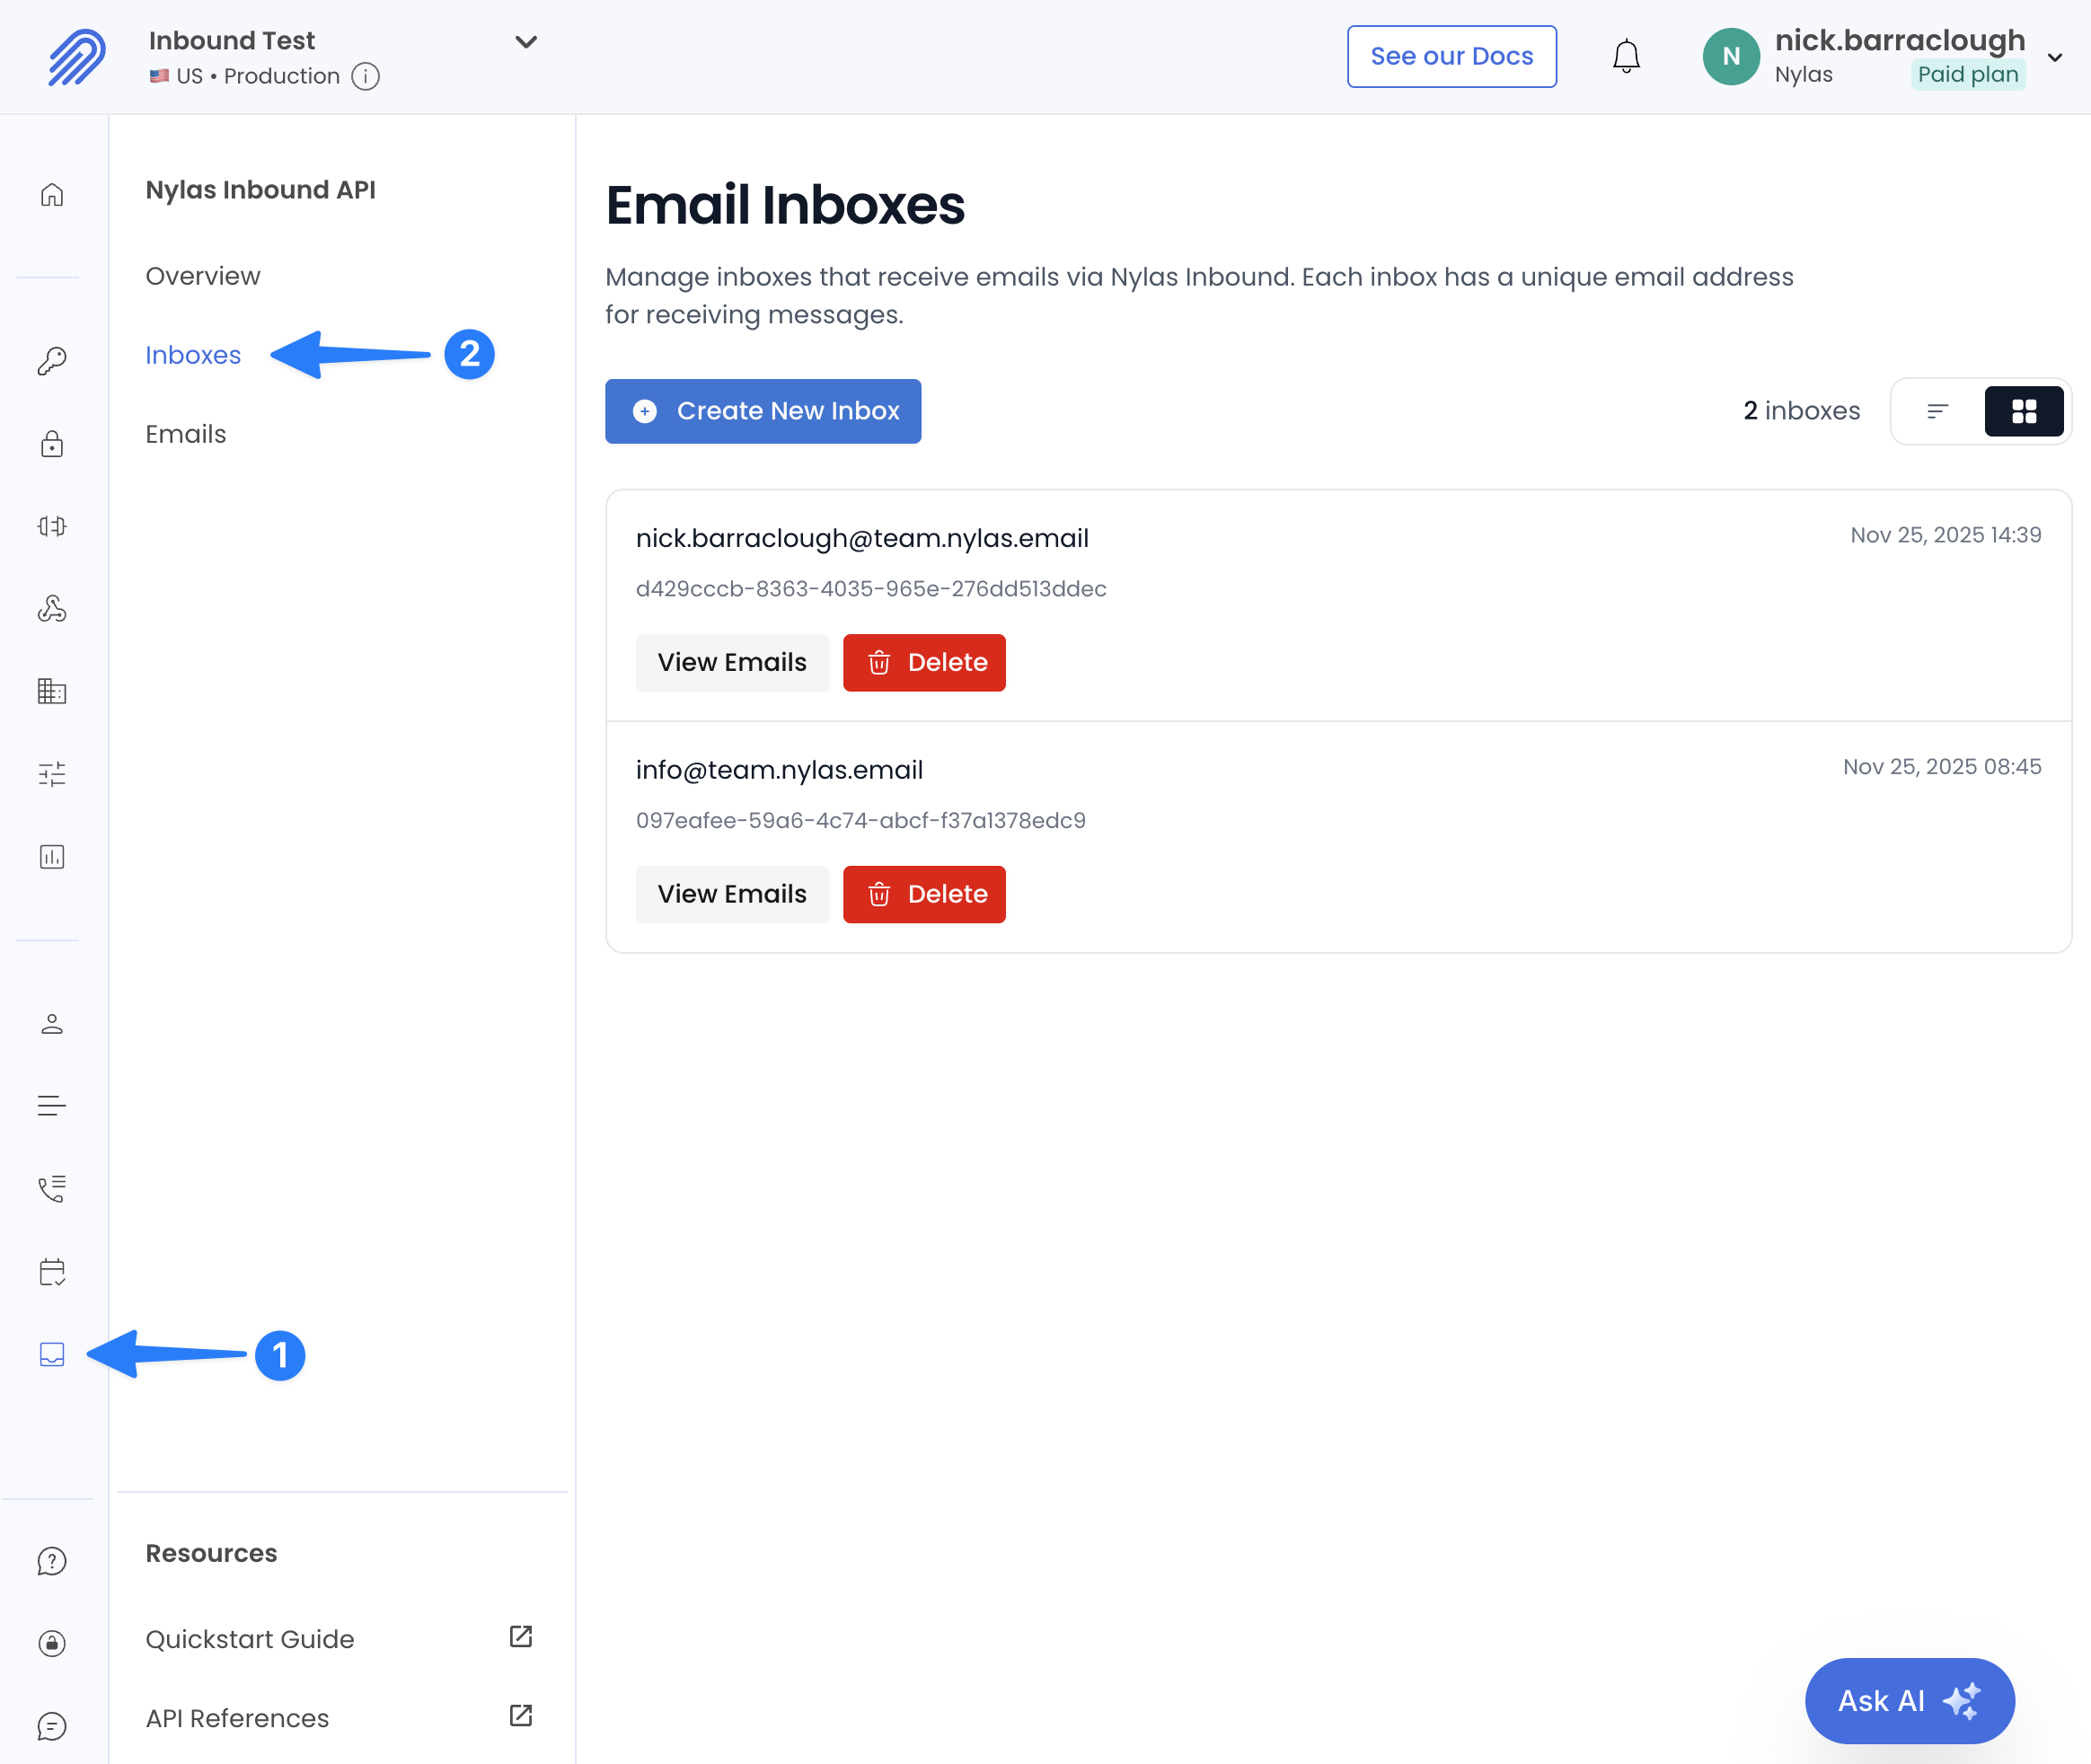
Section titled “Creating inboxes”On the left navigation, click Inbound and then Inboxes to create new mailboxes and see existing mailboxes.

Reading inboxes
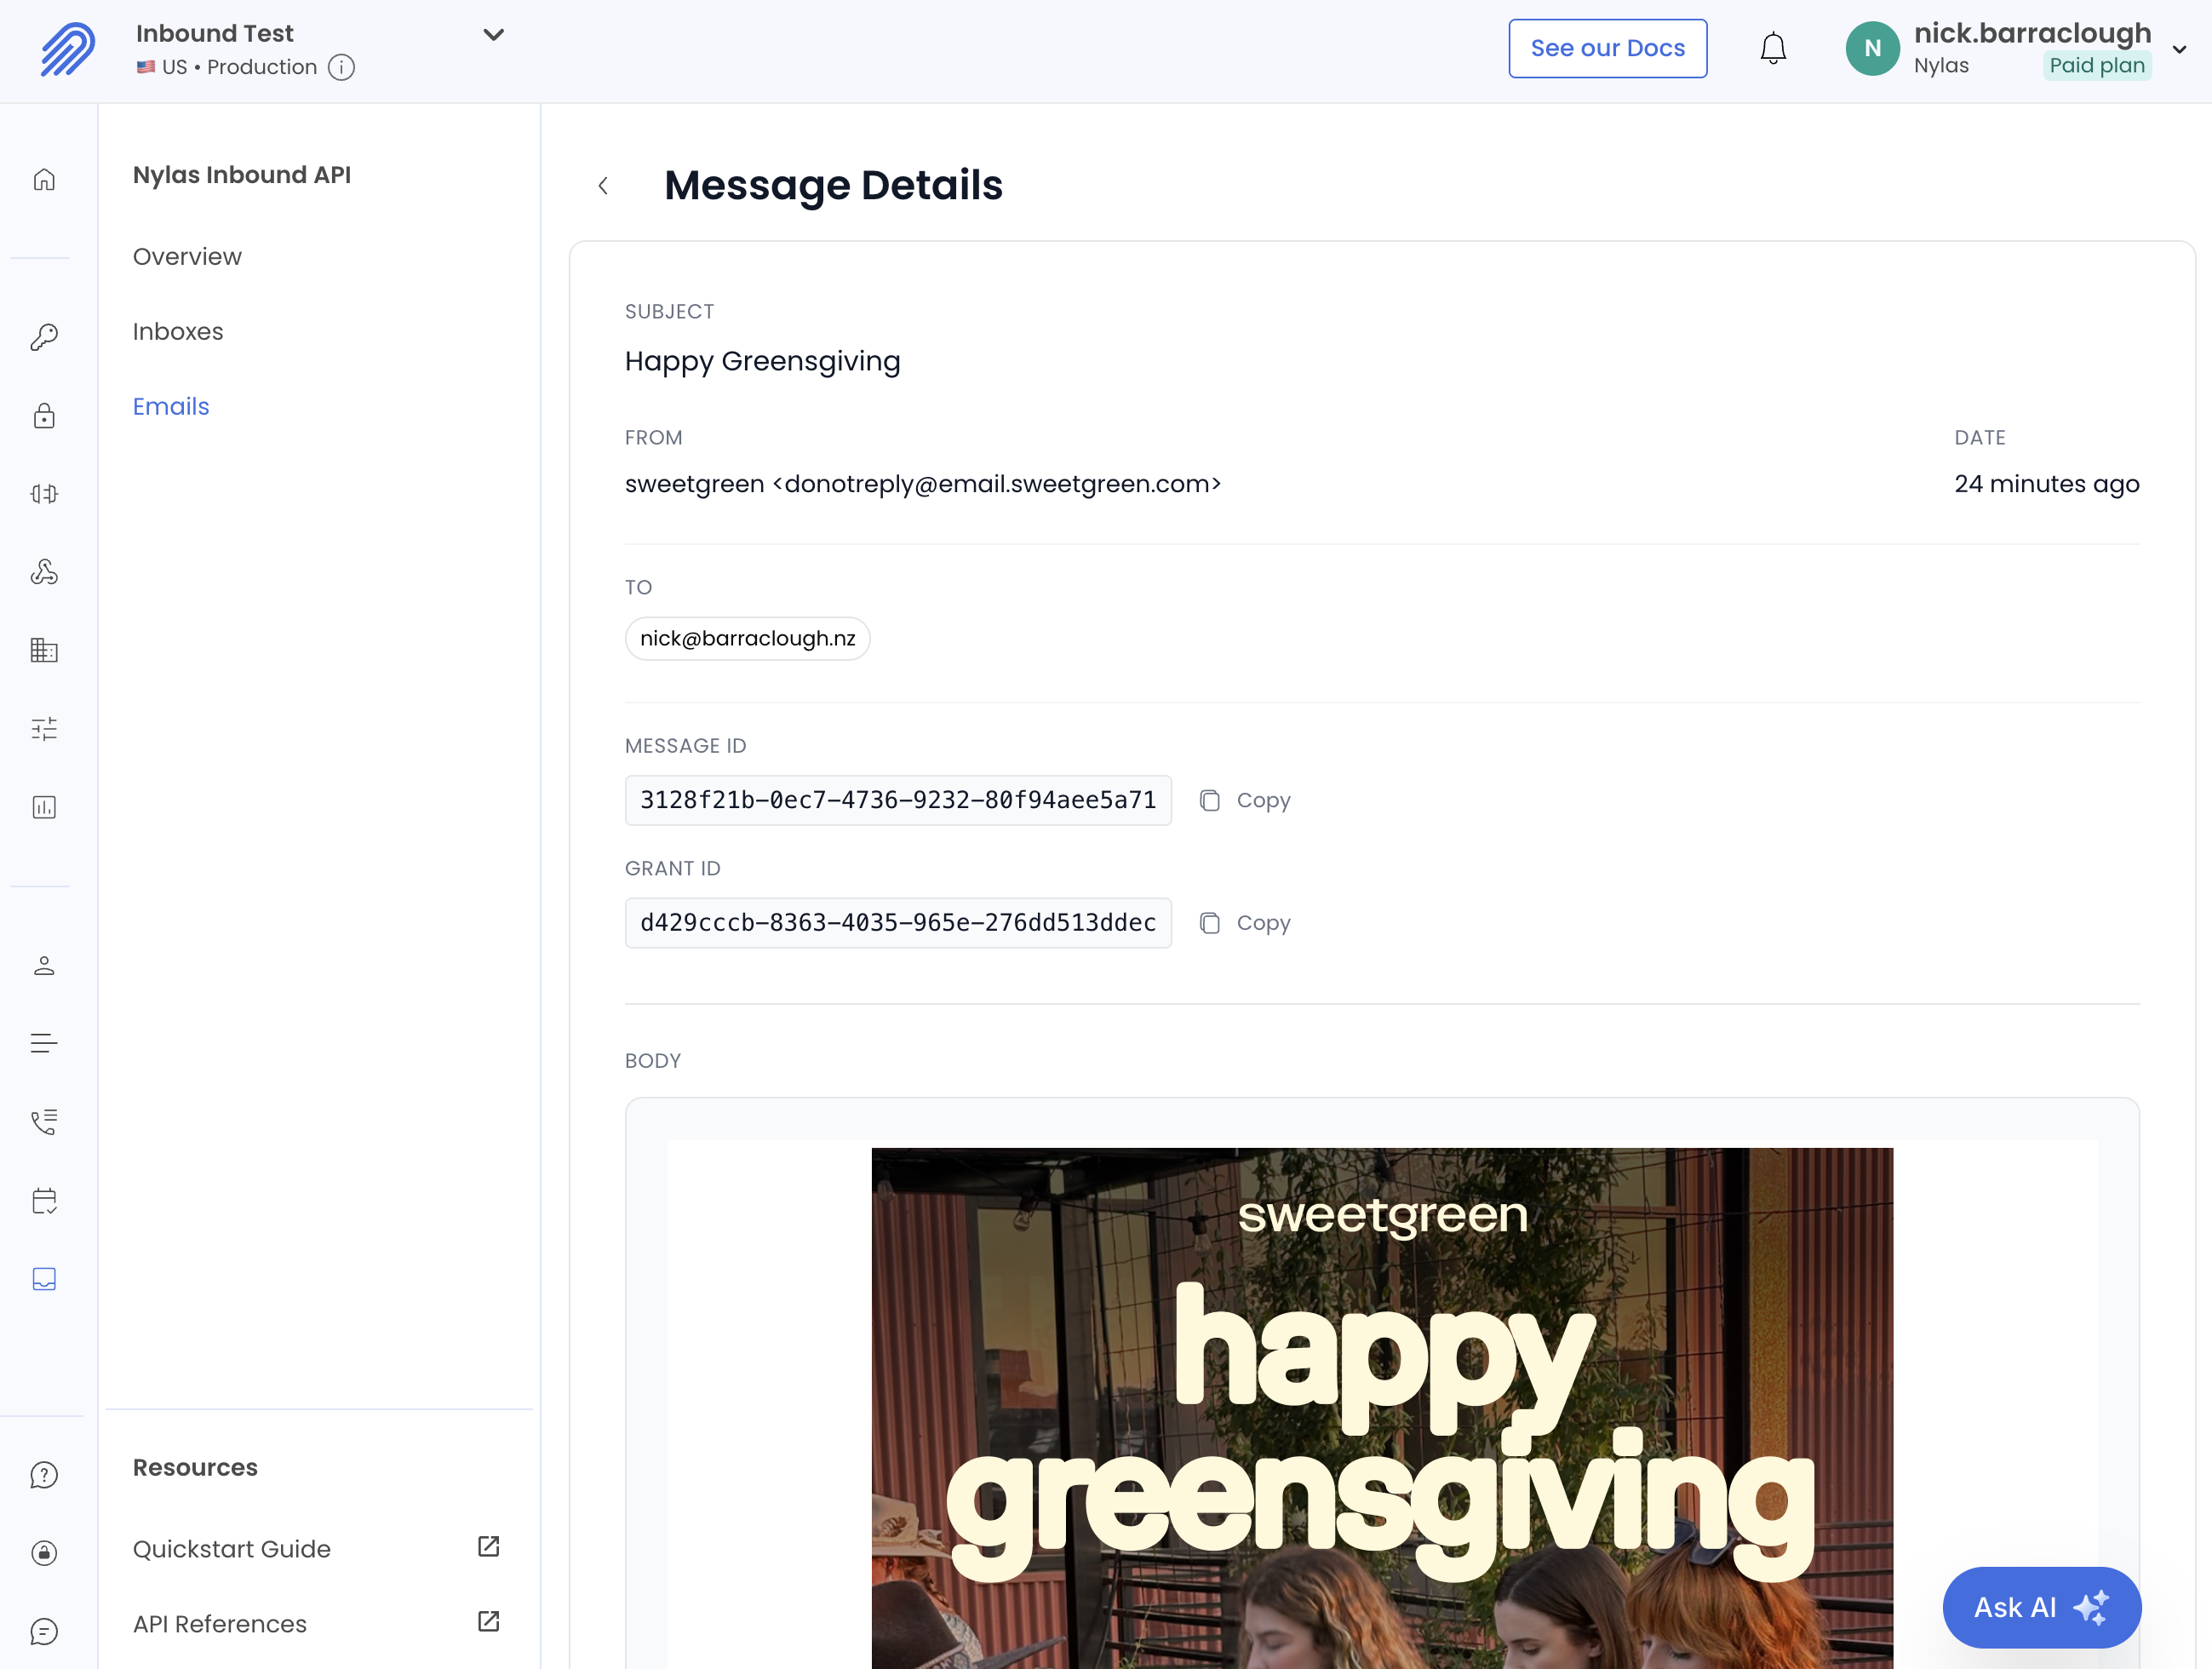
Section titled “Reading inboxes”The dashboard allows you to see existing mailboxes and read the contents of that mailbox.
Go to Inbound > Inboxes, and then click View Emails to see the contents of that inbox.
You can see the body of the email, the message ID, and the grant ID for that inbox.

Through the API
Section titled “Through the API”Creating inboxes
Section titled “Creating inboxes”Custom authentication is how you programmatically create inboxes for Nylas Inbound, using "provider": "inbox". This creates a Grant ID for that inbox, which you can use with the Email API to read the inbox with GET /messages.
Use your free Nylas domain (example):
curl --location 'https://api.us.nylas.com/v3/grants' \ --header 'Authorization: Bearer <API-Key>' \ --header 'Content-Type: application/json' \ --data-raw '{ "provider": "inbox", "settings": { "email": "[email protected]" } }'Reading inboxes
Section titled “Reading inboxes”Inboxes have a grant_id that you can use with the Email API to read the inbox.
List messages
Section titled “List messages”Use the GET /messages endpoint to list emails in the inbox:
curl --request GET \ --url 'https://api.us.nylas.com/v3/grants/<NYLAS_GRANT_ID>/messages?limit=5' \ --header 'Authorization: Bearer <NYLAS_API_KEY>' \ --header 'Content-Type: application/json'Get a specific message
Section titled “Get a specific message”Use the GET /messages/{id} endpoint to retrieve the full content of a specific email:
curl --request GET \ --url 'https://api.us.nylas.com/v3/grants/<NYLAS_GRANT_ID>/messages/<MESSAGE_ID>' \ --header 'Authorization: Bearer <NYLAS_API_KEY>' \ --header 'Content-Type: application/json'Handling attachments
Section titled “Handling attachments”If a message contains attachments, they will be included in the message object. Each attachment has an id that you can use to download the file.
- Get the attachment ID from the message object.
- Use the
GET /attachments/{id}/downloadendpoint to download the file content.
curl --request GET \ --url 'https://api.us.nylas.com/v3/grants/<NYLAS_GRANT_ID>/attachments/<ATTACHMENT_ID>/download?message_id=<MESSAGE_ID>' \ --header 'Authorization: Bearer <NYLAS_API_KEY>'Webhooks
Section titled “Webhooks”Nylas Inbound uses the message.created webhook to inform your application about new messages. There is a new "source": "inbox" which informs you that the message was received through Inbound. This can be set up on your Dashboard for your application, or through the POST /webhooks endpoint.
Create a Webhook with the message.created trigger to receive notifications for new Inbound messages:
curl --location 'https://api.us.nylas.com/v3/webhooks' \ --header 'Authorization: Bearer <API-Key>' \ --header 'Content-Type: application/json' \ --data-raw '{ "trigger_types": ["message.created"], "callback_url": "https://yourapp.example.com/webhooks/nylas" }'Test it!
Section titled “Test it!”From any email client, send an email to the address you created.
You will receive a message.created webhook similar to other providers’ Message objects.
Example payload:
{ "specversion": "1.0", "type": "message.created", "id": "<WEBHOOK_ID>", "time": 1723821985, "webhook_delivery_attempt": 1, "data": { "application_id": "<NYLAS_APPLICATION_ID>", "object": { "object": "message", "id": "<MESSAGE_ID>", "grant_id": "<NYLAS_GRANT_ID>", "subject": "Hello from Nylas", "date": 1723821981, "snippet": "This is a sample message" } }}For the full set of fields and variations, see the webhook schemas for message.created.