Follow this guide to set up hosted authentication for your iOS apps.
Requirements

- Xcode 11+
- iOS 11.0+
Before You Begin
- If you haven’t already, register app on provider’s console. Please, use Create a Google Application guide as a reference.
- Obtain
provider_client_idandprovider_client_secretfrom provider. - Specify the Nylas callback URL
https://api.us.nylas.com/connect/callbackandhttps://api-staging.us.nylas.com/connect/callbackto your authorized or trusted redirect URI’s.
Step 1: Create an Integration
Integrations are the provider you want to connect to the Nylas platform. Integrations let you add additional functionality to your Nylas accounts be connecting to services such as Google.
You only need to create an Integration once per provider and environment. If you have already created an Integration skip to Step 2.
Setup Basic Authentication using Nylas app client_id and client_secret. Important that you don’t confuse it with client_id and client_secret from your provider, for example, Google.
- Get (or create new) API key for your Nylas application
- Include in the header of your request like
Authorization: Bearer <NYLAS_API_KEY>
To create an integration use POST connect/integrations with Basic Auth included in request headers and following body:
{ "name": "Mobile Auth Demo", "provider": "google", "settings": { "client_id": "{provider_client_id}", "client_secret": "{provider_client_secret}" }, "redirect_uris": [ "application-url-scheme-placeholder://auth-callback" ], "scope": [ "https://www.googleapis.com/auth/gmail.readonly", "https://www.googleapis.com/auth/userinfo.email" ]}There are three required parameters in request’s body: name, provider, settings and recommended redirect_uri:
provideris an enum and might have in three following values:google,microsoft,imapsettingsis an object that need to includeprovider_client_idandprovider_client_secret.redirect_urishould include scheme that your mobile application can handle. Acceptable value for template app isnylas-demo-auth://but potentially could be anything your application could handle.- All other fields are optional.
Create and send your API request to create first integration. In case request has failed, visit Integrations API reference doc.
Step 2: Install OAuthSwift Library
Use Swift Package Manager to instal and manager dependencies.
-
In Xcode, with your app (or template app) project open, navigate to File → Add Packages
-
In a search field look for OAuthSwift library repository:
https://github.com/OAuthSwift/OAuthSwift.git -
Select OAuthSwift library.
-
Select Up to Next Major Version and specify
2.2.0version in as a lower bound of versions range.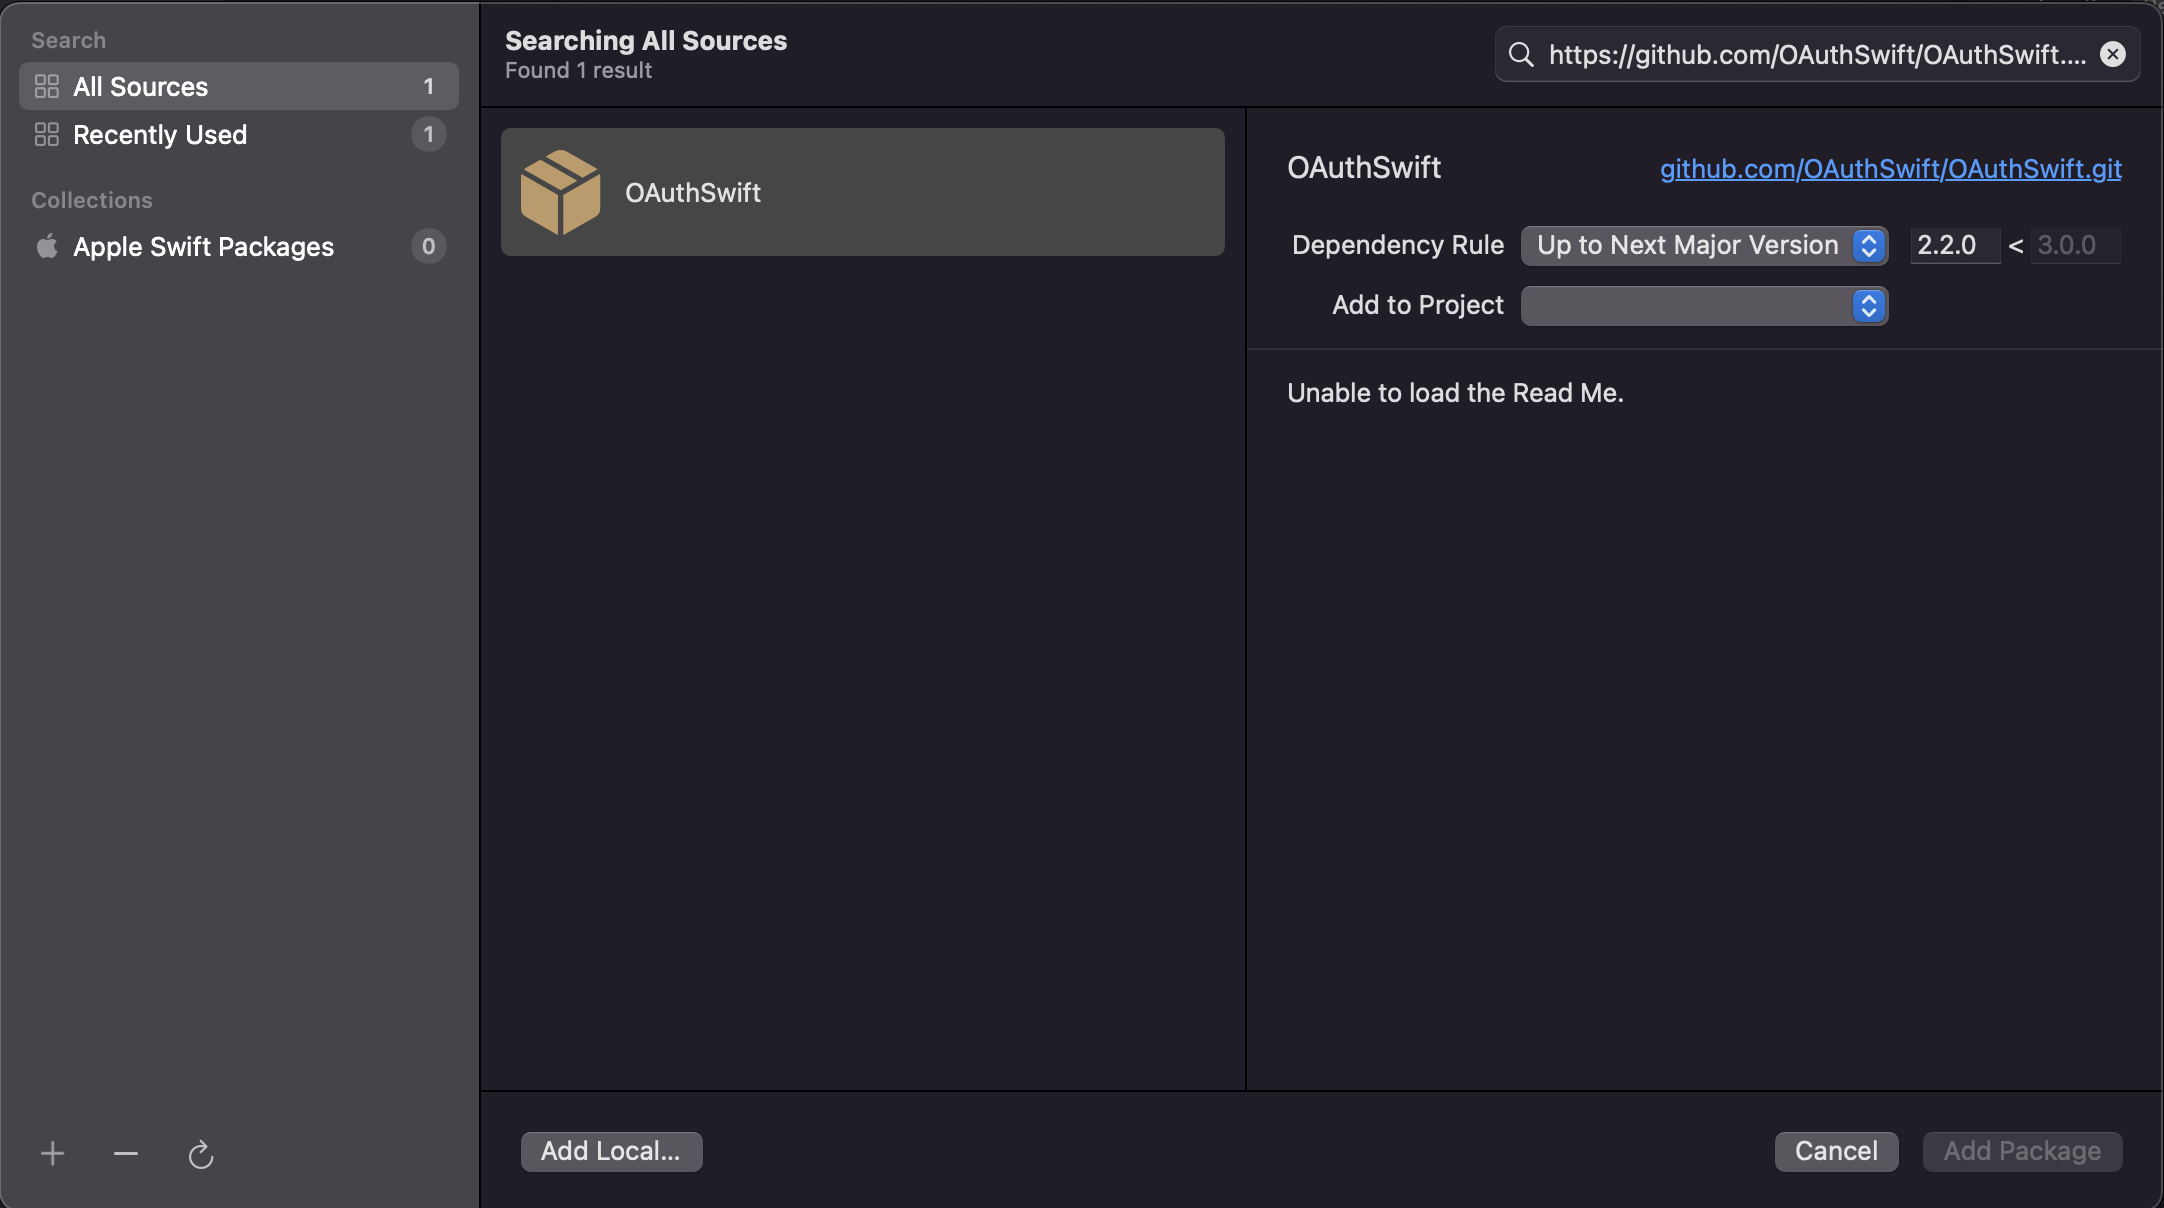
-
Select your project in Add to Project picker.
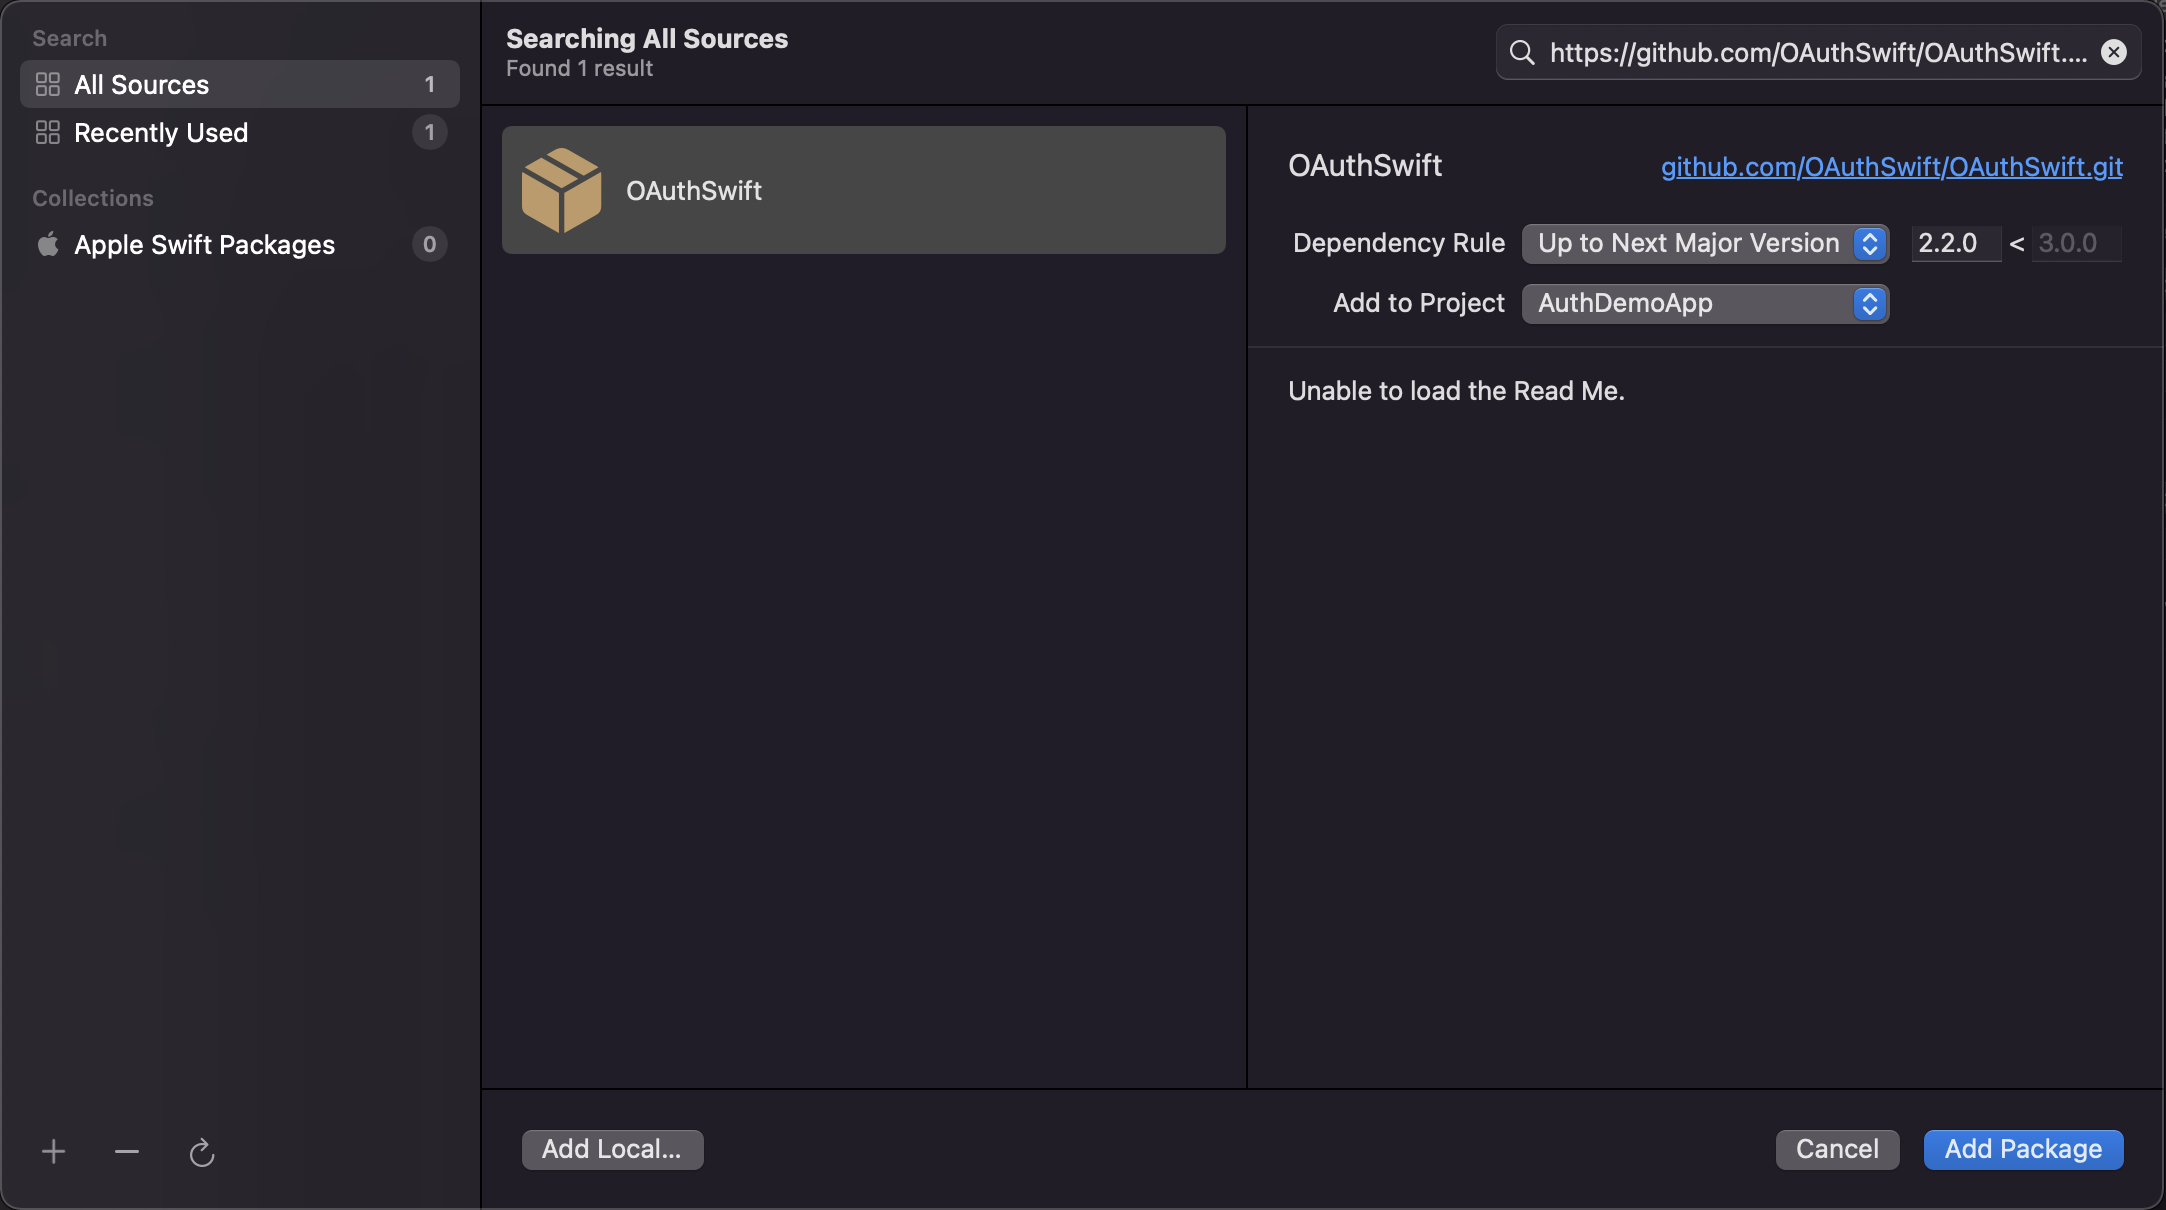
-
Press Add Package button to install the package.
As an alternative, OAuthSwift supports installation with CocoaPods in addition to Swift Package Manager. OAuthSwift distribution requires CocoaPods 1.10.0 or higher. Here’s how to install OAuthSwift using CocoaPods:
Create a Podfile if you don’t already have one. From the root of your project directory, run the following command in Terminal:
pod initThen to your Podfile, add the OAuthSwift pod.
platform :ios, '10.0'use_frameworks!
pod 'OAuthSwift', '~> 2.2.0'
Install the pods running following command in Terminal:
pod install --repo-updateMake sure you open your .xcworkspace file to see the project in Xcode.
Step 3: Configure Secrets and URL Schemes
OAuth process needs few account specific variables and environment where authorization will be performed. In order to configure that you need:
If you are using template app, go to Constants.swift and provide following parameters under API enumeration:
NYLAS_CLIENT_ID: Your Nylas application’s client ID.NYLAS_CLIENT_SECRET: Your Nylas application’s client secret.
In case you are integrating OAuth2.0 into your own application, consider some encrypted storage for sensitive data. We recommend to use xcconfigs or keychain access for your mobile devices
Example above made for presentation purposes only and we do not recommend to store any sensitive data, API keys, tokens as plain text in your project or under source control system. Please, consider using xcconfig or another encrypted approach to store sensitive data in a safe manner.
- Provide
baseURLinConstants.swiftfile. - Specify exactly the same URL scheme value used in creating integration in Step 1 for
callbackScheme. - Provide exactly the same value used in creating integration in Step 1 for
callback. - Provide
scopeinConstants.swift. Please, put scopes requested in Step 1 while creating integration.
Second part of OAuthSwift configuration is setting up URL schemes to handle redirect URI’s once authorization is completed. Applications can use Universal Links as redirect URI’s. To learn more about integration using Universal Links, please visit Using Universal Links as Redirect URI on iOS
With your project (or template app) open in Xcode, go to your target settings and select Info tab. Then open URL Types section and provide URL Scheme used for integration from Step 1.

Provided host nylas-demo-auth with the value using in Step 1.
Only host name is requested here. No need to put :// after a host name.
Handle redirect in either AppDelegate or SceneDelegate(starting from iOS 13 only). Add import OAuthSwift at the top of AppDelegate.swift file:
func application(_ app: UIApplication, open url: URL, options: [UIApplication.OpenURLOptionsKey : Any] = [:]) -> Bool { if url.host == Constants.callbackScheme { OAuthSwift.handle(url: url) } return true}In case project is using SceneDelegate.swift add import OAuthSwift there and implement following method:
func scene(_ scene: UIScene, openURLContexts URLContexts: Set<UIOpenURLContext>) { guard let url = URLContexts.first?.url else { return } if url.host == Constants.callbackScheme { OAuthSwift.handle(url: url) }}Step 4: Integrate OAuth 2.0 into application
If you are using template app, look for AuthViewModel.swift file and replace:
func performHostedAuth() { //Put code for hosted auth here}with following code:
func performHostedAuth() {    auth = OAuth2Swift(consumerKey: Constants.Secret.clientId,                        consumerSecret: Constants.Secret.clientSecret,                        authorizeUrl: Constants.Endpoint.auth,                        accessTokenUrl: Constants.Endpoint.token,                        responseType: Constants.responseType)
    _ = auth.authorize(withCallbackURL: Constants.Endpoint.callback,                        scope: Constants.scope,                        state: Constants.state,                        parameters: Constants.Request.params,                        headers: Constants.Request.headers,                        completionHandler: { [weak self] result in
        switch result {        case .success(let (credential, response, parameters)):            print("OAuth2.0: Token - \(credential.oauthToken)")            print("OAuth2.0: Response - \(String(describing: response))")            print("OAuth2.0: Parameters - \(parameters)")            self?.controller?.status = .authenticated        case .failure(let error):            print(error.localizedDescription)            self?.controller?.presentError()        }    })}
The auth instance should be retained since authorization is performed asynchronously. Template application has special variable defined within AuthViewModel class.
Build and Run application to any iPhone device or simulator. Once build is finished you should see app like on the screenshot below:
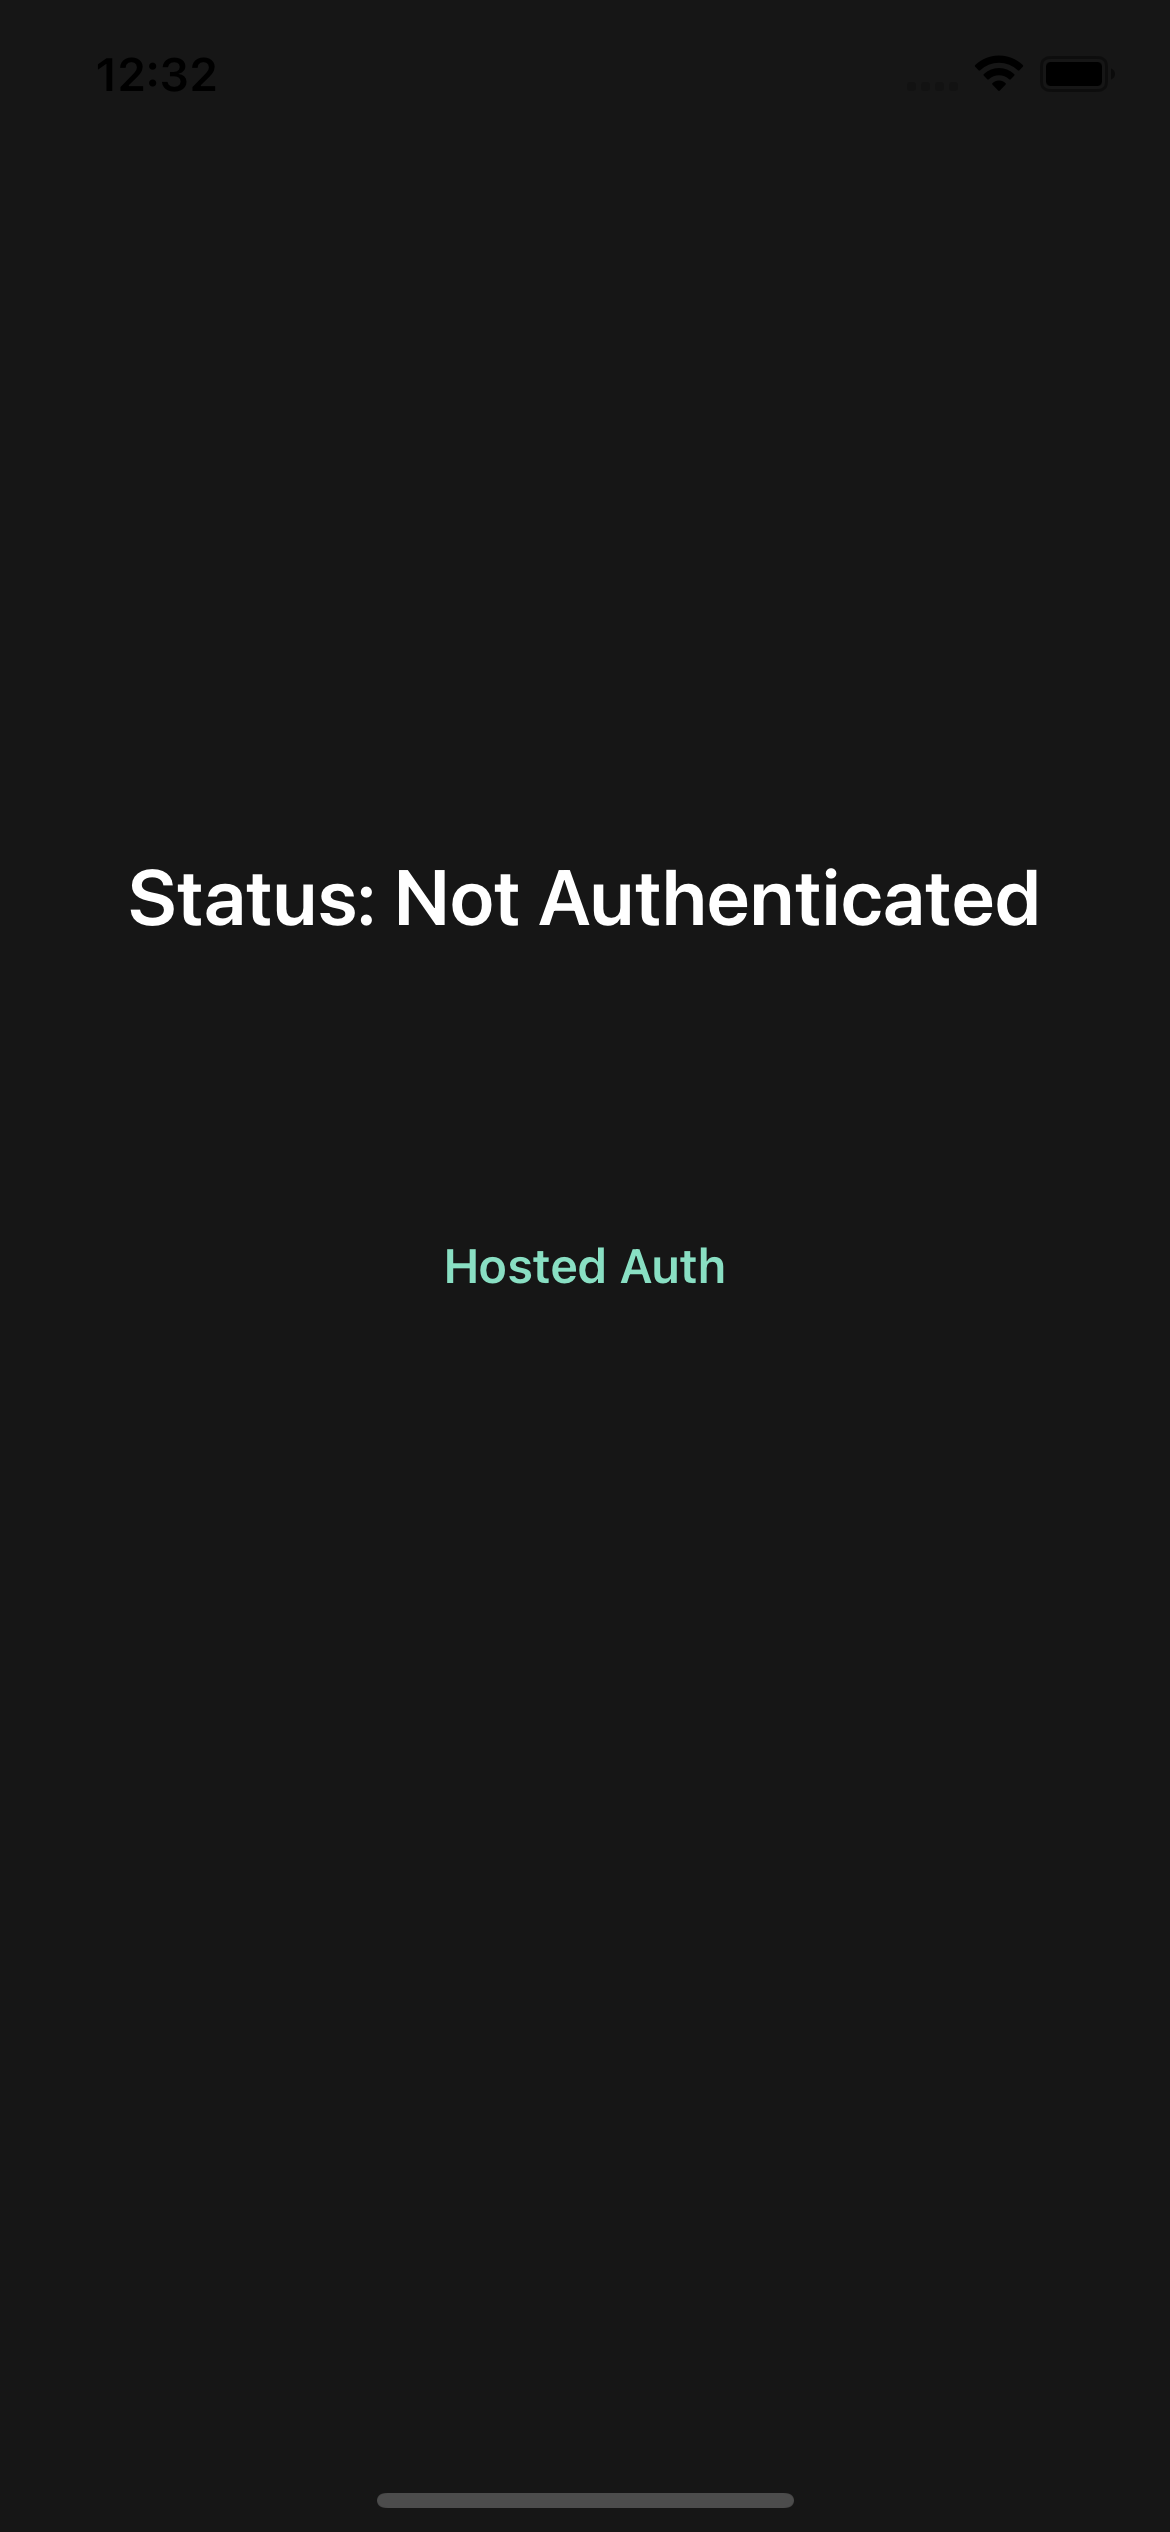
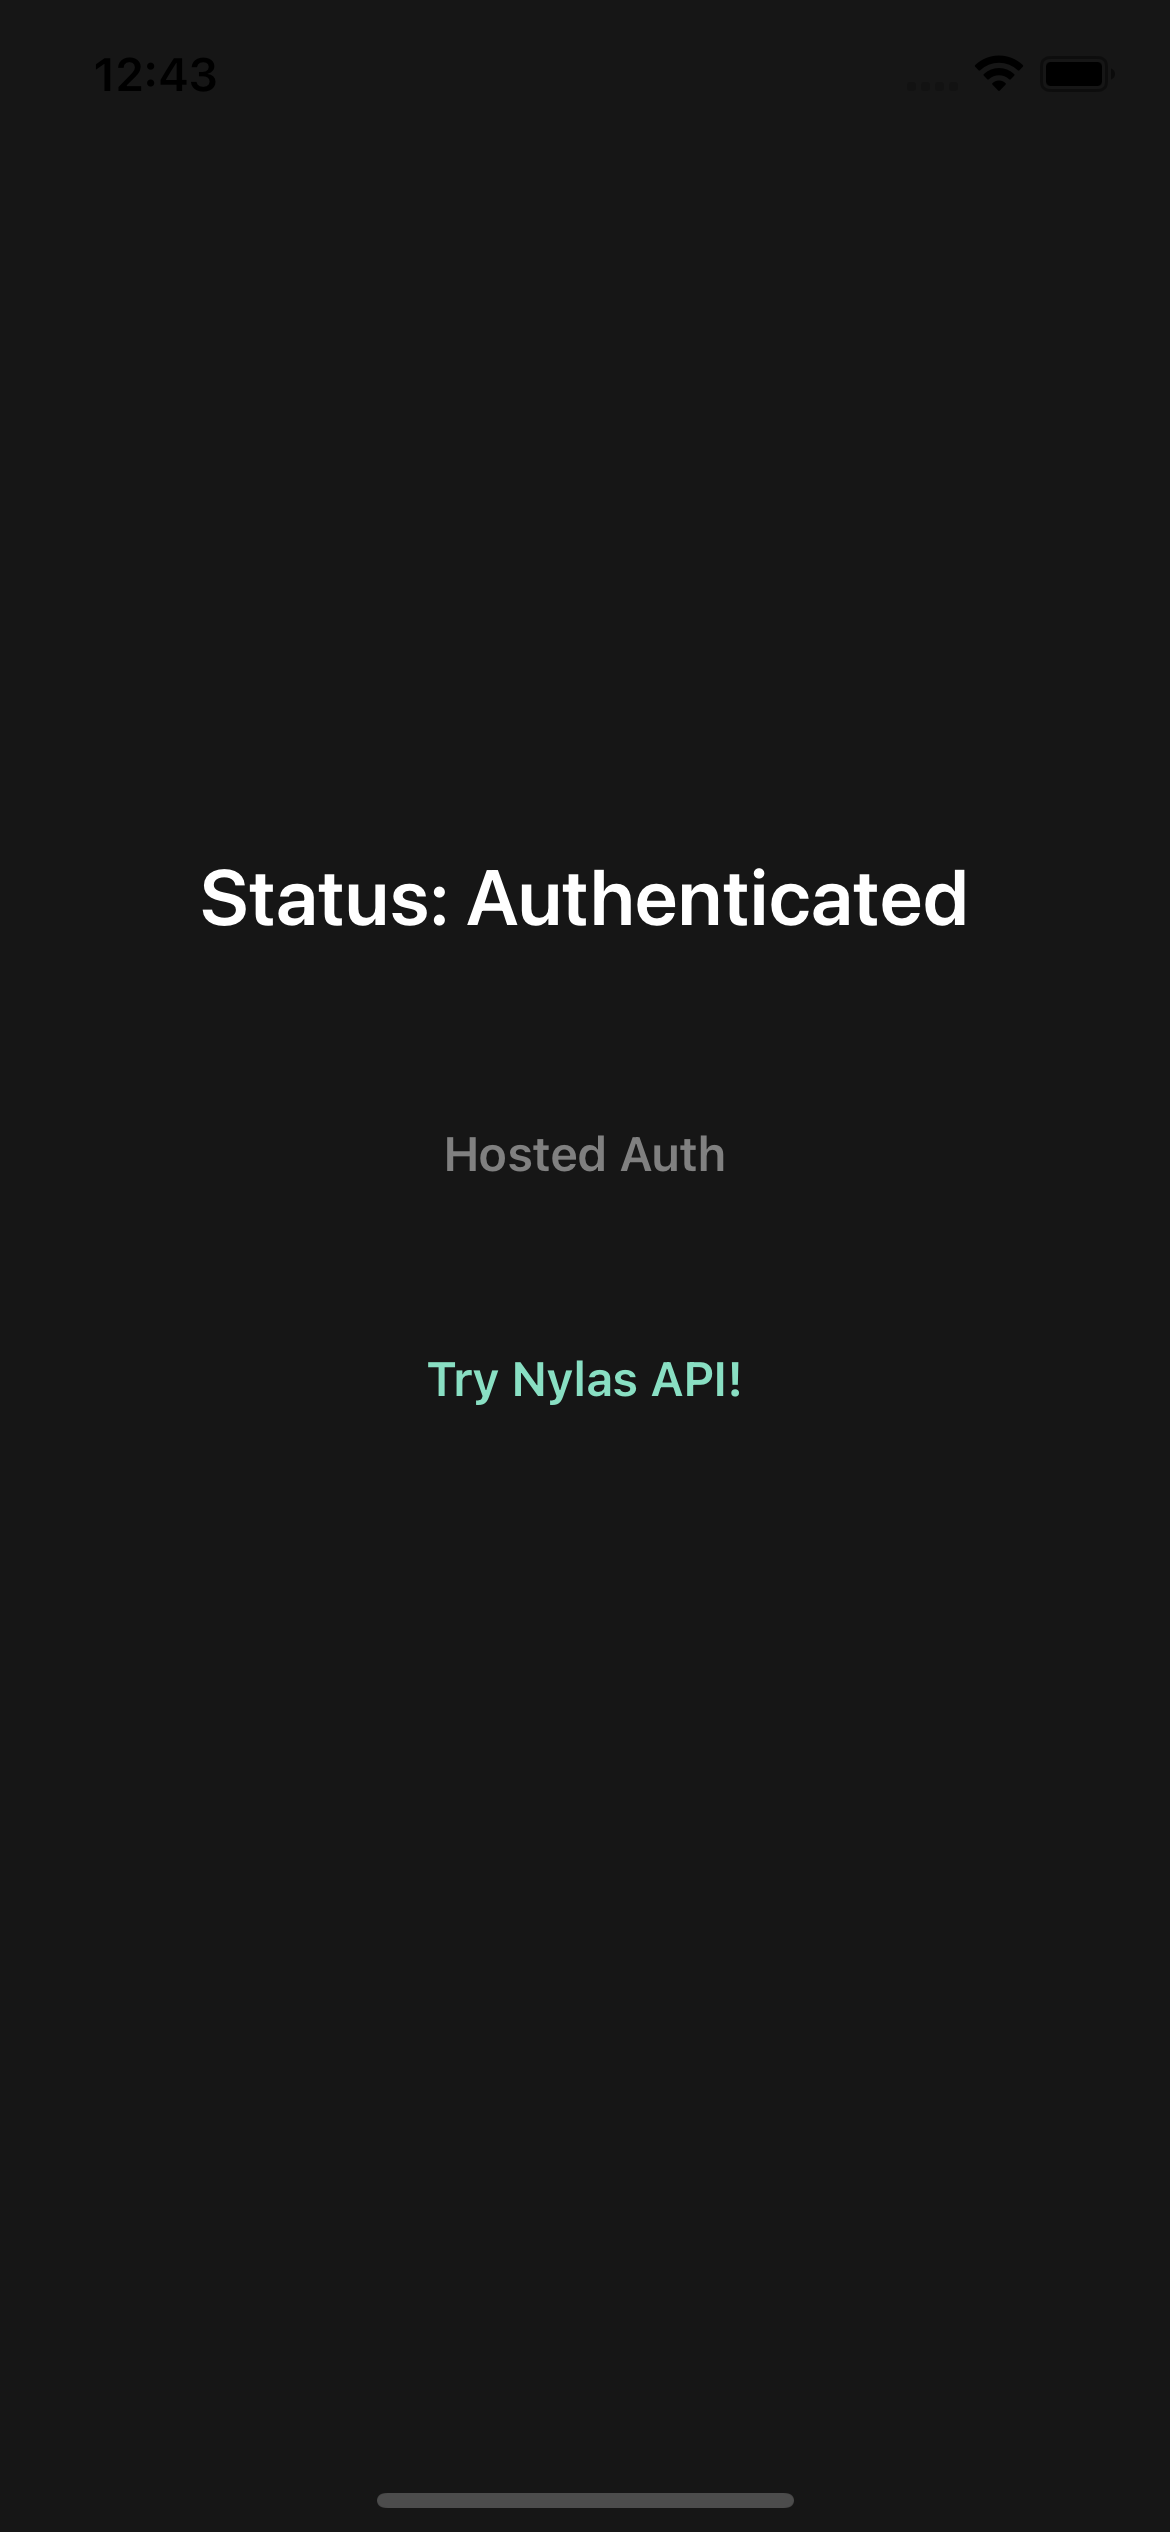
Press Hosted Auth button. Application will start User Consent flow in external browser. To learn how to change this behaviour visit Boosting Conversion Guide. Make sure you granted all the access requested on user consent screens. Once app is done you will see following application state:
Step 5: Enabling PKCE Support
OAuthSwift supports proof key for code exchange aka PKCE. There are only few adjustments needed to enable PKCE support for OAuth 2.0:
Define codeVerifier and codeChallenge using following rules:
codeVerifiermight be any string up to 256 characters long.codeChallengeshould be SHA256 equivalent ofcodeVerifierand be base64 encoded (with removed padding).
Switch usage of authorize() function to similar function that accepts codeVerifier and codeChallenge parameters. Entire code sample listed below:
func performHostedAuth() {    auth = OAuth2Swift(consumerKey: Constants.Secret.clientId,                            consumerSecret: Constants.Secret.clientSecret,                            authorizeUrl: Constants.Endpoint.auth,                            accessTokenUrl: Constants.Endpoint.token,                            responseType: Constants.responseType)
    auth.accessTokenBasicAuthentification = true
    guard let codeVerifier = String.randomCodeVerifier else { return }    guard let codeChallenge = codeVerifier.codeChallenge else { return }
    _ = auth.authorize(withCallbackURL: Constants.Endpoint.callback,                        scope: Constants.scope,                        state: Constants.state,                        codeChallenge: codeChallenge,                        codeChallengeMethod: Constants.challengeMethod,                        codeVerifier: codeVerifier,                        parameters: Constants.Request.params,                        headers: Constants.Request.headers,                        completionHandler: { [weak self] result in
        switch result {        case .success(let (credential, response, parameters)):            print("OAuth2.0: Token - \(credential.oauthToken)")            print("OAuth2.0: Response - \(String(describing: response))")            print("OAuth2.0: Parameters - \(parameters)")            self?.controller?.status = .authenticated        case .failure(let error):            print(error.localizedDescription)            self?.controller?.presentError()        }    })}
Boosting Conversion Guide
One of the good tips how to increase conversion is to keep your users in the same app for as long as you can. OAuthSwift library supports this out of the box for different iOS versions which depends on your minimum deployment target.
iOS 13+ gives an ability to use Authentication Services and specifically ASWebAuthenticationSession.
Provide and extension to UIWindow type to conform to ASWebAuthenticationPresentationContextProviding:
import AuthenticationServices
extension UIWindow: ASWebAuthenticationPresentationContextProviding {    public func presentationAnchor(for session: ASWebAuthenticationSession) -> ASPresentationAnchor {        return self    }}
After auth variable initialization in AuthViewModel.swift insert following code:
auth.authorizeURLHandler = WebAuthenticationSessionHandler(callbackUrlScheme: Constants.callbackScheme, presentationContextProvider: UIApplication.shared.topWindow)WebAuthenticationSessionHandler has third parameter prefersEphemeralWebBrowserSession which controls whether web authentication window will have access to cookies and data from external browser. Default values is false and we recommend to keep it as is. To learn more about ephemeral browsing visit Apple’s documentation.
iOS 11+ provides an ability to use SFAuthenticationSession to achieve similar to Authentication Services behaviour.
After auth variable initialization in AuthViewModel.swift insert following code:
auth.authorizeURLHandler = SafariAuthenticationSessionHandler(callbackUrlScheme: Constants.callbackScheme)In case your application supports multiple version starting from iOS 11 some universal solution might be provided:
if #available(iOS 13, *) { auth.authorizeURLHandler = WebAuthenticationSessionHandler(callbackUrlScheme: Constants.callbackScheme, presentationContextProvider: UIApplication.shared.topWindow)} else { auth.authorizeURLHandler = SafariAuthenticationSessionHandler(callbackUrlScheme: Constants.callbackScheme)}Using this approach does not require to setup custom URL scheme as shown in Step 3. Both Authentication and Safari services uses internal custom URL scheme that will not be exposed publicly for entire application. Error and URL handling happening internally in closure provided by WebAuthentication or SafariAuthentication sessions. Make sure to remove custom URL scheme from your info.plist.