The Scheduler Editor component lets your users access the Scheduler Editor from your project, so they can create and manage Configurations.
This page explains how to handle authentication, embed the component, and customize it.
How the Scheduler Editor component works
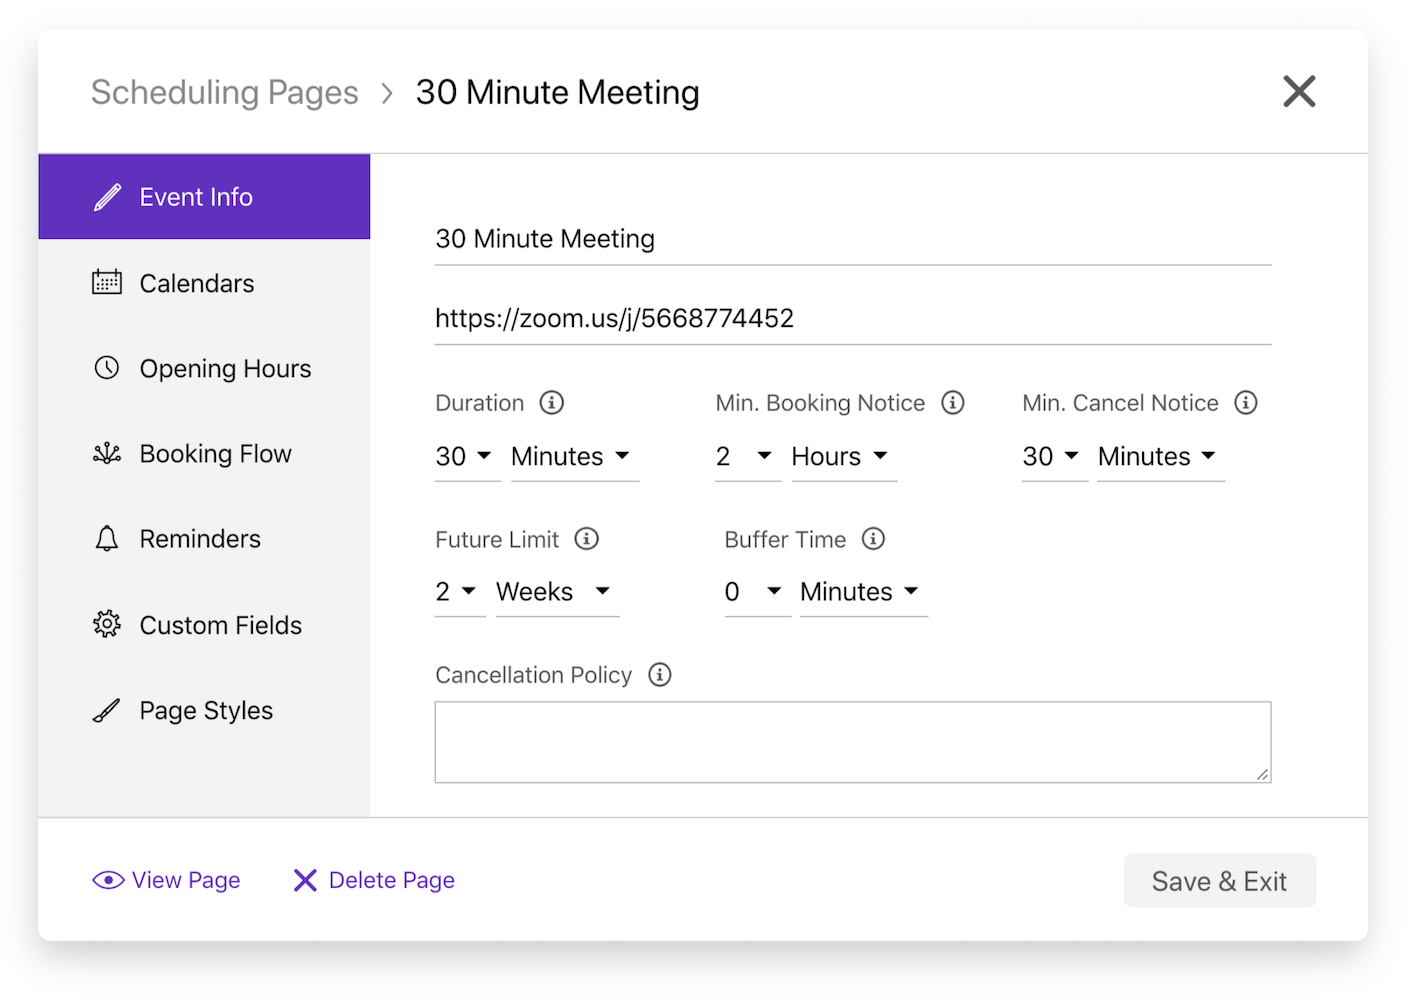
Section titled “How the Scheduler Editor component works”Nylas offers the Scheduler Editor component as a pre-built, extensible web- (HTML/Vanilla JS) and React-based UI component. After you add it to your project, organizers can use the Scheduler Editor to create and customize Configurations from your application. Organizers can use the component to…
- Configure events: Set titles, descriptions, durations, and locations.
- Manage availability: Set working hours, time slots, and scheduling methods.
- Manage participants: Add participants to bookings and set their availability.
- Customize bookings: Customize booking forms and confirmation settings.
- Style Scheduling Pages: Add your brand to your Scheduling Pages with custom logos and colors.
The Scheduler Editor component includes…
- Custom event handlers that let you define specific logic or behavior for user actions.
- Composable components that let you customize how each element is arranged and rendered in the UI.
- Custom UI stylings that support CSS shadow parts for a higher level of customization.
The component supports two configuration modes: app and composable. By default, it’s set to app mode. In this mode, the Scheduling component renders all elements it contains, meaning you can embed the pre-built component in your project with minimal configuration. composable mode allows you to customize how the Scheduling component arranges and renders each element in the UI. In this mode, you can embed elements as standalone components.
For more information, see the Scheduler UI components references.
Before you begin
Section titled “Before you begin”Before you can use the Scheduler Editor component, you need to…
-
Install the latest
@nylas/reactpackage.npm install @nylas/reactyarn add @nylas/reactpnpm add @nylas/react -
Set up authentication using either
nylasSessionsConfigornylasApiRequest.
Set up authentication with nylasSessionsConfig
Section titled “Set up authentication with nylasSessionsConfig”To set up Hosted OAuth for the Scheduler Editor component, set the nylasSessionsConfig property.
<html>  <body>    <nylas-scheduler-editor />    <script type="module">      import { defineCustomElement } from "https://cdn.jsdelivr.net/npm/@nylas/web-elements@latest/dist/cdn/nylas-scheduler-editor/nylas-scheduler-editor.es.js";
      defineCustomElement();
      const schedulerEditor = document.querySelector("nylas-scheduler-editor");
      schedulerEditor.nylasSessionsConfig = {        clientId: "<NYLAS_CLIENT_ID>",        redirectUri: `${window.location.origin}/scheduler-editor`,        domain: "https://api.us.nylas.com/v3",        hosted: true,        accessType: "offline",      };    </script>  </body></html>
import React from "react";import { NylasSchedulerEditor } from "@nylas/react";
function App() { return ( <NylasSchedulerEditor nylasSessionsConfig={{ clientId: "<NYLAS_CLIENT_ID>", redirectUri: `${window.location.origin}/scheduler-editor`, domain: "https://api.us.nylas.com/v3", hosted: true, accessType: "offline", }} /> );}
export default App;Set up authentication with nylasApiRequest
Section titled “Set up authentication with nylasApiRequest”You have two options for setting up authentication using nylasApiRequest:
- Using
nylasApiRequestwith theNylasIdentityRequestWrapperfor existing Hosted OAuth flows. - Using
nylasApiRequestwith theCustomIdentityRequestWrapperfor existing Bring Your Own Authentication flows.
Set up authentication with NylasIdentityRequestWrapper
Section titled “Set up authentication with NylasIdentityRequestWrapper”You can use nylasApiRequest with the NylasIdentityRequestWrapper to configure the Scheduler Editor component with your existing Hosted OAuth details.
<html class="h-full bg-white" lang="en"> <head> <meta charset="UTF-8" /> <meta name="viewport" content="width=device-width, initial-scale=1.0" /> <title> Nylas Scheduler Editor with auth using NylasIdentityRequestWrapper </title>
<link rel="preconnect" href="https://fonts.googleapis.com" /> <link rel="preconnect" href="https://fonts.gstatic.com" crossorigin /> <link rel="stylesheet" />
<style type="text/css"> body { font-family: "Inter", sans-serif; } </style> </head>
<body class="h-full"> <div class="grid h-full place-items-center"> <!-- Add the Nylas Scheduler Editor Component --> <nylas-scheduler-editor /> </div>
<!-- Configure the Nylas Scheduler Editor Component --> <script type="module"> import { defineCustomElement } from "https://cdn.jsdelivr.net/npm/@nylas/web-elements@latest/dist/cdn/nylas-scheduler-editor/nylas-scheduler-editor.es.js"; import { NylasSessions } from "https://cdn.jsdelivr.net/npm/@nylas/identity@latest/dist/nylas-identity.es.js"; import { NylasIdentityRequestWrapper } from "https://cdn.jsdelivr.net/npm/@nylas/web-elements@latest/dist/esm/index.js";
defineCustomElement();
// Specify settings for Nylas identity management const config = { clientId: "<NYLAS_CLIENT_ID>", redirectUri: `${window.location.origin}/login`, domain: "https://api.us.nylas.com/v3", hosted: false, accessType: "offline", };
const identity = new NylasSessions(config);
async function checkLoggedIn() { const loggedIn = await identity.isLoggedIn(); return loggedIn; }
// Create new nylasApiRequest instance const nylasApiRequest = new NylasIdentityRequestWrapper(identity);
// Specify Scheduler Editor Component details const schedulerEditor = document.querySelector("nylas-scheduler-editor"); schedulerEditor.nylasApiRequest = nylasApiRequest; schedulerEditor.schedulerPreviewLink = `${window.location.origin}/?config_id={config.id}`;
schedulerEditor.eventOverrides = { // The default behavior of the close button is to log the user out, so redirect to the login page. schedulerConfigCloseClicked: async (e) => { setTimeout(async () => { window.location.href = `${window.location.origin}/login`; }, 3000); }, };
schedulerEditor.defaultSchedulerConfigState = { selectedConfiguration: { requires_session_auth: false, // Creates a public Configuration. }, };
// Redirect to the login page if the user is not logged in. checkLoggedIn().then((loggedIn) => { if (!loggedIn) { window.location.href = `${window.location.origin}/login`; } }); </script> </body></html>import { BrowserRouter, Route, Routes } from "react-router-dom";import { NylasSchedulerEditor, NylasScheduling } from "@nylas/react";import LoginComp from "@nylas/login-component";import "./App.css";import { NylasSessions } from "@nylas/identity";import { NylasIdentityRequestWrapper } from "@nylas/react";
function App() { // Get the configuration ID from the URL query string const urlParams = new URLSearchParams(window.location.search); const clientId = "<NYLAS_CLIENT_ID>"; const configId = urlParams.get("config_id") || "";
const componentSettings = { // Adjust the scopes as needed authSettings: { scopes: { google: [ "openid", "https://www.googleapis.com/auth/userinfo.email", "https://www.googleapis.com/auth/userinfo.profile", "https://www.googleapis.com/auth/contacts", "https://www.googleapis.com/auth/calendar", "https://www.googleapis.com/auth/directory.readonly", ], microsoft: [ "Calendars.ReadWrite", "Mail.ReadWrite", "Contacts.ReadWrite", "User.Read", "offline_access", ], }, }, };
const identitySettings = { clientId: clientId, redirectUri: `${window.location.origin}/nylas-auth/scheduler-editor`, domain: "https://api.us.nylas.com/v3", hosted: true, accessType: "offline", };
const identity = new NylasSessions(identitySettings); const nylasApiRequest = new NylasIdentityRequestWrapper(identity);
return ( <BrowserRouter> <Routes> <Route path="/meet" element={ <div> <a href="/scheduler-editor" className="button"> View Scheduler Editor </a>
<NylasScheduling configurationId={configId} schedulerApiUrl="https://api.us.nylas.com" /> </div> } />
<Route path="/login" element={ <div> <LoginComp clientId={clientId} redirectUri={`${window.location.origin}/nylas-auth/scheduler-editor`} config={componentSettings} identity={identity} popup={false} hosted={false} /> </div> } />
<Route path="/nylas-auth/scheduler-editor" element={ <div> <NylasSchedulerEditor schedulerPreviewLink={`${window.location.origin}/meet?config_id={config.id}`} nylasApiRequest={nylasApiRequest} defaultSchedulerConfigState={{ selectedConfiguration: { requires_session_auth: false, // Creates a public Configuration. }, }} /> </div> } /> </Routes> </BrowserRouter> );}
export default App;Set up authentication with CustomIdentityRequestWrapper
Section titled “Set up authentication with CustomIdentityRequestWrapper”If you want to use your existing Bring Your Own (BYO) authentication configuration or a different HTTP library to authenticate users, you can set up the CustomIdentityRequestWrapper. This implements nylasApiRequest.
Once you have an access token, you can use it in CustomIdentityRequestWrapper and the Scheduler Editor component. Make sure that CustomIdentityRequestWrapper has a currentUser function that returns the email address associated with the access token.
<html class="h-full bg-white" lang="en"> <head> <meta charset="UTF-8" /> <meta name="viewport" content="width=device-width, initial-scale=1.0" /> <title>Nylas Scheduler Editor Component</title>
<link rel="preconnect" href="https://fonts.googleapis.com" /> <link rel="preconnect" href="https://fonts.gstatic.com" crossorigin /> <link rel="stylesheet" />
<script src="https://cdn.tailwindcss.com"></script>
<style type="text/css"> body { font-family: "Inter", sans-serif; } </style> </head>
<body class="h-full"> <div class="grid h-full place-items-center"> <!-- Add the Nylas Scheduler Editor Component --> <nylas-scheduler-editor /> </div>
<!-- Configure the Nylas Scheduler Editor Component --> <script type="module"> import { defineCustomElement } from "https://cdn.jsdelivr.net/npm/@nylas/web-elements@latest/dist/cdn/nylas-scheduler-editor/nylas-scheduler-editor.es.js"; import { CustomIdentityRequestWrapper } from "./custom.js";
defineCustomElement();
const schedulerEditor = document.querySelector("nylas-scheduler-editor"); schedulerEditor.schedulerPreviewLink = `${window.location.origin}/?config_id={config.id}`;
const accessToken = "<NYLAS_ACCESS_TOKEN>"; const domain = "https://api.us.nylas.com/v3";
// Create an instance of the CustomIdentityRequestWrapper class defined above. const nylasApiRequest = new CustomIdentityRequestWrapper( accessToken, domain, ); schedulerEditor.nylasApiRequest = nylasApiRequest;
schedulerEditor.defaultSchedulerConfigState = { selectedConfiguration: { requires_session_auth: false, // Creates a public Configuration. }, }; </script> </body></html>import { BrowserRouter, Route, Routes } from "react-router-dom";import { NylasSchedulerEditor, NylasScheduling } from "@nylas/react";import { CustomIdentityRequestWrapper } from "./custom";import "./App.css";
function App() { const accessToken = "<NYLAS_ACCESS_TOKEN>"; const domain = "https://api.us.nylas.com/v3";
// Get the configuration ID from the URL query string. const urlParams = new URLSearchParams(window.location.search); const configId = urlParams.get("config_id") || "";
const nylasApiRequest = new CustomIdentityRequestWrapper(accessToken, domain);
return ( <BrowserRouter> <Routes> <Route path="/meet" element={ <div> <a href="/scheduler-editor" className="button"> View Scheduler Editor </a>
<NylasScheduling configurationId={configId} schedulerApiUrl="https://api.us.nylas.com" /> </div> } />
<Route path="/custom-auth/scheduler-editor" element={ <div> <NylasSchedulerEditor schedulerPreviewLink={`${window.location.origin}/meet?config_id={config.id}`} nylasApiRequest={nylasApiRequest} defaultSchedulerConfigState={{ selectedConfiguration: { requires_session_auth: false, // Creates a public Configuration. }, }} /> </div> } /> </Routes> </BrowserRouter> );}
export default App;export class CustomIdentityRequestWrapper { private accessToken: string;
constructor(accessToken: string) { // Initialize the class this.accessToken = accessToken; } async request<T = any>(args: any): Promise<T> { try { const response = await fetch(`https://api.us.nylas.com/v3/grants/me/${args.path}`, { method: args.method, body: JSON.stringify(args.body), headers: { ...args.headers, 'Authorization': `Bearer ${this.accessToken}`, 'Content-Type': 'application/json', }, });
// Check if the response is not okay (e.g., 404, 500) if (!response.ok) { console.error(`Error: ${response.status} ${response.statusText}`); return { error: `Error: ${response.status} ${response.statusText}` } as any; }
// Parse the response const data = await response.json(); return [data, null] as any; } catch (error) { console.error('Fetch error:', error); return [null, error] as any; } }
/** * This method returns the current user's information. */
async currentUser() { // IMPLEMENT: Get the logged in user's ID token and return the user information. return { id: 'idToken.sub', name: 'John Doe', provider: 'google', }; }
/** * This method sets the default authentication arguments to use when authenticating the user. */ async setDefaultAuthArgs(authArgs: any) { // Set the default authentication arguments. return authArgs; };
/** * This method returns the URL to redirect the user to for authentication. */ async authenticationUrl(): Promise<string | undefined> { // IMPLEMENT: Return the URL to redirect the user to for authentication. return 'https://example.com/auth'; }}Embed Scheduler Editor component
Section titled “Embed Scheduler Editor component”To embed the Scheduler Editor in your project, import the NylasSchedulerEditor component and configure it to suit your needs.
<!DOCTYPE html><html> <head> <title>Scheduler Integration</title> <script src="https://cdn.jsdelivr.net/npm/@nylas/[email protected]/dist/cdn/nylas-scheduler-editor/nylas-scheduler-editor.es.js"></script> </head> <body> <div id="scheduler-editor-container"> <nylas-scheduler-editor enable-user-feedback="true" default-language="en"> </nylas-scheduler-editor> </div> </body></html>import { NylasSchedulerEditor } from "@nylas/react";
function SchedulerEditorPage() { return ( <div className="scheduler-editor-container"> <NylasSchedulerEditor enableUserFeedback={true} defaultLanguage="en" /> </div> );}Once it’s embedded, organizers can use the Scheduler Editor component to create and customize Configurations within your application. If you prefer to create Configurations manually, see Create Configuration with Scheduler API.
Customize Scheduler Editor component
Section titled “Customize Scheduler Editor component”The Scheduler Editor component includes many customization options — the following sections cover a few. For more options, see the NylasSchedulerEditor component references.
Customize event handlers
Section titled “Customize event handlers”Scheduler’s event handlers respond to user actions and control the operations that follow. Each event handler is associated with a specific type of event (for example, formSubmitted or previewButtonClicked).
You can use the eventOverrides property to customize the default event handlers to use specific logic or behaviors. For example, you can add or remove steps in your booking flow, track user interactions for analytics, update the available time slots when the user selects a date, and much more.
This example defines custom logic to perform after the schedulerConfigChanged event is triggered.
<html>  <body>    <nylas-scheduler-editor />
    <!-- Configure the Scheduler Editor Component -->    <script type="module">      import { defineCustomElement } from "https://cdn.jsdelivr.net/npm/@nylas/web-elements@latest/dist/cdn/nylas-scheduler-editor/nylas-scheduler-editor.es.js";
      defineCustomElement();
      const schedulerEditor = document.querySelector("nylas-scheduler-editor");
schedulerEditor.eventOverrides = { schedulerConfigChanged: async (event) => { // Any task that you want to perform console.log(event); }, }; </script> </body></html><NylasSchedulerEditor eventOverrides={{ schedulerConfigChanged: async (event) => { // Any task that you want to perform. console.log(event); }, }}></NylasSchedulerEditor>;This event is triggered when the user takes an action, and it makes a call to the Scheduler APIs. For example, when a user clicks Create to create a Scheduling Page, the event is triggered and the handler makes a Create Configuration request.
Disable Scheduling Page Manager view
Section titled “Disable Scheduling Page Manager view”You can set the configurationId to point to a specific Configuration. This disables the Scheduling Page Manager view and loads the Edit view for the specified Scheduling Page.
<html>  <body>    <nylas-scheduler-editor />
<script type="module"> // ...Scheduler Editor configuration schedulerEditor.configurationId = "<SCHEDULER_CONFIGURATION_ID>"; </script> </body></html><NylasSchedulerEditor configurationId="<SCHEDULER_CONFIGURATION_ID>" .../>Add Scheduling Page Preview button
Section titled “Add Scheduling Page Preview button”You can set schedulerPreviewLink to either config.id or slug to configure the Preview button in the Scheduling Page Manager view. When an organizer clicks the Preview button, they can view their Scheduling Page.
<html>  <body>    <nylas-scheduler-editor />
<script type="module"> // ...Scheduler Editor Configuration schedulerEditor.schedulerPreviewLink = `${window.location.origin}/?config_id={config.id}`; </script> </body></html><NylasSchedulerEditor schedulerPreviewLink={`${window.location.origin}/?config_id={config.id}`} .../>Arrange and customize elements
Section titled “Arrange and customize elements”You can use the composable mode to customize how the Scheduler Editor component renders each element. When you use composable mode, you add elements under the nylas-scheduler-editor tag rather than wrapping them with nylas-editor-tabs.
The following example removes the default navigation tabs, and displays the calendar picker and availability picker elements in a single view.
<html>  <body>    <nylas-scheduler-editor mode="composable">      <!-- Add sub-components -->      <nylas-calendar-picker />      <nylas-availability-picker />    <nylas-scheduler-editor />
    <!-- Configure the Scheduler Editor Component -->    <script type="module">      import { defineCustomElement } from "https://cdn.jsdelivr.net/npm/@nylas/web-elements@latest/dist/cdn/nylas-scheduler-editor/nylas-scheduler-editor.es.js";
      defineCustomElement();
      const schedulerEditor = document.querySelector('nylas-scheduler-editor');
schedulerEditor.nylasSessionsConfig = { clientId: '<NYLAS_CLIENT_ID>', redirectUri: `${window.location.origin}/scheduler-editor`, domain: 'https://api.us.nylas.com/v3', hosted: true, accessType: 'offline', } </script> </body></html><NylasSchedulerEditor nylasSessionsConfig={{ clientId: "<NYLAS_CLIENT_ID>", redirectUri: `${window.location.origin}/scheduler-editor`, domain: "https://api.us.nylas.com/v3", hosted: true, accessType: "offline", }}> // Add sub-components <NylasCalendarPicker /> <NylasAvailabilityPicker /></NylasSchedulerEditor>;