Google and Microsoft Contacts with Python
Learn how to manage Google and Microsoft contacts with the Nylas Python SDK. Build your contacts book integration in 15 minutes.
Create Your Free Developer Account
Ready to build your email integration? Create your Nylas developer account to get started.
Python is one of the most popular programming languages in the world due to its extensive collection of libraries, easy to understand syntax, and practical abstraction capabilities. We love Python so much that we’ve used it to build the Nylas Communications Platform, which enables developers to quickly integrate email, calendar, and contacts into their app. The Nylas Contacts API makes it very easy to create and modify contacts for your user’s Google and Microsoft accounts.
This guide explains how to use the Nylas Python SDK and Contacts API to create Google and Microsoft (Exchange, Outlook, Office365) contacts and modify their attributes. It covers the following steps:
- Set up your Nylas developer account and get your API keys
- Install the Nylas Python SDK
- Manage Google & Microsoft contacts
- Explore the Nylas Contacts API
Prerequisites
Before you can start using the Nylas Python SDK, make sure you have done the following:
-
CLIENT_ID
: The client ID for your application in the Nylas Dashboard.CLIENT_SECRET
: The client secret for your application in the Nylas Dashboard.ACCESS_TOKEN
: The access token provided when you authenticate an account to your Nylas application.
-
Ensure you have pip installed on your development environment.
-
Create a virtual environment to install Nylas.
Installing the Nylas Python SDK
With your virtual environment activated, run:
pip install nylas
Congrats! You’re now ready to write code with the Nylas Python SDK.
How to Manage Google and Microsoft Contacts
At its core, the Nylas Communication Platform is an API client that interfaces with all of the major contact book providers. First, import the APIClient
class from the nylas
package, and create a new instance of this class, passing the variables you gathered when you got your developer API keys. In the following example, replace CLIENT_ID
, CLIENT_SECRET
, and ACCESS_TOKEN
with your values.
from nylas import APIClient
nylas = APIClient(
CLIENT_ID,
CLIENT_SECRET,
ACCESS_TOKEN
)
Take care with your secrets
It’s not best practice to include secrets like this in your code. A more secure way to provide these values is to store them as environment variables and access them with the os.environ
module.
List Contacts
The next example demonstrates how to display the first and last name, email address, and ID for the first 10 contacts returned from an account. The first step is to get a list of contact objects. The following example uses the nylas
object to return the first 10 contacts from the user account.
contacts = nylas.contacts.all(limit=10)
Next, we’ll iterate through the list of contact objects and return their first and last name, the first email address stored for the contact, and the contact id
, which can be used to make modifications to the contact.
for contact in contacts:
email = list(contact.emails.values())[0][0]
print("Name: {} {} | Email: {} | ID: {}".format(
contact.given_name, contact.surname, email, contact.id)
)
This example defines email
using contact.emails
, which returns a defaultDict()
object. This object contains a list of all email addresses associated with the account, along with their types, which can be personal
, work
, or Null
. The example also uses contact.given_name
and contact.surname
to construct the contact’s full name. Take a look at the API reference for the contacts endpoint to learn more about the attributes the contact object contains.
Here is the entire code example to list contacts for a user account.
from nylas import APIClient
nylas = APIClient(
CLIENT_ID,
CLIENT_SECRET,
ACCESS_TOKEN,
)
contacts = nylas.contacts.all(limit=10)
for contact in contacts:
# contact.emails returns a defaultdict() object
# that contains a list of email addresses with their appropriate labels
email = list(contact.emails.values())[0][0]
print("Name: {} {} | Email: {} | ID: {}".format(
contact.given_name, contact.surname, email, contact.id)
)
Create a Contact
To create a contact, use nylas
to create a new contact object:
contact = nylas.contacts.create()
Now it’s time to define some attributes for this new contact:
contact.given_name = "My"
contact.middle_name = "Nylas"
contact.surname = "Friend"
contact.emails['work'] = ['[email protected]']
contact.notes = "Make sure to keep in touch!"
contact.phone_numbers['business'] = ['(555) 555-5555']
contact.web_pages['homepage'] = ["https://nylas.com"]
There is quite a bit happening here, so let’s break it all down.
contact.given_name
,contact.middle_name
, andcontact.surname
define the first, middle, and last name for the contact.contact.emails
adds an email address to the contact and sets the type towork
. You can also specifypersonal
as a type.- Similarly,
contact.phone_numbers
attaches a phone number to the contact using the typebusiness
; Google and Microsoft label this as the contact’s work phone number. This label must be one ofbusiness
,organization_main
,mobile
,assistant
,business_fax
,home_fax
,radio
,car
,home
, orpager
. - Finally,
contact.web_pages
connects a website URL to the contact with the labelhomepage
. This label must be one ofhomepage
,profile
,work
, orblog
.
Take a look a the API reference for the contact creation endpoint to learn more about the attributes you can assign to a contact object.
The very last thing you need to do is call .save()
on the contact object. This saves the contact to Nylas, which then syncs the new contact to the third party provider.
contact.save()
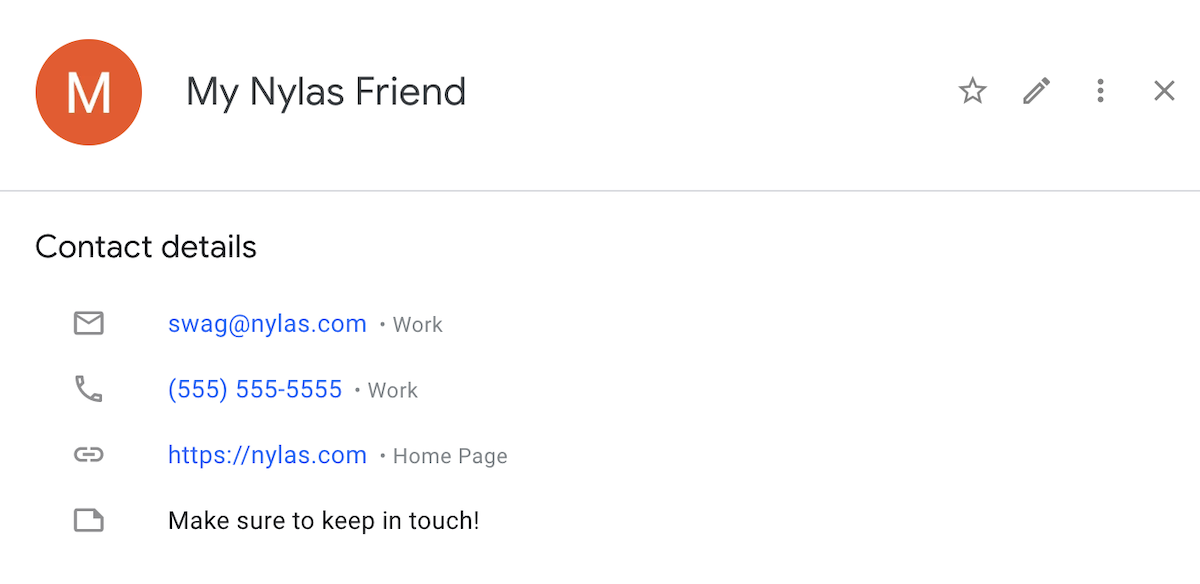
Once the contact has been saved and synced to Google, you should see a contact that looks something like this:
Here is an example of the same contact in Microsoft Outlook.
Here is the full example for creating a contact.
from nylas import APIClient
nylas = APIClient(
CLIENT_ID,
CLIENT_SECRET,
ACCESS_TOKEN,
)
contact = nylas.contacts.create()
# Add a first, middle, and last name for the contact.
contact.given_name = "My"
contact.middle_name = "Nylas"
contact.surname = "Friend"
# Email address 'type' must be either 'work' or 'personal'
contact.emails['work'] = ['[email protected]']
contact.notes = "Make sure to keep in touch!"
# Phone number type must be one of 'business', 'organization_main',
# 'mobile', 'assistant', 'business_fax', 'home_fax', 'radio', 'car', 'home', or 'pager'
# Google and Microsoft label 'business' phone numbers as the contact's Work phone number
contact.phone_numbers['business'] = ['(555) 555-5555']
# Web page type must be one of 'homepage', 'profile', 'work', or 'blog'
contact.web_pages['homepage'] = ["https://nylas.com"]
contact.save()
print(contact)
Delete a Contact
To delete a contact, you need to get the id
of the contact and pass it as an argument to the contacts.delete()
function. In the following example, replace CONTACT_ID
with the ID of the contact you want to delete.
You're about to delete a contact!
The next commands will delete the specified! Make sure you want to do this before proceeding.
contact = nylas.contacts.get(CONTACT_ID)
nylas.contacts.delete(contact.id)
Here is the entire code example to delete a contact.
from nylas import APIClient
nylas = APIClient(
CLIENT_ID,
CLIENT_SECRET,
ACCESS_TOKEN,
)
# CONTACT_ID should be the id of the contact object you want to delete.
contact = nylas.contacts.get(CONTACT_ID)
# WARNING: before running this script,
# ensure you want to delete the contact with this designated ID
nylas.contacts.delete(contact.id)
Explore the Nylas Contacts API
If you’ve made it this far, congrats, you’ve successfully learned how to manage Google and Microsoft contacts with the Nylas Contacts API! There is plenty more that you can do with it: take a look at the following resources to learn more about the Nylas Communications Platform capabilities.
- Learn about some of the more important features of the Nylas Contacts API.
- Take a look at additional code examples for the Python SDK to see what else you can do with email, calendar, and contacts.
- Follow our tutorials to learn about other aspects of the Nylas Email, Calendar, and Contacts APIs.
- Read about how the Nylas Communications Platform works.
- Review the Nylas Getting Started guide to learn about what it takes to integrate the Nylas Contacts API into your app.
- Read the blog post Working With the Nylas Contacts API and Python.