Webhooks Quickstart: create and read webhooks
Welcome to Nylas! 👋 We’re happy you’re here.
This guide walks you through the process of creating a sample web app that lets you configure and receive webhooks from Nylas.

✨ This Quickstart guide is for any developer who...
- Wants to learn the basics of Nylas by getting a minimal project up and running.
- Is comfortable with one of the Nylas SDK languages: Node.js, Python, Ruby, Java, or Kotlin.
- Wants to learn by doing and save the details for later.
What to expect
This guide will walk you through how to...
- Set up and configure your Nylas project.
- Bootstrap your application.
- Implement OAuth 2.0 with Nylas.
- Use the Nylas Webhooks API to create and read webhooks.
When you're done, you’ll understand the general process of building with Nylas. From there, we’ll point you to some resources to learn more and try out other APIs.
✨ The complete code for this Quickstart guide is available on GitHub. You can clone the repo and run the app to see it in action for the Nylas SDK language of your choice: Node.js, Python, Ruby, Java, or Kotlin.
Let’s get started!
Before you begin
Be sure to have the following ready before you begin:
- Your language’s development environment installed.
- A code editor.
- A terminal.
- A web browser.
Got all of that? You’re ready to go!
Set up your Nylas account
This section is all about what we need to do before we start coding.
Create a Nylas account
Nylas offers a free Sandbox account where you can prototype and test the Nylas APIs. Sign up to create a Nylas account.
Create a Nylas Sandbox application
Go to the Nylas v3 Dashboard and create a new application.
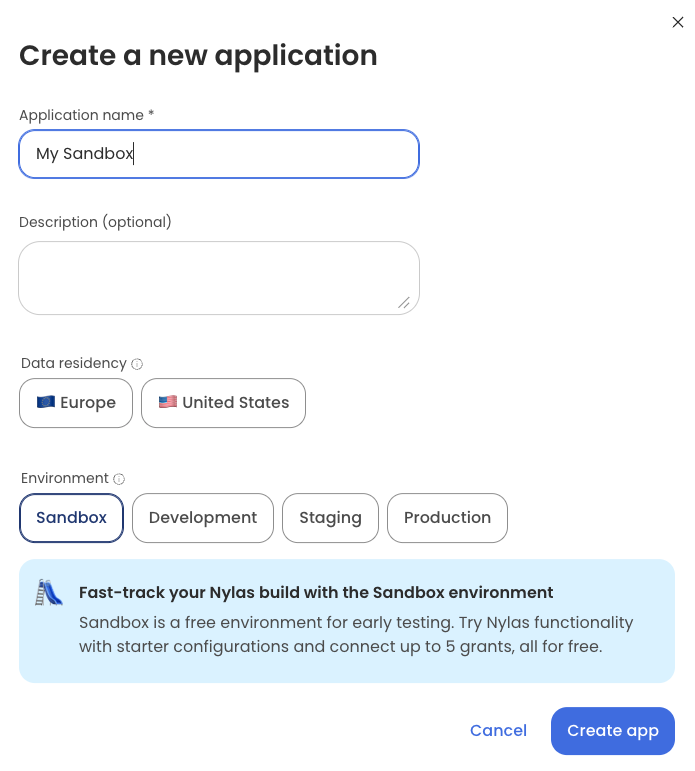
When you first log in to your v3 Dashboard account, your organization is empty. Click Create a new application to get started.
Set an Application name and Description, then select your preferred data residency location, and tag the environment as Sandbox. If you use the Sandbox, you can skip setting up your own service connector during the Quickstart.
Get your application credentials
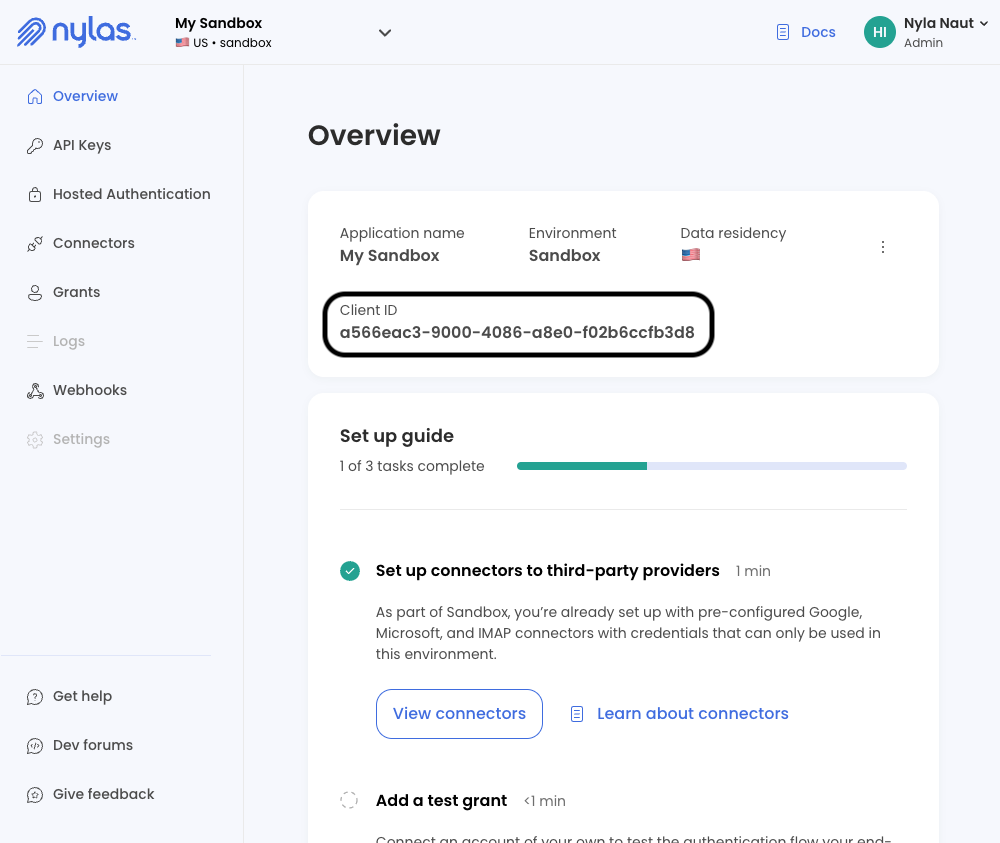
To use the Nylas API, you need your Nylas application’s client ID and an API key, which you can get from the Dashboard. You'll save these credentials in your code environment as NYLAS_CLIENT_ID and NYLAS_API_KEY.
You can find your Nylas client ID on the Dashboard Overview page.
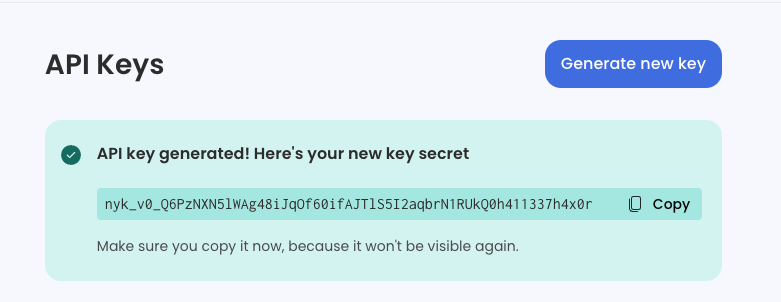
Next, generate an API key:
- In your Sandbox application click API keys in the left navigation.
- Click Generate new key.
- Enter a name for the key (something like "demo" or "test" is a good place to start) and an expiration date (for this walkthrough, you can leave the default date).
- Click Generate key, then copy the API key secret that appears and save it to your secrets manager.
You'll use this value as your NYLAS_API_KEY in your code.
Bootstrap your app
This section walks you through setting up a basic local project using your preferred language. Nothing here is Nylas-specific — we're just getting the server scaffold ready.
Create a local project
First, create a local project for testing. You can copy and paste the following commands directly into your terminal or command line tool.
npm init -y
touch index.js
touch index.py touch index.rb mvn archetype:generate -DgroupId=com.nylas -DartifactId="quickstart"
-DarchetypeArtifactId=maven-archetype-quickstart
-DinteractiveMode=false mvn archetype:generate -DgroupId=com.nylas -DartifactId="quickstart"
-DarchetypeArtifactId=maven-archetype-quickstart
-DinteractiveMode=false
rm -r main
mkdir kotlin Create your ENV file
Next, create an .env file. You'll use this file to store credentials and constants that you want to avoid including in your source code.
Your Nylas API URI should be either https://api.us.nylas.com if you're using the U.S. region, or https://api.eu.nylas.com if you're using the E.U. region.
# .env
NYLAS_CLIENT_ID=ADD_YOUR_NYLAS_CLIENT_ID_HERE
NYLAS_API_KEY=ADD_YOUR_NYLAS_API_KEY_HERE
NYLAS_API_URI=(pick one: https://api.us.nylas.com or https://api.eu.nylas.com)
WEBHOOK_URL=YOUR_SERVER_URL

# Python
NYLAS_CLIENT_ID="ADD_YOUR_NYLAS_CLIENT_ID_HERE"
NYLAS_API_KEY="ADD_YOUR_NYLAS_API_KEY_HERE"
NYLAS_API_URI="(pick one: https://api.us.nylas.com or https://api.eu.nylas.com)"
WEBHOOK_URL="YOUR_SERVER_URL"
📝 Note: Your .env file contains important credentials, and you should never commit it to the repository. Add your .env to your .gitignore list so you don't accidentally commit it to the repository. See the official Git documentation for more details.
Install your dependencies
Install the Nylas SDK of your choice, along with the dependencies for this project.
npm install dotenv express nylas pip3 install python-dotenv nylas -U flask gem install dotenv nylas sinatra <dependency>
<groupId>com.sparkjava</groupId>
<artifactId>spark-core</artifactId>
<version>2.9.4</version>
</dependency>
<dependency>
<groupId>io.github.cdimascio</groupId>
<artifactId>dotenv-java</artifactId>
<version>3.0.0</version>
</dependency>
<dependency>
<groupId>com.nylas.sdk</groupId>
<artifactId>nylas</artifactId>
<version>2.2.1</version>
</dependency>
<dependency>
<groupId>com.google.code.gson</groupId>
<artifactId>gson</artifactId>
<version>2.10.1</version>
</dependency> <groupId>com.sparkjava</groupId>
<artifactId>spark-kotlin</artifactId>
<version>1.0.0-alpha</version>
</dependency>
<dependency>
<groupId>com.nylas.sdk</groupId>
<artifactId>nylas</artifactId>
<version>2.2.1</version>
</dependency>
<dependency>
<groupId>io.github.cdimascio</groupId>
<artifactId>dotenv-kotlin</artifactId>
<version>6.4.1</version>
</dependency>
<dependency>
<groupId>com.google.code.gson</groupId>
<artifactId>gson</artifactId>
<version>2.10.1</version>
</dependency> Next, you'll fill out the information you need to read an incoming webhook notification.
Set up webhooks in your app
Finally, we'll set up the foundation for creating and receiving webhooks in your web app.
⚠️ Remember that you will need to upload this source code to a hosting server to make your web app accessible. You'll also need to define the WEBHOOK_SECRET variable, which is a value Nylas provides when you create your webhook.
Configure Nylas SDKs and webhook endpoint
First, configure the Nylas SDK that you'll be using and set up your webhook endpoint.
import "dotenv/config";
import express from "express";
import Nylas from "nylas";
import crypto from 'crypto';

const config = {
  clientId: process.env.NYLAS_CLIENT_ID,
  apiKey: process.env.NYLAS_API_KEY,
  apiUri: process.env.NYLAS_API_URI,
};

const nylas = new Nylas({
  apiKey: config.apiKey,
  apiUri: config.apiUri,
});

const app = express();
const port = 3000;

app.listen(port, () => {
  console.log(`Server is running on port ${port}`);
});

// Route to respond to Nylas webhook creation with challenge parameter.
app.get("/callback/nylas", (req, res) => {
  if (req.query.challenge) {
    console.log(`Received challenge code! - ${req.query.challenge}`);
    console.log(`Now returning challenge code! - ${req.query.challenge}`);

    // Enable the webhook by responding with the challenge parameter.
    return res.send(req.query.challenge);
  }
});
# Import packages
from flask import Flask, request, render_template
import hmac
import hashlib
import os
from dataclasses import dataclass
import pendulum
# Array to hold webhook dataclass
webhooks = []
# Webhook dataclass
@dataclass
class Webhook:
_id: str
date: str
subject: str
from_email: str
from_name: str
# Get today’s date
today = pendulum.now()
# Create the Flask app and load the configuration
app = Flask(__name__)
# Read and insert webhook data
@app.route("/webhook", methods=["GET", "POST"])
def webhook():
# We are connected to Nylas, let’s return the challenge parameter.
if request.method == "GET" and "challenge" in request.args:
print(" * Nylas connected to the webhook!")
return request.args["challenge"]
if request.method == "POST":
is_genuine = verify_signature(
message=request.data,
key=os.environ["WEBHOOK_SECRET"].encode("utf8"),
signature=request.headers.get("X-Nylas-Signature"),
)
if not is_genuine:
return "Signature verification failed!", 401
data = request.get_json()
hook = Webhook(
data["data"]["object"]["id"],
pendulum.from_timestamp(
data["data"]["object"]["date"], today.timezone.name
).strftime("%d/%m/%Y %H:%M:%S"),
data["data"]["object"]["subject"],
data["data"]["object"]["from"][0]["email"],
data["data"]["object"]["from"][0]["name"],
)
webhooks.append(hook)
return "Webhook received", 200
# Main page
@app.route("/")
def index():
return render_template("main.html", webhooks=webhooks)
# Signature verification
def verify_signature(message, key, signature):
digest = hmac.new(key, msg=message, digestmod=hashlib.sha256).hexdigest()
return hmac.compare_digest(digest, signature)
# Run our application
if __name__ == "__main__":
app.run() # frozen_string_literal: true
# Load gems
require 'nylas'
require 'sinatra'
require 'sinatra/config_file'
webhook = Data.define(:id, :date, :subject, :from_email, :from_name)
webhooks = []
get '/webhook' do
params['challenge'].to_s if params.include? 'challenge'
end
post '/webhook' do
# We need to verify that the signature comes from Nylas
is_genuine = verify_signature(request.body.read, ENV['WEBHOOK_SECRET'],
request.env['HTTP_X_NYLAS_SIGNATURE'])
unless is_genuine
status 401
'Signature verification failed!'
end
# Read the webhook information and store it on the data class.
request.body.rewind
model = JSON.parse(request.body.read)
puts(model["data"]["object"])
hook = webhook.new(model["data"]["object"]["id"],
Time.at(model["data"]["object"]["date"]).strftime("%d/%m/%Y %H:%M:%S"),
model["data"]["object"]["subject"], model["data"]["object"]["from"][0]["email"],
model["data"]["object"]["from"][0]["name"])
webhooks.append(hook)
status 200
'Webhook received'
end
get '/' do
puts webhooks
erb :main, locals: { webhooks: webhooks }
end
# Generate a signature with our client secret and compare it with the one from Nylas.
def verify_signature(message, key, signature)
digest = OpenSSL::Digest.new('sha256')
digest = OpenSSL::HMAC.hexdigest(digest, key, message)
secure_compare(digest, signature)
end
# Compare the keys to see if they are the same
def secure_compare(a_key, b_key)
return false if a_key.empty? || b_key.empty? || a_key.bytesize != b_key.bytesize
l = a_key.unpack "C#{a_key.bytesize}"
res = 0
b_key.each_byte { |byte| res |= byte ^ l.shift }
res.zero?
end //webhook_info.java
import lombok.Data;
@Data
public class Webhook_Info {
private String id;
private String date;
private String subject;
private String from_email;
private String from_name;
}
// Import Spark, Jackson and Mustache libraries
import spark.ModelAndView;
import static spark.Spark.*;
import spark.template.mustache.MustacheTemplateEngine;
import com.fasterxml.jackson.databind.JsonNode;
import com.fasterxml.jackson.databind.ObjectMapper;
// Import Java libraries
import java.net.URLEncoder;
import java.text.SimpleDateFormat;
import java.util.ArrayList;
import java.util.HashMap;
import java.util.Map;
// Import external libraries
import org.apache.commons.codec.digest.HmacUtils;
public class ReadWebhooks {
// Function to get Hmac
public static String getHmac(String data, String key) {
return new HmacUtils("HmacSHA256", key).hmacHex(data);
}
public static void main(String[] args) {
// Array list of Webhooks
ArrayList<Webhook_Info> array = new ArrayList<Webhook_Info>();
// Default path when we load our web application
get("/", (request, response) -> {
// Create a model to pass information to the mustache template
Map<String, Object> model = new HashMap<>();
model.put("webhooks", array);
// Call the mustache template
return new ModelAndView(model, "show_webhooks.mustache");
}, new MustacheTemplateEngine());
// Validate our webhook with the Nylas server
get("/webhook", (request, response) -> request.queryParams("challenge"));
// Get webhook information
post("/webhook", (request, response) -> {
// Create JSON object mapper
ObjectMapper mapper = new ObjectMapper();
// Read the response body as a Json object
JsonNode incoming_webhook = mapper.readValue(request.body(), JsonNode.class);
// Make sure we're reading our calendar
if (getHmac(request.body(), URLEncoder.
encode(System.getenv("WEBHOOK_SECRET"), "UTF-8")).
equals(request.headers("X-Nylas-Signature"))) {
// Create Webhook_Info record
Webhook_Info new_webhook = new Webhook_Info();
// Fill webhook information
System.out.println(incoming_webhook.get("data").get("object"));
new_webhook.setId(incoming_webhook.get("data").
get("object").get("id").textValue());
new_webhook.setDate(new SimpleDateFormat("yyyy-MM-dd HH:mm:ss").
format(new java.util.Date((incoming_webhook.get("data").
get("object").get("date").asLong() * 1000L))));
new_webhook.setSubject(incoming_webhook.get("data").
get("object").get("subject").textValue());
new_webhook.setFrom_email(incoming_webhook.get("data").
get("object").get("from").get(0).get("email").textValue());
new_webhook.setFrom_name(incoming_webhook.get("data").
get("object").get("from").get(0).get("name").textValue());
// Add webhook call to an array, so that we display it on screen
array.add(new_webhook);
}
response.status(200);
return "Webhook Received";
});
}
} import com.fasterxml.jackson.databind.JsonNode
import com.fasterxml.jackson.module.kotlin.jacksonObjectMapper
import com.fasterxml.jackson.module.kotlin.readValue
import spark.template.mustache.MustacheTemplateEngine;
import spark.ModelAndView
import spark.kotlin.Http
import spark.kotlin.ignite
import java.util.*
import javax.crypto.Mac
import javax.crypto.spec.SecretKeySpec
import java.net.URLEncoder
import java.text.SimpleDateFormat
data class Webhook_Info(
var id: String,
var date: String,
var subject: String,
var fromEmail: String,
var fromName: String
)
var array: Array<Webhook_Info> = arrayOf()
object Hmac {
fun digest(
msg: String,
key: String,
alg: String = "HmacSHA256"
): String {
val signingKey = SecretKeySpec(key.toByteArray(), alg)
val mac = Mac.getInstance(alg)
mac.init(signingKey)
val bytes = mac.doFinal(msg.toByteArray())
return format(bytes)
}
private fun format(bytes: ByteArray): String {
val formatter = Formatter()
bytes.forEach { formatter.format("%02x", it) }
return formatter.toString()
}
}
fun addElement(arr: Array<Webhook_Info>,
element: Webhook_Info): Array<Webhook_Info> {
val mutableArray = arr.toMutableList()
mutableArray.add(element)
return mutableArray.toTypedArray()
}
fun dateFormatter(milliseconds: String): String {
return SimpleDateFormat("dd/MM/yyyy HH:mm:ss").
format(Date(milliseconds.toLong() * 1000)).toString()
}
fun main(args: Array<String>) {
val http: Http = ignite()
http.get("/webhook") {
request.queryParams("challenge")
}
http.post("/webhook") {
val mapper = jacksonObjectMapper()
val model: JsonNode = mapper.readValue<JsonNode>(request.body())
if(Hmac.digest(request.body(), URLEncoder.encode(System.getenv("WEBHOOK_SECRET"),
"UTF-8")) == request.headers("X-Nylas-Signature").toString()){
array = addElement(array, Webhook_Info(model["data"]["object"]["id"].textValue(),
dateFormatter(model["data"]["object"]["id"].textValue()),
model["data"]["object"]["subject"].textValue(),
model["data"]["object"]["from"].get(0)["email"].textValue(),
model["data"]["object"]["from"].get(0)["name"].textValue()))
}
response.status(200)
"Webhook Received"
}
http.get("/") {
val model = HashMap<String, Any>()
model["webhooks"] = array
MustacheTemplateEngine().render(
ModelAndView(model, "show_webhooks.mustache")
)
}
} Prepare to log webhook notifications
Next, set up a foundation for logging webhook notifications from Nylas.
// Route to receive webhook events after creating webhook
app.post("/callback/nylas", (req, res) => {
  const nylasSignature = 'x-nylas-signature';
  const hashAlgorithm = 'sha256'

  /* Secret is storing the webhook secret in-memory for demo purposes
  TODO: Store the secret and retrieve as needed to verify the webhook signature
  */
  const webhookSecret = process.env.WEBHOOK_SECRET;

  console.log('==========Webhook log start==========');
  console.log(JSON.stringify(req.body.data));

  // Verify the webhook signature
  const signature = req.headers[nylasSignature];

  const digest = crypto
      .createHmac(hashAlgorithm, webhookSecret)
      .update(req.body.data)
      .digest('hex')

  const isValidWebhook = digest === nylasSignature

  console.log({isValidWebhook})
  console.log('==========Webhook log end==========\n');

  // Responding to Nylas is important to prevent the webhook from retrying!
  return res.status(200).end();
});
# Inside the templates folder
<!DOCTYPE html>
<html>
<head>
<meta charset="utf-8">
<meta name="viewport" content="width=device-width, initial-scale=1">
<script src="https://cdn.tailwindcss.com"></script>
<title>Webhooks</title>
</head>
<body>
<h1 class="text-4xl font-bold dark:text-black bg-green-600 border-green-600 border-b p-4 m-4 rounded grid place-items-center">Webhooks</h1>
<table style="width:100%">
<tr class="bg-green-600 border-green-600 border-b p-4 m-4 rounded">
<th>Id</th>
<th>Date</th>
<th>Subject</th>
<th>From Email</th>
<th>From Name</th>
</tr>
{% for webhook in webhooks: %}
<tr class="bg-white-600 border-green-600 border-b p-4 m-4 rounded">
<td><p class="text-sm font-semibold">{{ webhook._id }}</p></td>
<td><p class="text-sm font-semibold">{{ webhook.date }}</p></td>
<td><p class="text-sm font-semibold">{{ webhook.subject }}</p></td>
<td><p class="text-sm font-semibold">{{ webhook.from_email }}</p></td>
<td><p class="text-sm font-semibold">{{ webhook.from_name }}</p></td>
</tr>
{% endfor %}
</table>
</body>
</html> # Inside the views folder
<!DOCTYPE html>
<html>
<head>
<meta charset="utf-8">
<meta name="viewport" content="width=device-width, initial-scale=1">
<script src="https://cdn.tailwindcss.com"></script>
<title>Webhooks</title>
</head>
<body>
<h1 class="text-4xl font-bold dark:text-black bg-green-600 border-green-600 border-b p-4 m-4 rounded grid place-items-center">Webhooks</h1>
<table style="width:100%">
<tr class="bg-green-600 border-green-600 border-b p-4 m-4 rounded">
<th>Id</th>
<th>Date</th>
<th>Subject</th>
<th>From Email</th>
<th>From Name</th>
</tr>
<% webhooks.each do |item| %>
<tr class="bg-white-600 border-green-600 border-b p-4 m-4 rounded">
<td><p class="text-sm font-semibold"><%= item.id %></p></td>
<td><p class="text-sm font-semibold"><%= item.date %></p></td>
<td><p class="text-sm font-semibold"><%= item.subject %></p></td>
<td><p class="text-sm font-semibold"><%= item.from_email %></p></td>
<td><p class="text-sm font-semibold"><%= item.from_name %></p></td>
</tr>
<% end %>
</table>
</body>
</html> <!DOCTYPE html>
<html>
<head>
<meta charset="utf-8">
<meta name="viewport" content="width=device-width, initial-scale=1">
<script src="https://cdn.tailwindcss.com"></script>
<title>Webhooks</title>
</head>
<body>
<h1 class="text-4xl font-bold dark:text-black bg-green-600 border-green-600 border-b p-4 m-4 rounded grid place-items-center">Webhooks</h1>
<table style="width:100%">
<tr class="bg-green-600 border-green-600 border-b p-4 m-4 rounded">
<th>Id</th>
<th>Date</th>
<th>Subject</th>
<th>From Email</th>
<th>From Name</th>
</tr>
{{#webhooks}}
<tr class="bg-white-600 border-green-600 border-b p-4 m-4 rounded">
<td><p class="text-sm font-semibold">{{id}}</p></td>
<td><p class="text-sm font-semibold">{{date}}</p></td>
<td><p class="text-sm font-semibold">{{subject}}</p></td>
<td><p class="text-sm font-semibold">{{from_email}}</p></td>
<td><p class="text-sm font-semibold">{{from_name}}</p></td>
</tr>
{{/webhooks}}
</table>
</body>
</html> <!DOCTYPE html>
<html>
<head>
<meta charset="utf-8">
<meta name="viewport" content="width=device-width, initial-scale=1">
<script src="https://cdn.tailwindcss.com"></script>
<title>Webhooks</title>
</head>
<body>
<h1 class="text-4xl font-bold dark:text-black bg-green-600 border-green-600 border-b p-4 m-4 rounded grid place-items-center">Webhooks</h1>
<table style="width:100%">
<tr class="bg-green-600 border-green-600 border-b p-4 m-4 rounded">
<th>Id</th>
<th>Date</th>
<th>Subject</th>
<th>From Email</th>
<th>From Name</th>
</tr>
{{#webhooks}}
<tr class="bg-white-600 border-green-600 border-b p-4 m-4 rounded">
<td><p class="text-sm font-semibold">{{id}}</p></td>
<td><p class="text-sm font-semibold">{{date}}</p></td>
<td><p class="text-sm font-semibold">{{subject}}</p></td>
<td><p class="text-sm font-semibold">{{fromEmail}}</p></td>
<td><p class="text-sm font-semibold">{{fromName}}</p></td>
</tr>
{{/webhooks}}
</table>
</body>
</html> Install the server
🔍 Different coding languages need different files to perform server installations. They also need a Procfile (process file) to run the correct service.
Finally, install the server and set up a Procfile.
{
  "name": "quickstart-webhook-node",
  "version": "1.0.0",
  "main": "index.js",
  "type": "module",
  "scripts": {
    "test": "echo \"Error: no test specified\" && exit 1",
    "start": "node index.js",
    "create-nylas-webhook": "node create-nylas-webhook.js"
  },
  "keywords": [],
  "author": "",
  "license": "ISC",
  "dependencies": {
    "crypto": "^1.0.1",
    "dotenv": "^16.4.5",
    "express": "^4.19.0",
    "nylas": "^7.2.1"
  }
}
# Requirements.txt
Flask==3.0.2
gunicorn==20.1.0
pendulum==3.0.0
Jinja2==3.1.2
# Procfile
web: gunicorn -b :$PORT index:app # Gemfile
source "https://rubygems.org"
ruby "3.2.2"
gem "sinatra", '3.1.0'
gem "sinatra-contrib", "3.1.0"
gem "rack", '2.2.8'
gem "puma", '6.3.1'
# Procfile
web: bundle exec ruby index.rb
# config folder
# puma.rb
workers Integer(ENV['WEB_CONCURRENCY'] || 2)
threads_count = Integer(ENV['THREAD_COUNT'] || 5)
threads threads_count, threads_count # system.properties
java.runtime.version=11
maven.version=3.9.4
# Procfile
web: java -jar /workspace/target/quickstart_webhook_java-1.0-SNAPSHOT-jar-with-dependencies.jar # system.properties
java.runtime.version=11
maven.version=3.9.4
# Procfile
web: java -jar /workspace/target/quickstart_webhook_kotlin-1.0-SNAPSHOT-jar-with-dependencies.jar That was some heavy lifting...but now you're ready to go! 🚀
Use webhooks with Nylas
This section is the fun part! Now that you have the scaffold, it's time to build it up and start using webhooks with Nylas.
Enable webhooks for an account
Let's create an application to enable webhooks for an authenticated account. For these code samples, you'll need to define the WEBHOOK_URL with the path to your own webhook server.
import 'dotenv/config'
import Nylas, { WebhookTriggers } from "nylas"

const NylasConfig = {
  apiKey: process.env.NYLAS_API_KEY,
  apiUri: process.env.NYLAS_API_URI,
}

const nylas = new Nylas(NylasConfig)

const createWebhook = async () => {
  try {
    const webhook = await nylas.webhooks.create({
      requestBody: {
        triggerTypes: [WebhookTriggers.EventCreated],
        webhookUrl: process.env.WEBHOOK_URL,
        description: "My first webhook",
        notificationEmailAddress: [process.env.NOTIFICATION_EMAIL],
      }
    })

    console.log("Webhook created:", webhook)
  } catch (error) {
    console.error("Error creating webhook:", error)
  }
}

createWebhook()

/* Example output:
Webhook created: {
  requestId: '1',
  data: {
    id: '2',
    description: 'My first webhook',
    triggerTypes: [ 'event.created' ],
    webhookUrl: 'your-webhook-url',
    webhookSecret: 'webhook-secret-to-store',
    status: 'active',
    notificationEmailAddresses: null,
    statusUpdatedAt: 1710964914,
    createdAt: 1710964914,
    updatedAt: 1710964914
  }
}
*/
from nylas import Client
from dotenv import load_dotenv
import os
from nylas.models.webhooks import CreateWebhookRequest
from nylas.models.webhooks import WebhookTriggers
load_dotenv()
nylas = Client(
api_key = os.environ.get("NYLAS_API_KEY"),
api_uri = os.environ.get("NYLAS_API_URI")
)
request_body = CreateWebhookRequest(trigger_types = [WebhookTriggers.MESSAGE_CREATED],
webhook_url = os.environ.get("WEBHOOK_URL"),
description = "my webhook", notification_email_addresses = [os.environ.get("NYLAS_GRANT_ID")])
webhook, _ = nylas.webhooks.create(request_body = request_body)
print(webhook) # frozen_string_literal: true
# Load gems
require 'dotenv/load'
require 'nylas'
# Initialize Nylas client
nylas = Nylas::Client.new(
api_key: ENV['NYLAS_API_KEY'],
api_uri: ENV['NYLAS_API_URI']
)
# Request body
request_body = {
trigger_types: [Nylas::WebhookTrigger::MESSAGE_CREATED],
webhook_url: os.environ.get("WEBHOOK_URL"),
description: 'My first webhook',
notification_email_address: [ENV['NYLAS_GRANT_ID']]
}
webhooks, = nylas.webhooks.create(request_body: request_body)
puts webhooks // Import Nylas packages
import com.nylas.NylasClient;
import com.nylas.models.*;
import com.nylas.resources.Webhooks;
import com.nylas.models.WebhookTriggers;
import java.util.*;
// Import DotEnv to handle .env files
import io.github.cdimascio.dotenv.Dotenv;
public class webhooks {
public static void main(String[] args) throws NylasSdkTimeoutError, NylasApiError {
// Load the .env file
Dotenv dotenv = Dotenv.load();
// Initialize the Nylas client
NylasClient nylas = new NylasClient.Builder(dotenv.get("NYLAS_API_KEY")).build();
List<WebhookTriggers> triggers = new ArrayList<>();
triggers.add(WebhookTriggers.MESSAGE_CREATED);
CreateWebhookRequest webhookRequest = new CreateWebhookRequest(
triggers,
dotenv.get("WEBHOOK_URL"),
"My first webhook",
Collections.singletonList(dotenv.get("NYLAS_GRANT_ID")));
try {
Response<WebhookWithSecret> webhook = new Webhooks(nylas).create(webhookRequest);
System.out.println(webhook.getData());
} catch (Exception e) {
System.out.println("Error: " + e);
}
}
} // Import Nylas packages
import com.nylas.NylasClient
import com.nylas.models.*
import com.nylas.resources.Webhooks
// Import DotEnv to handle .env files
import io.github.cdimascio.dotenv.dotenv
// The main function
fun main(args: Array<String>) {
// Load our env variable
val dotenv = dotenv()
// Initialize Nylas client
val nylas: NylasClient = NylasClient(
apiKey = dotenv["NYLAS_API_KEY"],
apiUri = dotenv["NYLAS_API_URI"]
)
// Which triggers are we're going to use
val triggersList: List<WebhookTriggers> = listOf(WebhookTriggers.MESSAGE_CREATED)
// Create the webhook triggers request
val webhookRequest: CreateWebhookRequest = CreateWebhookRequest(
triggersList,
dotenv["WEBHOOK_URL"],
"My first webhook",
listOf(dotenv["NYLAS_GRANT_ID"])
)
// Create the webhook and return the response
try {
val webhook: Response<WebhookWithSecret> = Webhooks(nylas).create(webhookRequest)
println(webhook.data)
} catch(exception : Exception) {
println("Error :$exception")
}
} If all of these steps went smoothly, you'll now get a webhook notification every time you send or receive an email message!
Next steps
Congrats! 🎉 In this Quickstart guide, you set up a simple web app, created a webhook, and received webhook notifications using Nylas.
If you'd like to see the complete code for this guide, you can find it on GitHub for the Nylas SDK language of your choice—Node.js, Python, Ruby, Java, or Kotlin.
Want to try something similar with a calendar? Check out the Calendar API Quickstart guide.
What about using email? Check out the Email API Quickstart guide.
The links below are further reading as you continue your journey to Nylas greatness: