Contact List Component
This feature is in Maintenance mode. Nylas will patch bugs and vulnerabilities but is not currently working on new functionality.
Use Contact List to display your Contacts in a sortable, interactive list. Without needing to write a line of code, Contact List comes with:
- Display picture
- Contact Email
- Last date emailed
- Sortable list
- Customization

Quickstart
- Create a Contact List component in your Nylas Dashboard.
- Add it to your application.
    <head>
      <!-- Import the script from CDN -->
      <script src="https://unpkg.com/@nylas/components-contact-list"></script>
    </head>
    <body>
      <!-- Place the component on the page -->
      <nylas-contact-list id="<PASTE_YOUR_COMPONENT_ID>"></nylas-contact-list>
    </body>
That’s It! Contact List is ready to use!
Prerequisites
Before you use components, you must have the following prerequisites:
- A v2 Nylas application.
- The minimum required scopes:
- Agenda:
calendar - Composer:
email.modify,email.send,contacts.read_only - Contact list:
contacts.read_only - Email:
email.modify,contacts.read_only - Messages:
email.read_only,contacts.read_only
- Agenda:
- An application to add the component to.
Contact List Installation Options
You can install Contact List in 2 ways:
npm Package
- Run
npm i @nylas/components-contact-listoryarn add @nylas/components-contact-list. - Then import and render the component.
    // Import the web component
    import '@nylas/components-contact-list';

    // In render method
    <nylas-contact-list></nylas-contact-list>
Script Tag
Use the CDN script tag, https://unpkg.com/@nylas/components-contact-list.
    <head>
      <!-- Import the script from CDN -->
      <script src="https://unpkg.com/@nylas/components-contact-list"></script>
    </head>
    <body>
      <!-- Place the component on the page -->
      <nylas-contact-list></nylas-contact-list>
    </body>
Ways to Use Contact List
You'll learn how to use your Nylas accounts with the Contact List Component.
- Use Contact with Nylas Data - Choose this option if you want to integrate your existing Nylas accounts with the Contact List Component.
- Use Contact List with External Data - Choose this option if you want to pass in your data.
Use Contact List Component with Nylas Data
You'll learn how to use your Nylas accounts with the Contact List Component.
Create the Contact List Component
- Log in to your Nylas dashboard.
- Click Components > Contact List
- Name your Component and select the account.
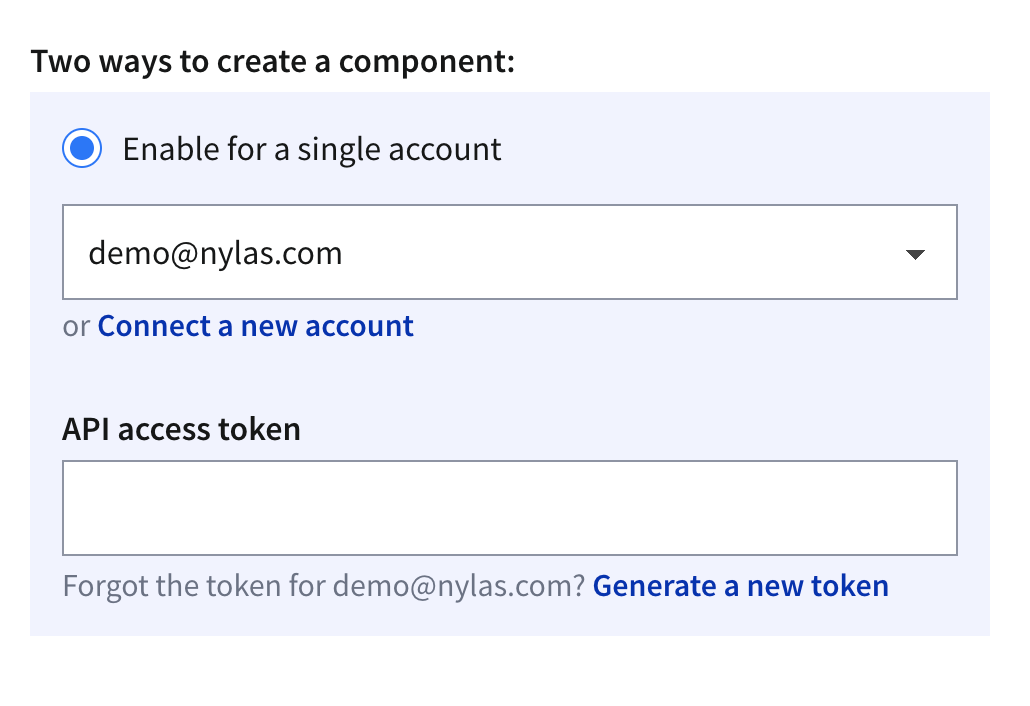
- Use an existing access token or generate a new one. To quickly start testing your Component select Enable for a single account.
- To learn how to enable components for multiple accounts see Authorizing Components
- Enter the domain the component will run on. Without the domains, the component will not run.
- Save your new Component.
- On the Edit page, you can configure your component behavior and appearance.
Generate an Access Token
Generating a new access token will not replace your existing access token; it will create a second access token with the same scopes as the previous token. You can revoke access tokens at any time.

Add the Component To Your Application
-
On the Edit page, there are instructions for installing the new Component.
-
If you haven't installed the Contact List Component already, open a terminal and run
npm i @nylas/components-contact-list. -
Then add your Nylas Component. Copy and paste your component code into your application.
<nylas-contact-list="your-component-id"></nylas-contact-list>.
-
You should refresh your application if needed. Any customization options set on the editing page will apply to your Component.
If you want to get started without installing the components in your application, fork this CodeSandbox and replace the ID with your Contact List ID.
Contact List CodeSandbox
The application uses demo data. Create a new Component so you can use your data.
Use Contact List with External Data
You'll learn how to pass in an contacts array and display an contact list within your application.
Create the Contact List Component
- Install the Nylas Contact List Component.
npm i @nylas/components-contact-list.
The Nylas Contact List Component can accept an array of objects for contacts.
You can pass in:
email- Emails must be unique for each contact.given_name- Full contact name
<script>
  import ContactList from "@nylas/components-contact-list";
  const staticContacts = [
    {
      emails: [
        {
          email: "[email protected]"
        }
      ],
      given_name: "Thomas Edison"
    },
    {
      emails: [
        {
          email: "[email protected]"
        }
      ],
      given_name: "Alexander Graham Bell"
    },
    {
      emails: [
        {
          email: "[email protected]"
        }
      ],
      given_name: "Albert Einstein"
    }
  ];
</script>

<style>
  main {
    font-family: sans-serif;
    text-align: center;
    height: 800px;
  }
</style>

<main>
 <h1>Nylas Contact List</h1>
  <nylas-contact-list contacts={staticContacts}/>
</main>
Contact List External Data Example
If you want to get started quickly, grab a copy of our CodeSandbox to get started. The application uses demo data. Create a new Component when you're ready to use your data.
Authorizing Components
You can authorize components to work with a single account or multiple accounts.
Enable for a single account
Enabling components for a single account is a good way to get started quickly. If you use this method in your production application, you must authenticate each account from the Nylas Dashboard one-by-one.
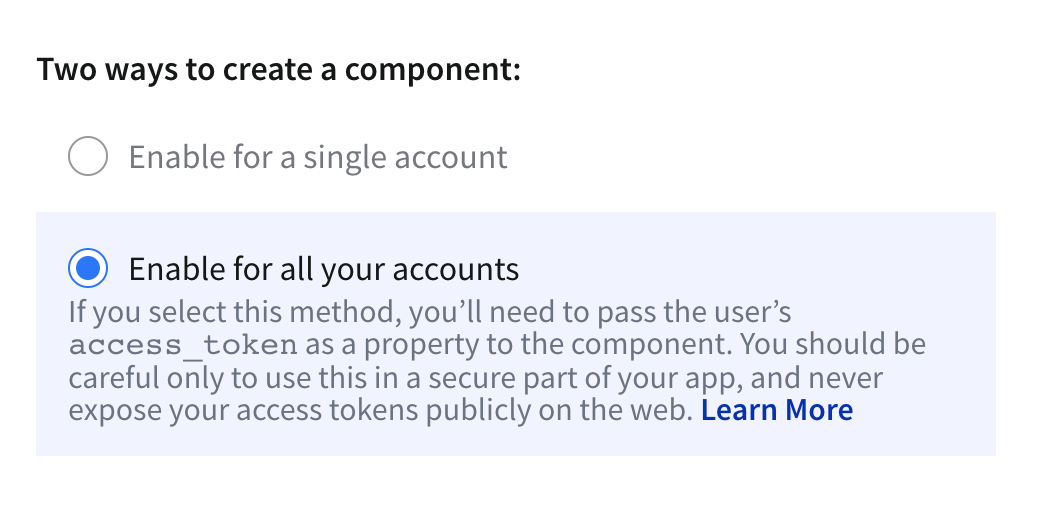
Enable for all accounts
🔍 Dashboard previews don't work when you enable components for all accounts.
To enable components for all accounts, you must pass in an end user's access token as a property of the component. One way to do this is to create a login screen, capture the access token, and pass it to the component. You can pass access_tokens directly in the component, as in the following example.
<nylas-agenda id="COMPONENT-ID" access_token="USER-ACCESS-TOKEN"/> Be sure to keep your end users' access tokens hidden, and never expose them online.
Customization
Customize your Contact List with these properties.
| Property | Value | Description |
|---|---|---|
| click_action | select, email |
Default, select, set the behavior when clicking on contacts. For email , clicking a contact attempts to open the email program |
| sort_by | name, last_emailed |
Default name, sort contacts by last name. last_emailed also requires email scopes to sort by date |
| contacts_to_load | 10, 50 , 100, 1000 |
Default 100, number of contacts to display |
| theme | theme-1, theme-2, theme-3, theme-4 |
Default theme-1, set the theme |
Contact List Event Listeners
| Name | Description |
|---|---|
manifestLoaded |
This event is dispatched on load when the manifest is loaded. The handler is passed the manifest argument. |
onError |
Emitted if an error occurs while fetching data in the component. The handler is passed an object with the component id as the key and the error as the value. |
contactClicked |
Emitted when contact is clicked. Returns the KeyboardEvent or MouseEvent as event, contact clicked and the list of contacts. |
Allowed Domains
You can restrict the domains that your component works on using glob patterns, as in the following examples:
nylas.commatches onlynylas.com.subdomain.nylas.commatches onlysubdomain.nylas.com.*subdomain.nylas.commatchessubdomain.nylas.comandsub.sub.subdomain.nylas.com.*matches any domain.
Domain restriction applies only to the domain name. You cannot restrict URL paths (for example, developer.nylas.com/docs/) or protocols (for example, HTTPS).
How Properties Are Handled
Nylas Components follow an order of operations to decide if the dashboard or code takes precedence.
- If the property is passed directly to the Component, use that first.
- If the property is not passed directly in the Component, use the dashboard settings.
- If there are no properties set in the Component or the dashboard, use the Component defaults.
Contact List Data
The Contact List Component pulls from the /contact endpoint. It displays:
- Name
- Photo if available. If there is no photo available, it defaults to showing the contact initials.
- Last Emailed Date
Demo Apps
Fork our demo to get started.
What's Next?
Take a look at other Components:
- Mailbox Component
- Contact List Component
- Agenda Component
- Conversation Component
- Email Component
- Composer Component
Check us out on GitHub: